Welcome To SimplyMac!
Articles, news, tech updates, reviews, helpful tips, and troubleshooting guides. We’re here to make your technology products easier to use and to help you get through any troubles you might have. We’ll show you the best way to use your electronics to the fullest and help you fix them if they break.

iPhone
Manual Focus Guide For iPhone (Photography)

iPhone
What Does RAW Mean on iPhone Camera?


What’s Hot
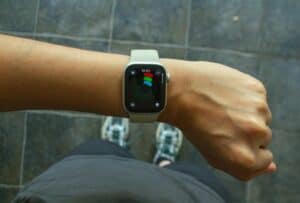
Apple Watch Series 10 Highlights — And What’s Coming in Series 11
The Apple Watch Series 10, launched in September 2024, marks one of the most significant …

Apple Watch User Guide: Essential Tips, Features, and What’s New in 2025
The Apple Watch has evolved into one of the most versatile and health-focused wearables on …

Tips For Improving Your Score If Your Cardio Fitness Is Low On Apple Watch
The Apple Watch’s low cardio fitness alert has sparked interest and concern among users. This …

Apple Cancels Camera Plans for Apple Watch, Refocuses on AI Smart Glasses
Apple has officially scrapped its plans to add a built-in camera to future Apple Watch …

How to Fix watchOS 11.5 Problems
Apple released watchOS 11.5 on May 12, 2025, delivering several new features and security fixes—but …

Apple TV+’s Cape Fear: Release Window, Cast, Story & Production Updates
Cape Fear revisits John D. MacDonald’s 1957 novel The Executioners—the same source material that inspired …

Dark Matter Season 2: Production Status, Cast Updates, and What’s Next
Apple TV+ wasted no time green-lighting a second season after Dark Matter debuted to strong …