Transferring data from one Mac to another is a breeze with Apple’s built-in tools. You can easily move all your files, apps, and settings to a new Mac using Migration Assistant or Time Machine backups. This saves you time and hassle when upgrading or replacing your computer.
Apple makes it simple to keep your digital life intact when switching Macs. You have options to transfer data directly between computers or restore from a backup. This ensures you don’t lose important documents, photos, or custom settings.
Before starting the transfer process, check that both Macs are up-to-date and connected to power. You’ll also want to temporarily disable any antivirus software. With a few clicks, you can copy all your information to the new Mac and pick up right where you left off.
| Transfer Method | Best For | Speed |
|---|---|---|
| Migration Assistant | Direct computer-to-computer transfer | Fast |
| Time Machine Backup | Restoring from external drive | Medium |
| Manual File Transfer | Moving select files only | Slow |

Migrating to a New Mac
Getting a new Mac is exciting. But you might be wondering how to move all your stuff from your old Mac to your new one. Apple has a few tools that make it easy. You can transfer your files, apps, and settings without losing anything.
Migration Assistant
Migration Assistant is a tool that comes with every Mac. It helps you move your data from an old Mac to a new Mac. You can use Migration Assistant to transfer your files, apps, user accounts, and settings.
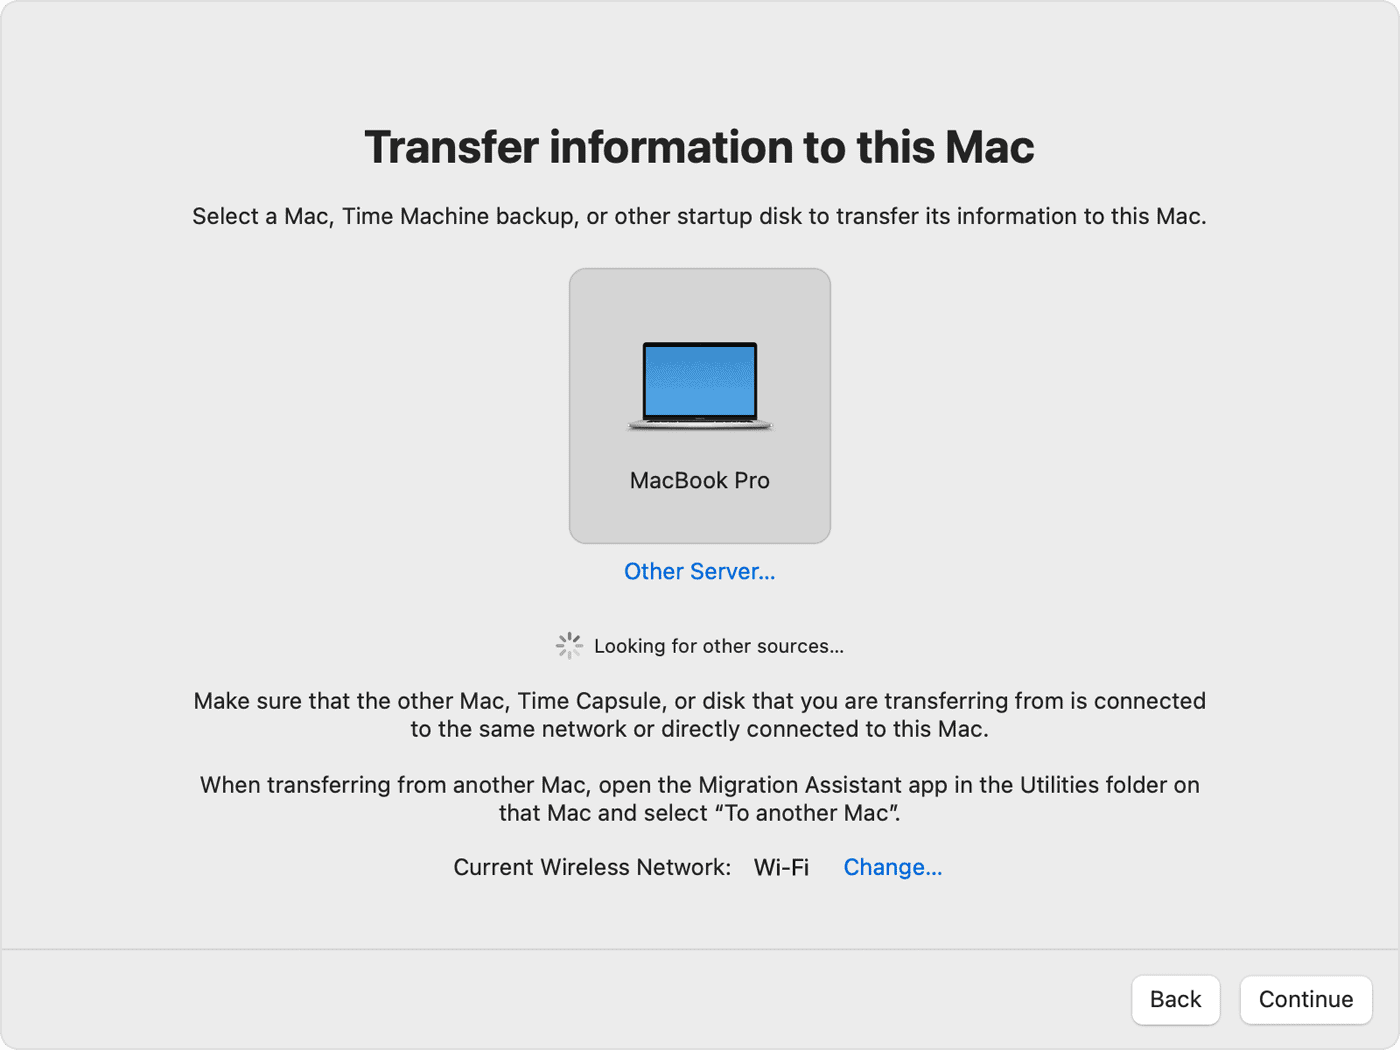
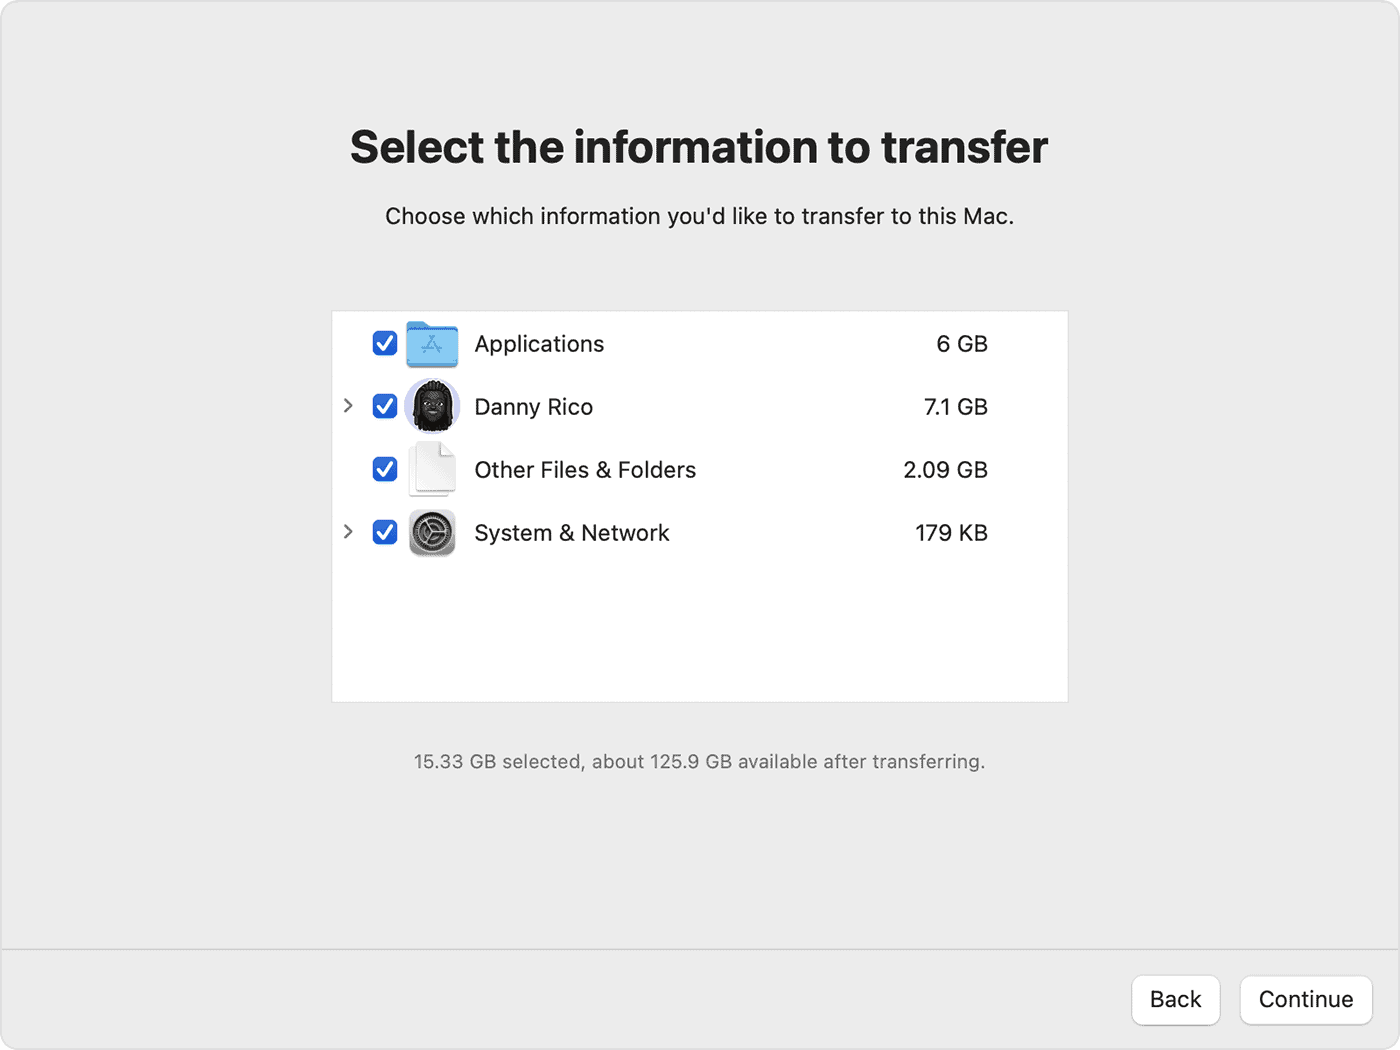
To use Migration Assistant, connect your old Mac to your new Mac. You can connect them using a cable or over Wi-Fi. Then, open Migration Assistant on both Macs. Follow the on-screen instructions to select the data you want to transfer.

Time Machine
Time Machine is a backup feature built into macOS. It makes copies of your entire Mac. This includes your files, apps, and system settings. You can use a Time Machine backup to restore your new Mac to the same state as your old Mac.
To use Time Machine, you’ll need an external hard drive. Connect the hard drive to your old Mac and set up Time Machine in System Settings > Time Machine. Once you have a Time Machine backup, you can use it to restore your new Mac.
Target Disk Mode
Target Disk Mode is a special mode that turns your old Mac into an external hard drive. You can then connect your old Mac to your new Mac and transfer files directly.
To use Target Disk Mode, restart your old Mac while holding down the T key. Then, connect your old Mac to your new Mac using a cable. Your old Mac will appear as a hard drive on your new Mac.
iCloud
iCloud can help you transfer some of your data. If you use iCloud to store your photos, documents, and other data, it will automatically be available on your new Mac. Just sign in to your new Mac with the same Apple ID you used on your old Mac.
Data Transfer Options
| Method | Description | Pros | Cons |
|---|---|---|---|
| Migration Assistant | Transfers data directly from one Mac to another | Easy to use, transfers most data | Requires both Macs to be available |
| Time Machine | Restores data from a Time Machine backup | Can restore your entire Mac | Requires a Time Machine backup |
| Target Disk Mode | Transfers files directly from one Mac to another | Fast and efficient | Requires a cable, old Mac is unavailable during transfer |
| iCloud | Syncs data through iCloud | Automatic and convenient | Only transfers data stored in iCloud |

Preparing for Your Transfer
Upgrading to a new Mac is always a fun experience, but the thought of moving all your data can feel daunting. Thankfully, with the tools Apple provides, transferring your files, apps, and settings is a breeze. Whether you choose Migration Assistant, Time Machine, or Target Disk Mode, you’ll be up and running on your new Mac in no time.
Before transferring data between Macs, take these important steps:
- Update both Macs
- Install the latest macOS updates on your old and new Mac
- This ensures compatibility and security
- Back up your old Mac
- Use Time Machine or another backup solution
- Store the backup on an external storage device
- Check available space
- Verify your new Mac has enough storage for the transfer
- Delete unnecessary files from the old Mac if needed
- Connect to power
- Plug both Macs into power outlets
- Prevents interruptions during the transfer process
- Disable sleep mode
- Turn off sleep settings in System Preferences on both Macs
- Keeps the transfer running smoothly
| Preparation Step | Old Mac | New Mac |
|---|---|---|
| Update macOS | ✓ | ✓ |
| Back up data | ✓ | – |
| Check storage | ✓ | ✓ |
| Connect to power | ✓ | ✓ |
| Disable sleep | ✓ | ✓ |
- Review software
- Identify which apps you want to transfer
- Check if newer versions are available for the new Mac
- Gather login information
- Have your Apple ID and passwords ready
- You may need them during the transfer process
By following these steps, you’ll set the stage for a smooth transfer between your Macs.
Methods of Transferring Data
Transferring data between Macs can be done through several efficient methods. Each approach offers unique benefits depending on your specific needs and setup.
Using Migration Assistant
Migration Assistant is a built-in tool that simplifies the process of moving your data to a new Mac. To use it, open Migration Assistant on both your old and new Macs. You’ll find it in Applications > Utilities.
Connect both Macs to the same Wi-Fi network or use a Thunderbolt cable for a direct connection. Select the option to transfer to another Mac on your old device and follow the prompts.
Migration Assistant moves user accounts, applications, and files. It preserves your settings, making the transition smooth. The transfer time depends on the amount of data and connection speed.
Utilizing Time Machine
Time Machine is Apple’s backup solution that can also aid in data transfer. First, ensure you have a recent backup of your old Mac. Then, during your new Mac’s setup, choose to restore from a Time Machine backup.
If your new Mac is already set up, use Migration Assistant and select the Time Machine backup as the source. This method is ideal if you don’t have access to your old Mac but have a recent backup.
Time Machine transfers preserve your file structure and settings. It’s a comprehensive solution that minimizes setup time on your new device.
File Transfer with AirDrop and Target Disk Mode
For smaller transfers, AirDrop offers a quick wireless option. Enable AirDrop on both Macs and ensure they’re within range. Select files on your old Mac, click the Share button, and choose AirDrop to send them to your new Mac.
Target Disk Mode turns your old Mac into an external drive. Connect the Macs with a Thunderbolt cable. Restart your old Mac while holding the T key to enter Target Disk Mode. Your old Mac’s drive will appear on the new Mac, allowing direct file transfer.
These methods are best for transferring specific files or folders rather than entire system setups.
| Method | Best For | Speed | Complexity |
|---|---|---|---|
| Migration Assistant | Full system transfer | Medium-Fast | Low |
| Time Machine | Full system restore | Medium | Low |
| AirDrop | Small file transfers | Fast | Very Low |
| Target Disk Mode | Large file transfers | Fast | Medium |
Migrating Applications and System Settings
When transferring data from one Mac to another, you can easily move your applications and system settings. The Migration Assistant tool simplifies this process.
Start by opening Migration Assistant on your new Mac. You’ll find it in the Utilities folder within Applications. Select the option to transfer from another Mac when prompted.
Next, enter the security code displayed on your new Mac into your old Mac. This establishes a secure connection between the devices.
Choose which items to transfer. You can select:
- Applications
- User accounts
- Documents
- System settings
The transfer process may take some time depending on the amount of data. Your new Mac will restart once complete.
Here’s a quick overview of what gets transferred:
| Item | What’s Included |
|---|---|
| Apps | Most applications installed on your old Mac |
| Settings | Wi-Fi networks, desktop wallpaper, keyboard preferences |
| User Data | Documents, photos, music, emails |
Not all apps may transfer due to compatibility issues with your new macOS version. You might need to reinstall some programs manually.
After migration, check your new Mac’s settings. Ensure everything transferred correctly. Update any apps that require it for optimal performance on your new system.
Transferring Personal Data
Moving your personal information between Macs ensures continuity in your digital life. This process covers transferring your files and maintaining the integrity of your user accounts.
Documents and Files
To transfer files from Mac to Mac, you have several options. Apple’s Migration Assistant is a straightforward tool for this task. It allows you to move documents, photos, and other data easily.
For a more flexible approach, consider using iCloud Drive. This method lets you sync files across devices without physical connections. Simply enable iCloud Drive on both Macs and your files will transfer automatically.
External hard drives offer another reliable option. Connect the drive to your old Mac, copy your files, then move them to the new device. This method works well for large amounts of data.
| Transfer Method | Pros | Cons |
|---|---|---|
| Migration Assistant | Easy to use, comprehensive | Requires direct connection |
| iCloud Drive | Wireless, automatic sync | Depends on internet speed |
| External Hard Drive | Large capacity, offline transfer | Manual process |
User Accounts and Data Integrity
Preserving user accounts ensures a smooth transition to your new Mac. The Migration Assistant can transfer user accounts along with their associated data and settings.
For manual transfers, create a new user account on the new Mac with the same name as your old one. This helps maintain file permissions and access rights. Copy your home folder contents to the new account to preserve your personal settings.
Always verify data integrity after transfer. Check important files and folders to ensure they’ve moved correctly. Run your frequently used apps to confirm all necessary data is present and functional.
Remember to transfer app-specific data separately if not using Migration Assistant. Some apps store data outside the user folder, so consult app documentation for transfer instructions.
Frequently Asked Questions
Migration Assistant offers a straightforward way to transfer data between Macs. It handles various aspects of the process, from file transfers to account setups. Let’s explore some common questions about using this tool.
Does Migration Assistant transfer the entire contents of an old Mac to a new Mac?
Migration Assistant can transfer most data from your old Mac to your new one. This includes user accounts, applications, documents, and system settings. However, it may not transfer some third-party applications or certain system files. You can choose which items to transfer during the process.
What is the procedure to transfer files between Macs using a USB cable?
To transfer files between Macs using a USB cable, you’ll need a compatible USB-C or Thunderbolt cable. Connect both Macs using the cable. Open Migration Assistant on both devices. Select the option to transfer to another Mac on your old device and from another Mac on your new one. Follow the on-screen instructions to complete the transfer.
Can you explain the process for transferring data from a Mac to a new Mac using the Migration Assistant?
The process involves a few key steps. First, ensure both Macs are on the same network or connected via cable. Open Migration Assistant on both devices. On your new Mac, choose to transfer from another Mac. Select your old Mac when it appears. Choose the data you want to transfer. Start the transfer and wait for it to complete.
Does using Migration Assistant to migrate data affect the data on the old Mac?
Using Migration Assistant does not alter or delete data on your old Mac. It simply copies the selected information to your new device. Your old Mac’s data remains intact and accessible after the transfer process is complete.
How do I ensure all my files are transferred wirelessly from my old Mac to my new Mac?
To transfer files wirelessly, make sure both Macs are on the same Wi-Fi network. Open Migration Assistant on both devices. Select the wireless transfer option. Choose the files and settings you want to transfer. Verify that all desired items are selected before starting the transfer. Monitor the process to ensure completion.
What are the transfer speeds like when using Migration Assistant between two Macs?
Transfer speeds can vary depending on factors like connection type and data volume. Wired connections typically offer faster speeds than wireless. A USB or Thunderbolt connection can provide quicker transfers for large amounts of data. Wireless transfers may take longer but offer more convenience. Expect larger transfers to take several hours.
| Connection Type | Approximate Speed |
|---|---|
| Thunderbolt 3 | Up to 40 Gbps |
| USB 3.1 | Up to 10 Gbps |
| Wi-Fi | Up to 1.3 Gbps |


