Capturing what’s on your Mac’s screen is simple with the built-in snipping tool. You can capture the whole screen, a window, or a selected portion using shortcuts and tools built into Mac OS. You can easily take, edit, and manage screenshots without needing to download anything extra. To start using the snipping tool, just use a few keyboard shortcuts.
Press Shift, Command, and 3 together to take a shot of your whole screen (that saves to a file). Or you can Press Shift, Command, and 4 together to select the area you want to capture with a crosshair cursor. For more advanced tasks, like setting a timer or capturing a specific window, you can use Mac’s Screenshot app, which offers additional features like various capture modes and the ability to edit images right after taking them. This tool is great for work, school, or personal use, and makes it easy to share what’s on your screen.
Mac’s Built-in Snipping Tool: A Simple Guide
Taking a Screenshot on Mac: Keyboard Shortcuts
Mac users have a handy tool for taking screenshots. It’s built right in and easy to use! Here’s a quick guide on how to grab screenshots using keyboard shortcuts:
| Shortcut | Action |
|---|---|
| Shift + Command + 3 | Capture the entire screen |
| Shift + Command + 4 | Capture a selected area |
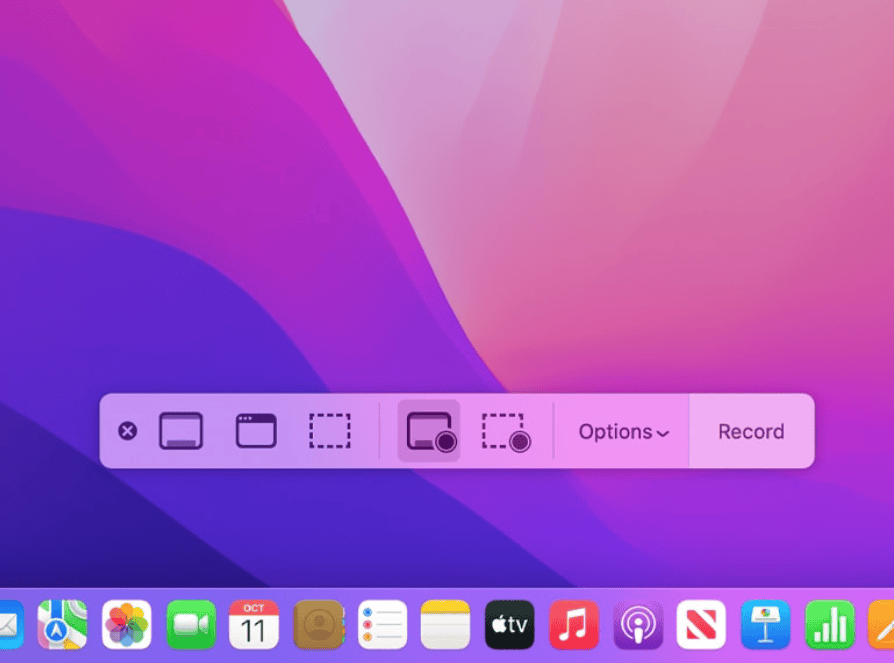
| Shift + Command + 5 | Open the screenshot toolbar for more options (record video, set timer, etc.) |
Capturing a Specific Window
To capture just one window, press Shift + Command + 4, then press the spacebar. Your cursor will change to a camera icon. Click on the window you want to capture.
Saving Your Screenshots
By default, screenshots are saved to your desktop as PNG files. You can change this in the screenshot toolbar options (Shift + Command + 5).
Editing Your Screenshots
A handy feature of the Mac screenshot tool is the quick editing option. After taking a screenshot, a thumbnail appears in the corner of your screen. Click on it to open the Markup editor. Here, you can crop, draw, add text, and more.
Other Screenshot Options
The screenshot toolbar (Shift + Command + 5) offers additional options:
- Record a video of your screen
- Set a timer for delayed screenshots
- Choose where to save screenshots
Third-Party Screenshot Apps
While the built-in tool is great, many third-party apps offer more features. Some popular options include:
- Snagit
- Lightshot
- Skitch
- Monosnap
These apps provide features like scrolling capture, cloud storage, and advanced editing tools.
Key Takeaways
- Mac OS provides a built-in snipping tool for capturing screenshots.
- Users can use keyboard shortcuts for quick screen captures.
- The Screenshot app offers advanced features for editing and managing screenshots.
Getting Started with Snipping Tool on Mac
To capture visuals on a Mac, users can access built-in tools for screenshots and recordings. This section guides you through the steps to use these tools effectively.
Accessing the Screenshot Toolbar
To access the capture tools on macOS, users can press Command + Shift + 5. This displays the screenshot toolbar at the bottom of the primary monitor. On MacBooks with Touch Bar, you have the same controls replicated for convenience.
Taking Screenshots on Mac
Mac offers several options for taking screenshots. With Shift + Command + 3, you can capture the entire screen. Press Shift + Command + 4, and your cursor changes to let you select a portion of the screen. To capture a specific window, press Shift + Command + 4, then tap the Spacebar and click on the window.
Using Screen Recording on Mac
Starting with macOS Mojave, users can record their screen by pressing Command + Shift + 5 and selecting the recording options from the toolbar. Options include recording the entire screen or just a selected portion. You can also set a timer before the recording starts.
Keyboard Shortcuts for Efficiency
Utilize keyboard shortcuts to boost productivity when capturing your screen. For full-screen screenshots, press Command + Shift + 3. For a portion of the screen, use Command + Shift + 4. To record your screen, toggle to the recording option after pressing Command + Shift + 5.
Saving and Locating Your Snips
By default, Mac saves screenshots to the desktop. After capturing, a thumbnail appears in the corner of the screen offering quick edits. Users can change the save location by clicking Options in the screenshot toolbar. Recordings follow similar steps for saving and can also be found on the desktop unless the save location is customized.
Advanced Snipping and Editing
The right tools and knowledge can transform basic screenshots into informative visuals. This section provides guidance on enhancing and troubleshooting your screen captures on a Mac.
Annotating Your Screenshots
Mac users can annotate their screenshots directly after capture. Press Shift + Command + 5, and click the Options button. Here, you choose ‘Save to’ for your image, usually a PNG file. After taking the snapshot, click on the thumbnail that appears to edit. Use Apple’s markup tools to add text, shapes, or sketches.
Leveraging Third-Party Apps
Third-party apps like Snagit offer more than the basic Mac snipping tool. They provide advanced editing features, such as scrolling screens or video capture. After installing a third-party app, you can usually access it through the app controls in your Menu Bar or System Preferences.
Customization and Preferences
The Mac snipping tool offers different modes to capture your screen. Press Shift + Command + 5 to see all the options, including capturing the entire screen or a selected portion. You can customize the location where screenshots are saved in the Options menu, simplifying your workflow.
Troubleshooting Common Issues
Users may occasionally face issues with screen capture tools. If the tool is not working, check for updates in System Preferences. If screenshots are not saving, ensure you’ve selected a Save To location. For shortcut conflicts, customize the shortcut key in the keyboard section of System Preferences.
Tips and Tricks
To quickly capture a portion of your screen, press Shift + Command + 4 then click and drag the crosshair cursor. For MacBook Pro touch bar models, use Shift + Command + 6 for a screenshot of your Touch Bar. For tutorials or articles, simplify the process by using shortcuts and familiarizing yourself with the capture tool.


