
Saving images on a MacBook is an essential skill for anyone who uses this device. Whether you are downloading a picture from the internet, capturing a screenshot, or receiving an image through email, understanding the methods will enhance your productivity. To save an image, right-click on it and select “Save Image As” to choose a location on your MacBook.
If you need to save multiple images, you can use shortcuts. By pressing Command + C to copy and Command + V to paste, you can move images effortlessly within your device. These techniques help in managing and organizing your image files efficiently.
It is also possible to use browser extensions that simplify the image-saving process. Extensions provide additional features and improve workflow, especially when saving numerous images. By knowing these methods, you can ensure that your images are saved and managed correctly.
Saving Images Made Simple on Your MacBook
Using the Right-Click Menu
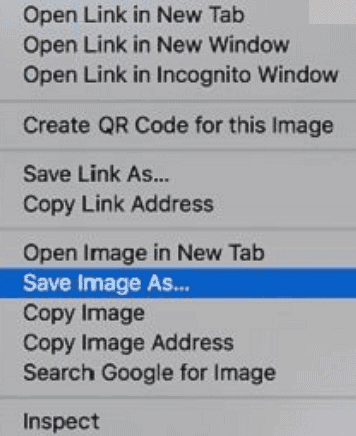
This is the most straightforward method. Right-click (or Control-click) on the image you want to save. A menu will pop up, giving you several options. Choose “Save Image As…” to download the image to your Downloads folder, or pick a different location. You can also rename the file here if you’d like.
Dragging and Dropping
For a quick save, simply click and hold the image, then drag it to your desktop or a folder in Finder. This will create a copy of the image in the chosen location.
Saving Images from Safari
Safari offers a couple of convenient options for saving images:
- Right-Click Menu: Just like the general method, you can right-click on the image and choose “Save Image As…”
- Control-Click and Options: Control-click the image and select “Save Image to ‘Downloads'” or “Add Image to Photos.”
Saving Images in Other Apps
Many apps have their own ways to save images:
- Preview: Open the image in Preview, then go to File > Export.
- Photos: Control-click the image and select “Save Image As…” or “Export.”
Keyboard Shortcuts
If you’re a fan of shortcuts, try these:
- Command-Shift-3: Takes a screenshot of your entire screen.
- Command-Shift-4: Lets you select an area to screenshot.
- Command-Shift-5: Opens the Screenshot toolbar for more options.
Saving Images From the Web on Your MacBook
Saving images from the web to your MacBook is a breeze, whether you’re using Safari, Chrome, or another browser. You can utilize the right-click menu, simply drag and drop the image, or employ keyboard shortcuts. These convenient methods allow you to quickly capture visuals for reference, inspiration, or future projects. So, next time you come across an image you’d like to keep, don’t hesitate to save it to your MacBook!
Key Takeaways
- Right-click on the image and select “Save Image As” to save it.
- Use Command + C and Command + V for quick copying and pasting.
- Browser extensions can simplify the process.
Saving Images on MacBook: Basics and Techniques
Saving images on a MacBook involves several methods and tools. Users can save images by understanding file formats, organizing files using Finder, managing images with the Photos app, and capturing screenshots.
Understanding File Formats: JPEG, PNG, GIF, TIFF, and PDF
When saving images on a MacBook, knowing the different file formats is essential. JPEG is widely used for its balance of quality and file size, making it ideal for photographs. PNG maintains image quality and supports transparency, making it suitable for web graphics. GIF is perfect for simple animations and supports transparency as well. TIFF offers high-quality images suitable for professional use but results in larger files. PDF allows for multi-page documents, useful for sharing images within formatted documents. Choose the format based on your needs to prevent any quality loss or compatibility issues.
Learning macOS Finder: Navigating and Organizing Files
macOS Finder is a powerful tool for managing your files. To save an image, you can right-click and select “Save Image As” or use shortcuts like Command + C to copy and Command + V to paste into a desired location.
Use Folders and Tags to keep your images organized. For example, create a folder named “2024 Photos” and use tags like vacation or work to easily find your images later. Finder also allows you to change file names and view details such as the date the file was created, helping you keep everything well-organized.
Photos App: Importing, Managing, and Editing Images
The Photos app on a MacBook is versatile for managing images. Importing images is simple—connect your device, open Photos, and select Import All New Photos or choose specific images. The app automatically organizes images by date and location.
You can create Albums to group images and add Keywords to search for specific photos easily. The Edit function lets users adjust brightness, contrast, cropping, and more. Using iCloud, your photos get synchronized across all your Apple devices, ensuring access to them on any device.
Utilizing Screen Capture for Saving Images
Screen capture is a handy tool for saving images directly from your screen. To capture the entire screen, press Command + Shift + 3. For a specific part of the screen, press Command + Shift + 4, then drag the crosshair to select the area. The screenshot is saved directly to your desktop with a file name containing the date and time.
You can also capture a window by pressing Command + Shift + 4, then pressing Spacebar. The captured images can then be moved, renamed, or edited using Preview or other image editing tools.
Frequently Asked Questions
A MacBook offers various ways to save images, whether from the internet, external devices, or by using keyboard shortcuts. Below are answers to common questions related to saving images on a MacBook.
What steps are required to save images on a MacBook Air, especially without using a mouse?
Users can save images on a MacBook Air without a mouse by using the trackpad. Tap with two fingers or press “Control” and click the image. Select “Save Image As” and choose the desired location.
Why am I unable to save images as a particular format on my Mac, and what can I do to resolve this?
If images cannot be saved in a desired format, it may be due to software limitations. Users can open the image in Preview, then choose “File” and “Export.” From there, select the required format from the drop-down menu and save the image.
How can I save pictures from the internet directly to my MacBook?
To save pictures from the internet on a MacBook, right-click the image and choose “Save Image As.” Select a folder for the file and name it before saving. Alternatively, drag the image directly to the desktop or a specific folder.
How can I permanently store photos on my MacBook to avoid losing them?
Photos can be permanently stored by organizing them in the Photos app. Transfer images from external devices and regularly back up the Photos Library to an external drive or cloud service. This ensures they are not lost if the MacBook fails.
What are the keyboard shortcuts available for saving images on a Mac?
Frequent shortcuts include “Shift + Command + 3” to capture the full screen and “Shift + Command + 4” to capture a portion of the screen. These images are automatically saved to the desktop.
How can I save a photo in a specific format like JPEG on a Mac?
To save a photo in a specific format like JPEG, open the photo in Preview. Choose “File” and then “Export.” Select JPEG from the Format drop-down menu, adjust the quality if needed, and save the image in the desired location.