Recording your screen with audio on a Mac is easy and requires no extra software, as macOS includes a built-in feature. Users can access this tool through keyboard shortcuts, allowing them to select a specific area or the entire screen and choose an audio input source. Adjusting settings for audio inclusion and managing volume ensures quality recordings. After recording, the video file is easily accessible for editing, sharing, or storage.
Screen Recording With Audio (Mac)
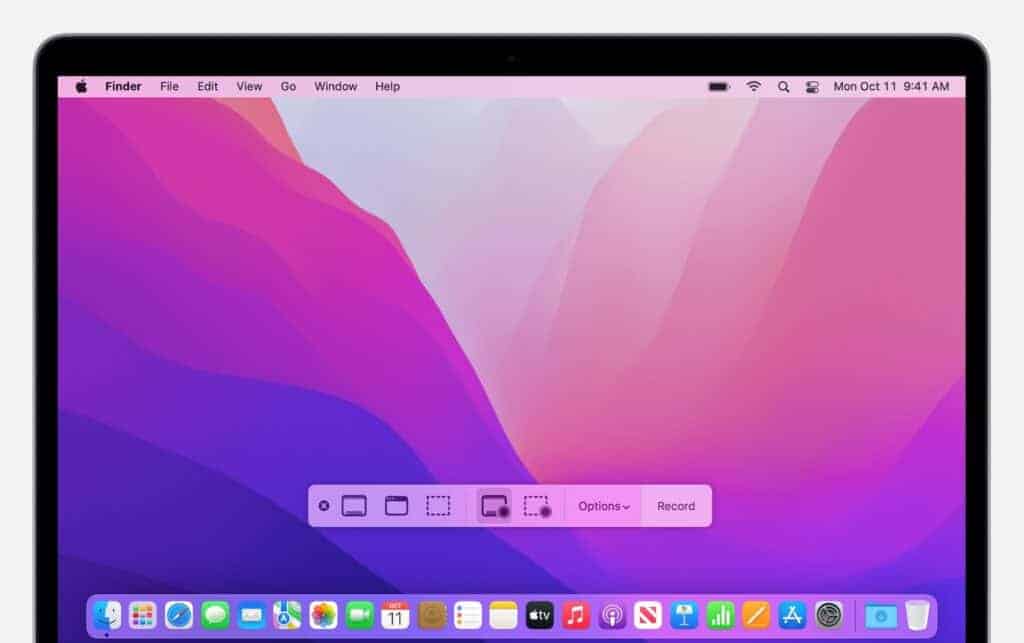
1. Using the Screenshot Toolbar (macOS Mojave and later):
- Open the Toolbar: Press Shift-Command-5. This will bring up a small toolbar at the bottom of your screen.
- Choose Recording Type: You have two options:
- Record Entire Screen: This will capture everything on your display.
- Record Selected Portion: This lets you drag a box around the area you want to record.
- Select Microphone: Before you start recording, click Options in the toolbar. Under Microphone, choose the microphone you want to use (built-in or external).
- Start Recording: Click Record.
- Stop Recording: Click the Stop button in the menu bar at the top of your screen, or press Command-Control-Esc (Escape).
2. Using QuickTime Player:
- Open QuickTime: Find it in your Applications folder and open it.
- New Screen Recording: Go to File > New Screen Recording.
- Select Microphone: A small window will appear. Click the little arrow next to the Record button. Choose your microphone from the dropdown menu.
- Start Recording: Click the Record button. Then:
- Click anywhere on the screen to record the entire screen.
- Drag to select a portion of the screen, then click Start Recording within that area.
- Stop Recording: Click the Stop button in the menu bar, or press Command-Control-Esc (Escape).
Important Notes:
- Internal Audio: macOS has some limitations on recording internal audio (sounds from apps, etc.). For this, you might need third-party tools like BlackHole or Loopback.
- Saving: By default, recordings are saved to your desktop.
- Editing: You can trim or make basic edits to your recordings in QuickTime Player.
Which method should you use?
- Screenshot Toolbar: Best for quick, simple recordings.
- QuickTime Player: Good if you need a little more control over audio and want basic editing features.
Key Takeaways
- Mac’s native screen recording tool allows for video and audio capture simultaneously.
- No additional software is needed to record your screen with audio on a Mac.
- Adjusting volume and selecting a proper microphone ensures high-quality audio in recordings.
Getting Started With Screen Recording on Mac
Screen recording on a Mac is a process that involves capturing what’s happening on your screen, often with audio. It’s a useful tool for tutorials, presentations, and troubleshooting.
Understanding Your Mac’s Built-in Capabilities
Your Mac comes equipped with built-in tools for screen recording, introduced in macOS Mojave. With these tools, you can record the full screen or select a specific area. They also allow you to choose whether to include audio in your recording. This functionality is easily accessed via the Screenshot toolbar.
Here’s how to use your Mac’s built-in capabilities for screen recording:
- Press Command+Shift+5 to open the Screenshot toolbar.
- Options will appear, allowing you to record the entire screen or a selected portion.
- After making your choice, you can click to start the recording process.
QuickTime Player: The Default Solution
QuickTime Player is the default application on your Mac for media playback. It also serves as a simple solution for screen recording. You can find QuickTime Player in the Applications folder.
Steps for recording your screen with QuickTime Player:
- Open QuickTime Player.
- Go to the menu bar and select File > New Screen Recording.
- Before recording, you can choose your audio source by clicking the arrow next to the record button.
- To start recording, click the Record button.
Your Mac makes it simple to capture your screen with or without audio using these built-in methods.
Executing a Screen Record With Audio
Screen recording on a Mac with audio can be simple. This section explains the steps for recording the entire screen or a portion, using built-in or external microphones, and some advanced recording features.
Steps to Record Your Entire Screen With Audio
To record your entire screen with audio on a Mac, follow these steps:
- Press
Shift + Command + 5to open the Screenshot toolbar. - Click on Options and under Microphone, select the desired audio source.
- Press the Record Entire Screen button followed by Record to start.
Audio from the chosen microphone will accompany the screen recording.
Recording a Selected Portion of Your Screen
To record a selected area of your screen with audio:
- Use the shortcut
Shift + Command + 5to see the screen recording controls. - Choose Options to select a microphone for the audio.
- Click Record Selected Portion and drag to select the area.
- Click Record to begin capturing the screen and audio.
You may choose to show mouse clicks for added clarity in the recording settings.
Incorporating External Devices and Microphones
To use an external microphone:
- Connect the desired external microphone to your Mac.
- Hit
Shift + Command + 5, go to Options, and choose the external microphone. - Press the record button to begin.
For the best audio quality, it is often helpful to use headphones with a built-in microphone to prevent feedback.
Advanced Tips for Professional Screen Capturing
Professionals can capture high-quality recordings by adjusting a few settings:
- Before recording, attach high-quality external microphones to improve audio clarity.
- Amplify your Mac’s capabilities by linking it to devices like an iPhone, iPad, or iPod Touch for a multi-device recording experience.
- Access the Screenshot toolbar with
Shift + Command + 5and use the Options to fine-tune recording settings like showing mouse clicks.