You can easily screen record on a Mac using built-in tools. Apple provides simple options to capture your screen activity without extra software. This feature is handy for creating tutorials, sharing gameplay, or troubleshooting issues.
Mac screen recording works on recent versions like macOS Mojave and Catalina. The process is straightforward and quick to learn. You’ll find options to record your full screen or just a portion.
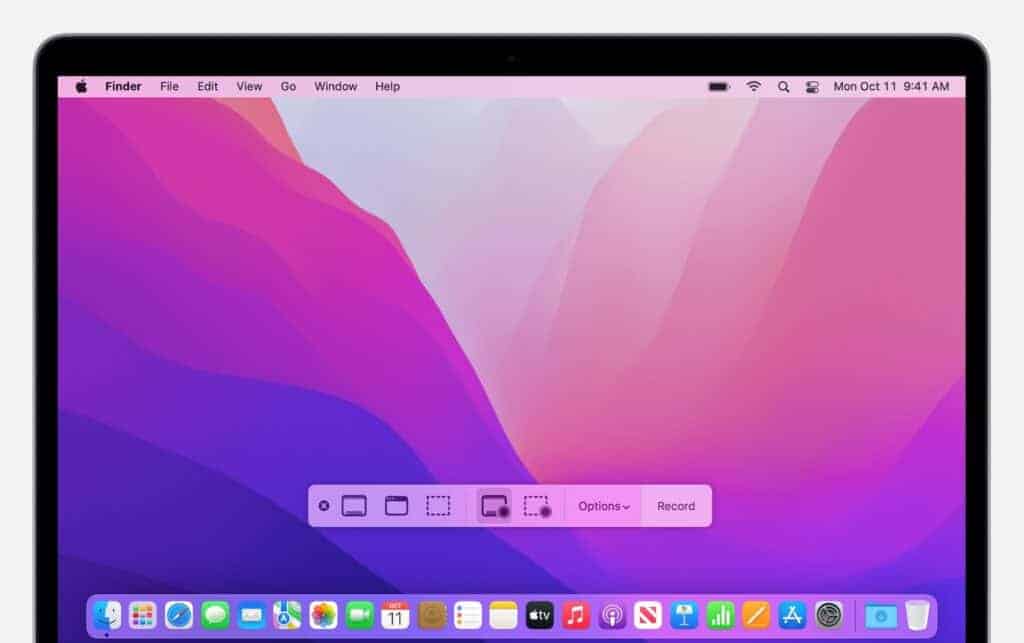
To start recording, press Shift+Command+5 on your keyboard. This opens the Screenshot toolbar with recording controls. You can choose to capture audio and show mouse clicks too. Let’s compare the main screen recording methods:
| Method | Ease of Use | Features | Best For |
|---|---|---|---|
| Screenshot Toolbar | Very Easy | Basic recording, audio options | Quick captures |
| QuickTime Player | Easy | More control, basic editing | Longer recordings |
| Third-party apps | Varies | Advanced features, editing | Professional use |
Macs have built-in tools for screen recording, and there are also some great third-party options. Here’s a rundown:
Built-in Options:
- Screenshot Toolbar (macOS Mojave and later): This is the easiest way to get started.
- Press Shift-Command-5 to open the toolbar.
- Choose to record the entire screen or a selected portion.
- Click Record.
- Click the Stop button in the menu bar to finish.
- QuickTime Player: This is a classic Mac app that can also do screen recordings.
- Open QuickTime Player.
- Go to File > New Screen Recording.
- You’ll see similar options to the Screenshot Toolbar.
Tips for Built-in Recording:
- Audio: You can record audio along with your screen recording. In the Screenshot Toolbar or QuickTime Player, look for the options to choose a microphone.
- Options: Both methods have options for things like showing mouse clicks or setting a timer before recording starts.
Third-Party Apps:
If you need more advanced features, here are some popular choices:
- OBS Studio (Free): This is a powerful, open-source app that’s popular with gamers and streamers. It has a bit of a learning curve, but it offers a lot of control.
- Camtasia (Paid): This is a premium app with a wide range of features, including video editing tools. It’s great for creating tutorials or professional-looking screen recordings.
- Snagit (Paid): This is another popular paid option that’s known for its ease of use. It has a good balance of features and simplicity.
Which Option is Right for You?
- Quick recordings, basic features: The Screenshot Toolbar is perfect.
- More control over audio, some editing: QuickTime Player is a good choice.
- Advanced features, streaming, etc.: OBS Studio is the way to go.
- Professional recordings, editing tools: Camtasia or Snagit are worth considering.
Preparing to Screen Record
Before recording your Mac screen, it’s important to set up properly. This involves checking your system requirements and accessing the necessary tools.
Checking System Requirements
To screen record on Mac, you need a compatible operating system. macOS Mojave (10.14) or later includes built-in screen recording features. For older systems, you’ll need QuickTime Player.
Make sure your Mac has enough storage space for recordings. Screen captures can take up significant memory, especially for longer videos.
Check your microphone if you plan to record audio. Test it in System Preferences to ensure it’s working correctly.
Close unnecessary applications to free up system resources. This helps prevent lag during recording.
| macOS Version | Built-in Screen Recording |
|---|---|
| Mojave 10.14+ | Yes |
| High Sierra | No (use QuickTime) |
| Earlier | No (use QuickTime) |
Accessing the Screenshot Toolbar
The Screenshot toolbar is your main tool for screen recording on newer Macs. To open it, press Command + Shift + 5.
This brings up a control panel with various options. You can choose to capture the entire screen, a window, or a selected portion.
For audio recording, click Options in the toolbar. Select Internal Microphone to capture system audio or choose an external mic.
You can also set a timer delay, choose where to save your recording, and show mouse clicks in the video.
Practice using these controls before your actual recording. This ensures you’re comfortable with the process when it’s time to capture important content.
Step-by-Step Recording Process
Screen recording on Mac is straightforward with built-in tools. The process involves selecting your recording area, configuring audio settings, and managing the recording session.
Choosing Recording Area
To start a screen recording on Mac, press Command + Shift + 5. This opens the screen capture toolbar. You’ll see options to record the entire screen or a selected portion.
For full-screen recording, click the “Record Entire Screen” button. If you have multiple displays, you can choose which one to record.
To capture a specific area, select “Record Selected Portion”. Drag your cursor to define the recording zone. Resize the selection box as needed before starting.
Consider what content is essential for your recording. Exclude unnecessary elements to keep your video focused and professional.
Recording Audio with Your Screen
Audio can significantly enhance your screen recordings. Mac allows you to record system audio and your voice simultaneously.
Click the Options menu in the screen capture toolbar. Here you can select your audio input source. Choose between:
- Built-in microphone
- External microphone (if connected)
- System audio
For clear audio, use a quality microphone if available. Test your audio levels before starting the main recording.
Remember to close unnecessary apps to prevent unexpected sounds from interrupting your recording.
Starting and Stopping Recording
With your area and audio settings configured, you’re ready to begin. Click the Record button in the toolbar to start capturing.
A small recording icon appears in the menu bar while active. To stop recording, click this icon or press Command + Control + Esc.
After stopping, a thumbnail of your recording appears. Click it to edit or save your video. If you miss the thumbnail, find your recording on the desktop by default.
| Feature | Shortcut |
|---|---|
| Open screen recording tools | Command + Shift + 5 |
| Start recording | Click Record button |
| Stop recording | Click menu bar icon or Command + Control + Esc |
Practice these steps to become efficient at creating screen recordings on your Mac.
Enhancing Screen Recordings
Mac screen recording offers several ways to improve your captures. You can add visual elements and adjust settings for better results.
Adding Annotations and Mouse Clicks
To make your screen recordings more informative, you can add annotations and highlight mouse clicks. This helps viewers follow along easily. To show mouse clicks, open the screenshot toolbar and click Options. Check the box for “Show Mouse Clicks” before starting your recording.
For annotations, use third-party apps like ScreenFlow. These let you add text, arrows, and shapes to your video after recording. This is useful for tutorials or presentations.
Adjusting Recording Options
You can fine-tune your screen captures by changing recording options. Open the screenshot toolbar and click Options. Here you can select:
- Microphone for audio
- Timer delay
- Save location
- Show floating thumbnail
| Option | Description |
|---|---|
| Microphone | Choose internal or external audio source |
| Timer | Set 5 or 10 second delay before recording |
| Save to | Pick where recordings are stored |
| Floating thumbnail | Enable/disable preview after recording |
Adjust these settings to fit your needs. For instance, use a timer if you need time to set up before recording starts. Pick the right microphone for clear audio in your videos.
Additional Tools and Software
Third-party applications offer advanced features for Mac screen recording. These tools provide more options for exporting and managing recorded files.
Using Third-Party Applications
Snagit is a popular choice for Mac users. It lets you capture both still images and video. Snagit offers editing tools to enhance your recordings.
OBS Studio is a free, open-source option. It’s great for live streaming and complex recordings. OBS Studio supports multiple audio sources and scenes.
Camtasia is a powerful tool for creating instructional videos. It combines screen recording with robust video editing features. Camtasia allows you to add effects, transitions, and annotations to your recordings.
| Application | Key Features | Best For |
|---|---|---|
| Snagit | Image + video capture, basic editing | Quick tutorials |
| OBS Studio | Live streaming, multiple sources | Complex recordings |
| Camtasia | Advanced editing, effects | Professional videos |
Exporting and Managing .mov Files
Mac screen recordings are typically saved as .mov files. These files are high quality but can be large. You can convert .mov files to other formats for easier sharing.
To manage your .mov files:
- Create a dedicated folder for your recordings
- Use descriptive file names
- Consider using external storage for large files
You can edit .mov files using QuickTime Player or iMovie. These built-in Mac apps let you trim, split, and combine video clips.
For more storage space, compress your .mov files. Use HandBrake or similar tools to reduce file size without major quality loss.
Frequently Asked Questions
Mac users have several options for screen recording. These built-in tools offer flexibility for capturing video and audio on macOS devices.
How do you initiate screen recording on a MacBook?
To start a screen recording on your MacBook, press Shift + Command + 5. This opens the Screenshot toolbar with various capture options. Select “Record Entire Screen” or “Record Selected Portion” then click “Record” to begin.
What steps are needed to screen record with audio on a Mac?
Click the Options menu in the Screenshot toolbar. Choose a microphone for audio input. Select “Built-in Microphone” to record your voice or “Internal Microphone” for system sounds. Click “Record” to start capturing video and audio.
Can you perform a screen recording with a voiceover on macOS?
Yes, you can add voiceover to your screen recordings. Open QuickTime Player and select “New Screen Recording” from the File menu. Click the arrow next to the record button to choose your microphone. Begin recording and narrate as needed.
After screen recording, where are the files saved on a Mac?
By default, screen recordings save to your Desktop. You can change this location in the Options menu of the Screenshot toolbar. Choose a new folder or create a custom save location for your recordings.
Is it possible to record both video and sound simultaneously on a Mac?
Yes, Macs can capture both video and audio at the same time. Use QuickTime Player or the Screenshot toolbar to record your screen. Select internal audio, external microphone, or both in the recording settings.
What methods are available to stop an ongoing screen recording on a Mac?
To end a screen recording, click the Stop button in the menu bar. You can also press Command + Control + Esc. For QuickTime recordings, click the Stop button in the QuickTime window or press Command + . (period).
| Feature | QuickTime Player | Screenshot Toolbar |
|---|---|---|
| Video Capture | Yes | Yes |
| Audio Recording | Yes | Yes |
| Partial Screen Recording | Yes | Yes |
| Built-in Editing | Basic | No |
| File Format | .mov | .mov |