MacBooks come with a built-in camera app that’s easy to use and versatile. You can quickly take photos or record videos using the Photo Booth app on your Mac. This handy tool lets you snap selfies, capture group shots, or film short clips without extra equipment.
To open the camera on your MacBook, simply launch Photo Booth from the Applications folder. The app automatically activates your Mac’s built-in FaceTime camera, indicated by a green light next to the lens. You can choose from various effects to enhance your photos or videos right in the app.
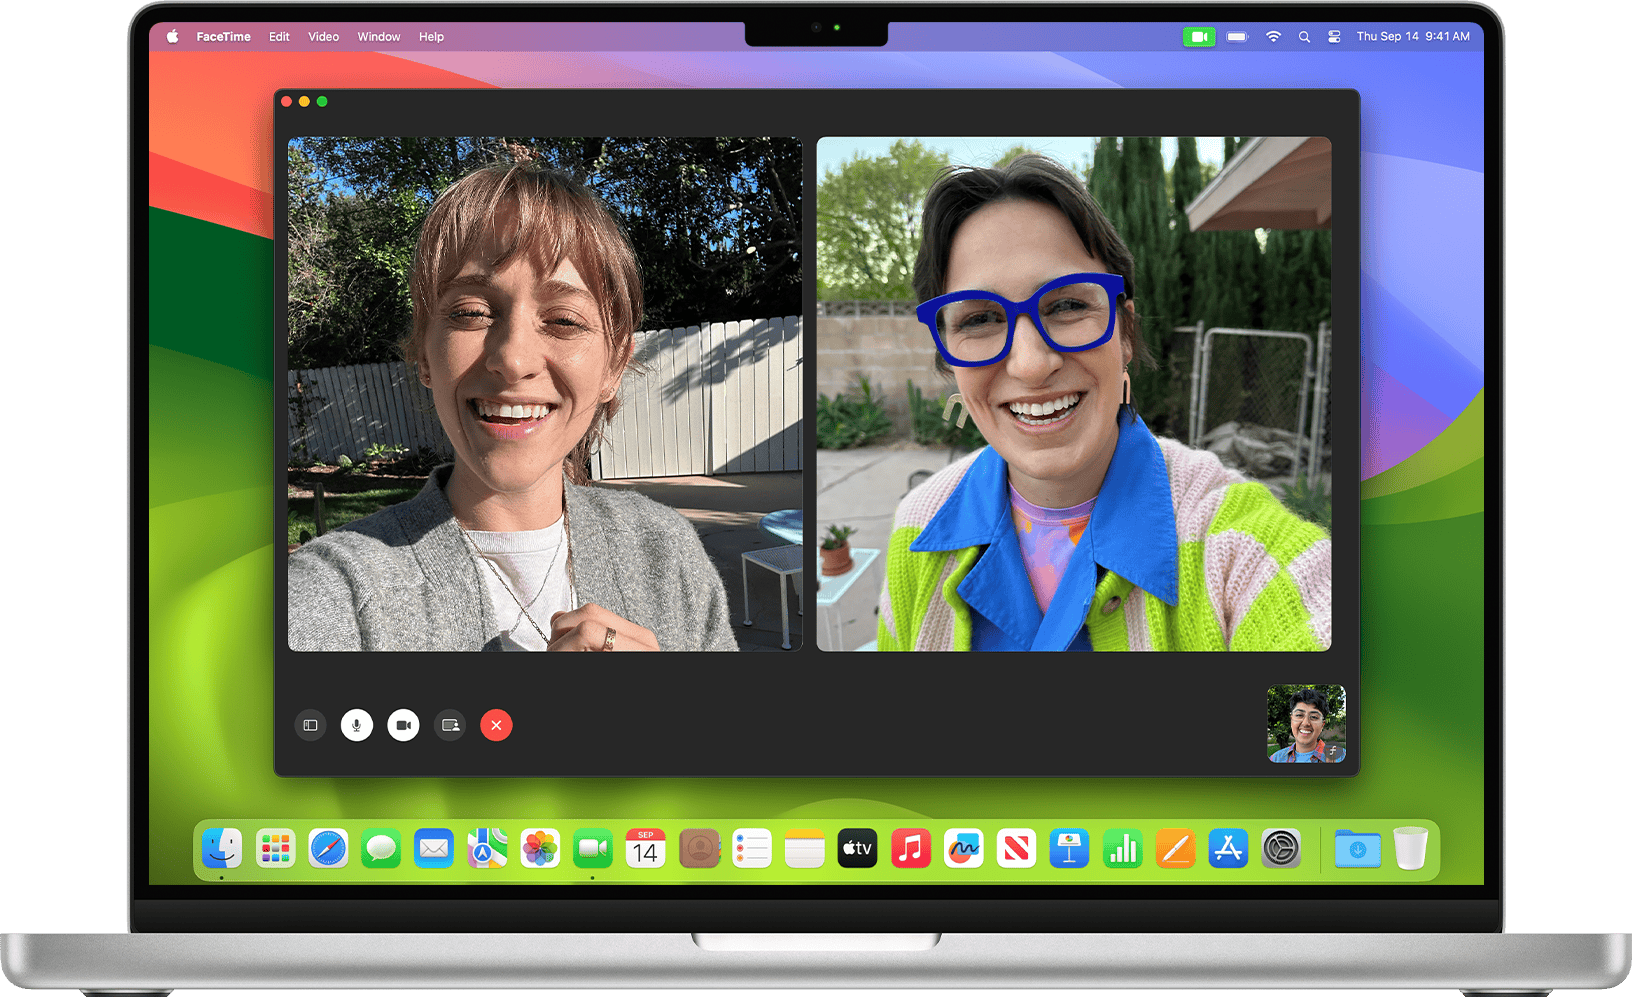
For video calls or other camera needs, apps like FaceTime and third-party options can also access your Mac’s camera. Remember to manage app permissions in System Settings to control which programs can use your camera.
| Camera App | Main Use | Key Feature |
|---|---|---|
| Photo Booth | Photos/Videos | Built-in effects |
| FaceTime | Video Calls | Screen sharing |
| Third-party Apps | Various | Depends on app |
MacBooks have a built-in camera, often called the FaceTime camera, located near the top of the display. Here’s how to use it:
1. Accessing the Camera:
- Photo Booth: This is the most common app for using the built-in camera. It allows you to take photos and record videos of yourself. You can find it in your Applications folder.
- FaceTime: If you want to make video calls, you’ll use the FaceTime app. It automatically activates the camera when you start a call.
- Other Apps: Many other apps can use the camera, such as Zoom, Skype, and QuickTime Player (for screen recording with your camera).
2. Using the Camera:
- Open an App: Launch Photo Booth, FaceTime, or any other app that uses the camera.
- Camera Activation: The camera should automatically turn on, and a small green light next to it will illuminate.
- Taking Photos/Videos: In Photo Booth, you can choose to take a single photo, a burst of four photos, or record a video.
- Adjusting Settings: Some apps may have settings to adjust things like video resolution or microphone input.
3. Tips and Tricks:
- Privacy: If you’re concerned about privacy, you can cover the camera with a physical cover when you’re not using it.
- External Cameras: You can also connect external webcams to your MacBook if you need better image quality or different features.
- Troubleshooting: If the camera isn’t working, make sure no other apps are using it, restart your Mac, and check the camera permissions in System Preferences > Security & Privacy > Camera.
Understanding Your MacBook’s Built-In Camera
MacBooks come equipped with a high-quality camera for video calls and photo capture. The camera integrates seamlessly with macOS and various applications to enhance your digital communication experience.
Exploring the FaceTime HD Camera
The FaceTime HD camera sits at the top of your MacBook’s display. It activates automatically when you open compatible apps like FaceTime or Photo Booth. A green light next to the camera indicates it’s in use.
The camera works with many third-party apps too. You’ll need to grant permission for these apps to access your camera. This ensures your privacy and control over which programs can use the device.
MacBooks feature advanced image processing. This enhances video quality in various lighting conditions. The result is clearer, more vibrant video calls even in dimly lit rooms.
Camera Specifications and Resolution
MacBook cameras offer impressive specs for built-in devices. Here’s a quick breakdown:
| Feature | Specification |
|---|---|
| Type | FaceTime HD |
| Resolution | 720p or 1080p (model dependent) |
| Frame Rate | Up to 30 fps |
| Focus | Fixed focus |
Most recent MacBook models boast 1080p resolution. This provides sharp, detailed video for your calls and recordings. The fixed focus ensures you stay clear without constant refocusing.
The camera’s wide aperture allows for good low-light performance. This means you can have quality video chats without perfect lighting conditions.
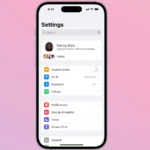
Accessing the Camera Through macOS System Preferences
You can manage your MacBook’s camera settings through System Preferences. Here’s how to access and adjust them:
- Click the Apple menu in the top-left corner.
- Select “System Preferences.”
- Look for “Security & Privacy.”
- Click the “Privacy” tab.
- Select “Camera” from the left sidebar.
In this section, you’ll see a list of apps requesting camera access. You can grant or revoke permissions here. This gives you full control over which apps can use your camera.
You can also use this area to troubleshoot camera issues. If an app isn’t detecting your camera, check here first to ensure it has the necessary permissions.
Utilizing Camera Apps on MacBook
MacBooks come equipped with powerful camera capabilities. Various apps allow you to capture photos, enhance video calls, and access advanced camera controls.
Taking Photos With Photo Booth
Photo Booth is a built-in app on MacBooks for taking quick snapshots and fun selfies. To use it:
- Open Photo Booth from your Applications folder
- Choose between single photo, four-shot burst, or video mode
- Click the red camera button to capture
Photo Booth offers filters and effects to spice up your photos. You can easily share your captures via email or social media directly from the app.
For best results, ensure good lighting and a clean camera lens. Photo Booth automatically accesses your MacBook’s camera without needing extra permissions.
Enhancing Video Calls with Zoom and Microsoft Teams
Zoom and Microsoft Teams are popular video conferencing apps for MacBook users. To optimize your video call experience:
- Test your camera before important calls
- Adjust video settings within the app preferences
- Use virtual backgrounds for privacy or professionalism
Both apps offer features like noise suppression and beauty filters. Ensure camera access is granted in System Preferences for smooth operation.
Consider using an external webcam for improved video quality during important calls. Position your camera at eye level for the most flattering angle.
Using Third-Party Apps for Advanced Controls
Third-party apps provide extended functionality for your MacBook’s camera. Some popular options include:
| App Name | Key Features |
|---|---|
| Webcam Settings | Adjust brightness, contrast, saturation |
| Camtasia | Screen recording with webcam overlay |
| ManyCam | Virtual camera with multiple video sources |
These apps often require explicit camera permissions in System Preferences. They can enhance your camera’s capabilities for content creation, streaming, or professional video production.
When choosing a third-party app, consider your specific needs and check compatibility with your MacBook model. Some apps offer free trials to test features before purchasing.
Optimizing Camera Performance and Settings
Enhancing your MacBook’s camera performance involves adjusting settings for better image quality and managing privacy. These optimizations can significantly improve your video conferencing and photo-taking experience.
Improving Image Quality in Various Lighting Conditions
To improve your Mac camera quality, start by adjusting the basic settings. Open Photo Booth and click on the Video menu. Here you can tweak brightness, contrast, and saturation.
For low-light situations, try these steps:
- Increase brightness
- Reduce contrast slightly
- Boost saturation for more vivid colors
In bright environments, do the opposite:
- Lower brightness
- Increase contrast for better definition
- Reduce saturation to prevent color washout
Consider using external lighting sources. A small desk lamp or ring light can dramatically enhance image quality.
For advanced adjustments, third-party apps like iGlasses offer more control. This $19.95 app allows fine-tuning of sharpness, white balance, and digital zoom.
Adjusting Webcam Settings for Optimal Video Conferencing
Video conferencing apps often have built-in camera settings. In Zoom, for example, you can enhance your appearance and adjust for low light:
- Open Zoom Settings (Command + ,)
- Go to the Video tab
- Check “Touch up my appearance”
- Enable “Adjust for low light”
For better video quality, ensure you’re using HD settings when available. Position yourself facing a light source for even illumination.
If your MacBook’s built-in camera isn’t cutting it, consider using your iPhone as a webcam. The Continuity Camera feature allows wireless connection for superior image quality.
Managing Privacy and Security Settings
To protect your privacy, control which apps can access your camera:
- Open System Settings
- Click on Privacy & Security
- Select Camera
- Toggle permissions for individual apps
Always keep your MacBook’s software updated to patch security vulnerabilities. Be cautious when granting camera access to new apps.
Consider using a physical camera cover when not in use. This simple step prevents unauthorized access to your camera.
| Setting | Purpose | How to Access |
|---|---|---|
| Brightness | Adjust image lightness | Photo Booth > Video menu |
| Contrast | Enhance image definition | Photo Booth > Video menu |
| HD | Improve video quality | Video conferencing app settings |
| Camera Access | Control app permissions | System Settings > Privacy & Security |
Integrating External Cameras with Your MacBook
External cameras can enhance your MacBook’s video capabilities. They offer improved quality and flexibility for video calls, content creation, and more.
Choosing the Right External Webcam for Your Needs
When selecting an external webcam for your MacBook, focus on video quality and features. Look for cameras that offer at least 1080p resolution for crisp images. Frame rates of 30 fps or higher ensure smooth video.
Consider the camera’s field of view. A wider angle is great for group calls or showing more of your background. For solo use, a narrower field works well.
Check for built-in microphones. Some webcams have noise-canceling mics that improve audio quality.
Autofocus and low-light correction features help maintain image clarity in various conditions.
| Feature | Importance |
|---|---|
| Resolution | High |
| Frame Rate | Medium |
| Field of View | Medium |
| Microphone | Low |
| Autofocus | High |
USB connectivity ensures easy setup with most MacBooks. Some newer models offer USB-C for faster data transfer.
Setting Up an External Camera with Apple Silicon Macs
Connecting an external camera to Apple Silicon Macs is straightforward. Simply plug the camera into an available USB or USB-C port. Your Mac should recognize it automatically.
To use the camera in apps, you may need to select it as the video source. In FaceTime, click Video in the menu bar and choose your external camera.
For Photo Booth, click Camera in the menu bar to select your external device.
In QuickTime Player, start a new movie recording. Click the dropdown arrow next to the record button to choose your camera.
Some third-party apps like Zoom or Skype may require you to change the camera in their settings.
Exploring Features of Continuity Camera for macOS
Continuity Camera lets you use your iPhone as a webcam for your Mac. This feature works wirelessly, offering high-quality video without extra hardware.
To use Continuity Camera, ensure both devices are signed in to the same Apple ID. Enable Wi-Fi and Bluetooth on both devices.
In video apps, select your iPhone as the camera source. Your iPhone will automatically activate its camera.
Continuity Camera offers Center Stage, which keeps you in frame as you move. Portrait mode blurs your background for a professional look.
Studio Light brightens your face in low-light conditions. Desk View shows your desk and face simultaneously, great for demonstrations.
These features make Continuity Camera a powerful alternative to traditional external webcams for MacBook users.
Frequently Asked Questions
MacBook cameras offer various features and functions. Users can easily access the built-in camera, take photos, and resolve common issues. External cameras and photo editing apps expand creative possibilities.
How can I access the built-in camera on my MacBook Air?
To access your MacBook Air’s built-in camera, open an app that uses it. Popular choices include FaceTime, Photo Booth, or Zoom. The camera turns on automatically when you launch these apps.
You can also check camera access in System Preferences. Go to Apple menu > System Preferences > Security & Privacy > Privacy. Select “Camera” and ensure the apps you want to use are checked.
What steps are involved in taking a photo using my MacBook?
Taking a photo with your MacBook is simple. Open the Photo Booth app from your Applications folder. The camera will activate, showing a live preview.
Click the red camera button to snap a photo. You can add effects before taking the picture by clicking the Effects button. Your photos save automatically to the Photos app.
How do I resolve issues when my MacBook camera is not working?
If your MacBook camera isn’t working, try these steps:
- Close all apps using the camera
- Restart your MacBook
- Check camera permissions in System Preferences
- Update macOS to the latest version
If problems persist, contact Apple Support or visit an Apple Store for further assistance.
What are the options for adding filters to the MacBook camera output?
MacBooks offer built-in filter options through the Photo Booth app. Open Photo Booth and click the Effects button to access various filters and effects.
For more advanced editing, try third-party apps like Photoshop or Pixelmator. These offer a wider range of filters and editing tools for your photos.
Can I use an external camera with my MacBook, and if so, how?
Yes, you can use an external camera with your MacBook. Most USB webcams work with macOS. Here’s how to set it up:
- Connect the external camera to your MacBook’s USB port
- Open System Preferences > Camera
- Select the external webcam from the list of available cameras
Your MacBook will now use the external camera for video calls and photo applications.
What applications are available for camera usage on MacBook Pro?
MacBook Pro offers several built-in apps for camera use:
- Photo Booth: Take photos and videos with effects
- FaceTime: Make video calls
- QuickTime Player: Record video from your camera
Popular third-party options include:
- Zoom: Video conferencing
- Skype: Video calls and messaging
- OBS Studio: Streaming and recording
| App Name | Primary Use | Free/Paid |
|---|---|---|
| Photo Booth | Photos/Videos | Free |
| FaceTime | Video Calls | Free |
| Zoom | Video Conferencing | Free/Paid |
| Skype | Video Calls | Free/Paid |
| OBS Studio | Streaming | Free |
These apps cater to different needs, from casual photo-taking to professional video streaming.