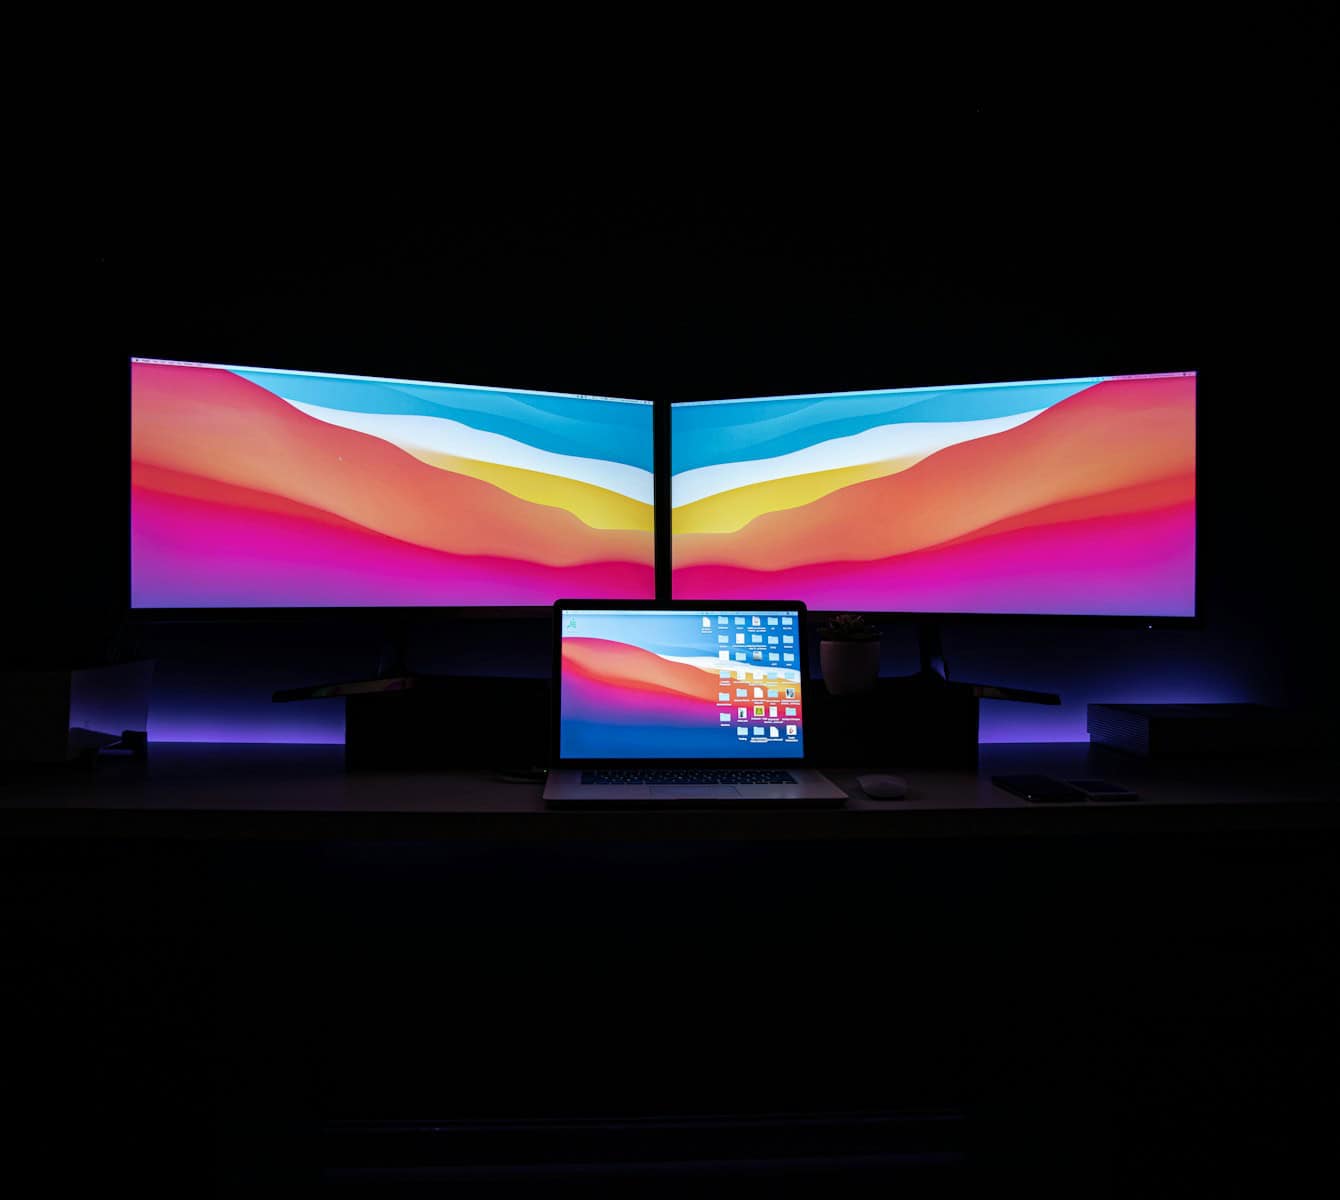
MacBook Air users can now enjoy the benefits of dual monitors. Apple’s latest M3 MacBook Air models support two external displays when the laptop is closed in clamshell mode. This feature enhances productivity and expands workspace for various tasks.
The M3 MacBook Air can handle up to two external displays with impressive resolutions. You can connect a primary display with up to 6K resolution at 60 Hz or 4K at 144 Hz. The secondary display supports up to 5K at 60 Hz or 4K at 100 Hz. This setup offers crisp visuals and smooth performance for your work or entertainment needs.
To use dual monitors with your MacBook Air, you’ll need to meet a few requirements. Your device must run macOS Sonoma 14.3 or later. You’ll also need to keep your MacBook Air plugged into a power source and adjust some battery settings. With these steps, you can transform your MacBook Air into a powerful workstation with expanded screen real estate.
| Feature | Primary Display | Secondary Display |
|---|---|---|
| Max Resolution | 6K at 60 Hz or 4K at 144 Hz | 5K at 60 Hz or 4K at 100 Hz |
| Requirement | macOS Sonoma 14.3+ | macOS Sonoma 14.3+ |
| Mode | Clamshell (lid closed) | Clamshell (lid closed) |
Using Dual Displays with Your MacBook Air
MacBook Air Display Capabilities
The latest MacBook Air models, powered by the M3 chip, offer enhanced external display support. Unlike previous models, these can drive two external displays. This is a big plus for users who like a multi-monitor setup for better productivity. However, there are some important details.
Key Requirements for Dual Displays
To use two external displays with your M3 MacBook Air, you must meet these conditions:
- The MacBook Air’s lid must be closed (clamshell mode).
- The MacBook Air must be plugged into power.
- You need an external keyboard and mouse or trackpad connected.
If these requirements aren’t met, the MacBook Air will only support one external display.
Supported Resolutions and Refresh Rates
The M3 MacBook Air provides good flexibility in terms of display resolution and refresh rate. When using two external displays, you can expect the following:
- Display 1: Up to 6K resolution at 60Hz or 4K resolution at 144Hz.
- Display 2: Up to 5K resolution at 60Hz or 4K resolution at 100Hz.
This means you can connect a high-resolution display for detailed work and a second display for other tasks, like messaging or web browsing.
Comparison of MacBook Air Display Support
Here’s a quick comparison of external display support across recent MacBook Air models:
| MacBook Air Model | Number of External Displays | Conditions for Multiple Displays |
|---|---|---|
| M1 | One | N/A |
| M2 | One | N/A |
| M3 | Two | Lid closed, plugged into power, external keyboard/mouse |
As you can see, the M3 model marks a significant improvement for users who need multiple displays. This is beneficial for tasks like video editing, coding, and graphic design, where having more screen real estate can greatly enhance workflow.
Setting up dual displays is fairly simple. Connect your displays using the appropriate cables and adapters. Once you meet the key requirements, the MacBook Air should automatically detect and configure the displays. You can then adjust display settings, such as arrangement and resolution, in System Settings.
The M3 MacBook Air’s ability to drive two external displays offers a compelling advantage for professionals and power users. This feature, combined with the performance boost of the M3 chip, makes the latest MacBook Air a very capable machine for demanding workloads.
Understanding the MacBook Air’s Display Capabilities
The MacBook Air’s display capabilities have evolved with each generation. Recent models offer improved external monitor support and higher resolutions.
Apple Silicon and Display Support
The M1 MacBook Air supports one external display up to 6K resolution at 60Hz. M2 models maintain this limitation. The M3 MacBook Air breaks new ground with dual monitor support in clamshell mode.
To use two external displays on an M3 MacBook Air:
- Close the laptop lid
- Connect two monitors
- Use an external keyboard and mouse
This setup allows for a 6K display at 60Hz and a second display up to 5K at 60Hz or 4K at 100Hz.
Thunderbolt and USB-C Connectivity
MacBook Air models feature Thunderbolt/USB-C ports for display connections. These ports offer versatility and high bandwidth.
Thunderbolt 3 and 4 support:
- Data transfer speeds up to 40 Gbps
- Power delivery
- DisplayPort video output
You can use Thunderbolt docks to expand connectivity options. These docks often provide additional USB ports HDMI outputs and Ethernet.
Resolution and Refresh Rate Considerations
When choosing external displays consider both resolution and refresh rate. Higher resolutions offer sharper images while faster refresh rates provide smoother motion.
| MacBook Air Model | Max External Resolution | Max Refresh Rate |
|---|---|---|
| M1/M2 | 6K | 60Hz |
| M3 (1st display) | 6K | 60Hz |
| M3 (2nd display) | 5K | 60Hz |
For the best experience match your display’s resolution and refresh rate to your MacBook Air’s capabilities. This ensures optimal performance and image quality.
How to Connect Multiple Monitors to MacBook Air
Connecting multiple monitors to your MacBook Air enhances productivity and expands your workspace. You’ll need specific adapters or docking stations to achieve this setup. Proper configuration ensures optimal display arrangement.
Adapters and Hubs
MacBook Air models with M1, M2, or M3 chips can support multiple external displays using the right adapters. The USB-C Digital AV Multiport Adapter is a popular choice. It provides an HDMI port and additional USB-A port.
For VGA monitors, use the USB-C VGA Multiport Adapter. This adapter also includes a USB-A port and a USB-C port for charging.
USB-C hubs offer more versatility. They typically include multiple ports like HDMI, DisplayPort, and USB-A. Choose a hub with the ports that match your monitor connections.
| Adapter Type | Ports Provided | Best For |
|---|---|---|
| USB-C Digital AV | HDMI, USB-A, USB-C | HDMI monitors |
| USB-C VGA | VGA, USB-A, USB-C | Older VGA monitors |
| USB-C Hub | HDMI, DisplayPort, USB-A, etc. | Multiple monitor types |
Docking Stations
Docking stations provide a more permanent solution for connecting multiple monitors. They offer numerous ports and can power your MacBook Air.
Look for docks that support dual 4K displays at 60Hz. Some popular options include CalDigit TS3 Plus and OWC Thunderbolt 3 Dock.
Docking stations often include:
- Multiple USB ports
- Ethernet
- Audio jacks
- SD card readers
Place the dock on your desk and connect your MacBook Air with a single cable. This setup simplifies connecting and disconnecting your laptop from multiple peripherals.
Setting Up Dual Monitors
Once you’ve connected your monitors using adapters or a docking station, you need to configure them in macOS.
- Click the Apple menu and select System Settings.
- Choose Displays from the sidebar.
- Click “Add Display” if your monitors aren’t detected automatically.
You can arrange your displays by dragging their icons in the Displays settings. This determines how your cursor moves between screens.
To mirror your displays:
- Open Display settings
- Select a display
- Choose “Mirror for” from the “Use as” menu
Adjust resolution and scaling for each monitor individually. This allows you to optimize text size and screen space on each display.
Maximizing Dual Monitor Usage on MacBook Air
Setting up dual monitors on your MacBook Air boosts productivity and enhances your workspace. This section explores key strategies to optimize your dual-screen setup for improved efficiency and comfort.
Optimizing Workflows
Arrange your apps and windows across both screens to streamline tasks. Place your main work on the primary display and support tools on the secondary. Use macOS Sonoma’s built-in window management features to quickly organize windows.
Create virtual desktops for different projects or tasks. Swipe between them using trackpad gestures or keyboard shortcuts.
Set up app-specific layouts. Save time by automatically opening frequently used apps in preset positions across your displays.
| Task | Primary Display | Secondary Display |
|---|---|---|
| Coding | Code editor | Documentation, terminal |
| Design | Main canvas | Tools, asset libraries |
| Writing | Word processor | Research materials |
Adjusting Display Settings
Fine-tune your displays for optimal viewing. Open System Settings and navigate to Displays. Adjust resolution, brightness, and color profile for each monitor.
Enable Night Shift to reduce eye strain during evening work. Set different color temperatures for each screen based on your preferences.
Use DisplayLink Manager software if you’re connecting multiple displays to M1 or M2 MacBook Air models. This lets you extend beyond the built-in limitations.
Customize your cursor behavior. Choose whether it flows freely between screens or requires a pause at the edge.
Accessibility and Ergonomics
Position your monitors at eye level to maintain good posture. Align the top of the screens with your eye line when sitting upright.
Use an external keyboard and mouse or trackpad for better ergonomics. This setup allows you to work comfortably with the MacBook in clamshell mode.
Enable accessibility features like zoom or high contrast mode on specific displays. This helps if you need different settings for close-up and distance work.
Take regular breaks to prevent eye strain. Use the 20-20-20 rule: every 20 minutes, look at something 20 feet away for 20 seconds.
Frequently Asked Questions
MacBook Air users often have questions about connecting multiple external displays. The following answers address common concerns about adapters, compatibility, and specifications for various MacBook Air models.
How can I connect two external displays to a MacBook Air?
You can connect two external displays to a MacBook Air with M3 chip when the laptop lid is closed. This setup requires using the Thunderbolt / USB 4 ports on your MacBook Air.
What type of adapter is needed for dual monitors with a MacBook Air?
A Thunderbolt dock or USB-C hub with multiple video outputs is needed for dual monitors. These adapters convert the Thunderbolt signal to compatible display outputs like HDMI or DisplayPort.
Does MacBook Air support dual HDMI output for multiple monitors?
MacBook Air doesn’t have built-in dual HDMI outputs. You’ll need a Thunderbolt dock or USB-C hub with dual HDMI ports to achieve this setup.
Can the MacBook Air M1 model support a dual monitor setup?
The M1 MacBook Air natively supports one external display. For dual monitors, you need third-party software and a DisplayLink adapter.
What are the specifications for connecting multiple monitors to a MacBook Air M2?
MacBook Air M2 supports one external display up to 6K resolution at 60Hz. For dual monitors, you’ll need similar solutions as the M1 model.
Are there any docking stations recommended for MacBook Air models to achieve a dual display configuration?
Several docking stations work well for dual displays with MacBook Air. Look for Thunderbolt 4 docks or USB-C hubs that explicitly state support for multiple monitors with your specific MacBook Air model.