Upgrading your MacBook Pro’s RAM can breathe new life into your aging laptop. When apps start to lag or your computer freezes during simple tasks, adding more memory might be the solution you need. Not all MacBook Pro models allow for RAM upgrades, as newer Apple Silicon models have memory integrated directly into the chip, making it impossible to upgrade after purchase.
If you own an older MacBook Pro (pre-2016 for most models), you may be able to swap out the memory modules yourself. The process is fairly straightforward, requiring just a few basic tools and some careful handling. Adding RAM can significantly boost performance when multitasking, editing photos or videos, or running memory-intensive applications.
How To Add RAM to a MacBook Pro (And Whether You Can)
Upgrading the RAM in a MacBook Pro used to be a simple way to speed things up—but on most newer models, it’s either tricky or downright impossible. Here’s what you need to know about adding RAM to your MacBook Pro, step by step, and whether it’s even an option for your specific model.
1. Can You Add RAM to Your MacBook Pro?
Short answer: It depends on the year and model.
✅ You CAN upgrade RAM on:
- MacBook Pro (Non-Retina models) – 2012 and earlier
- Some 2012 MacBook Pro Retina models (very limited)
❌ You CANNOT upgrade RAM on:
- MacBook Pro Retina models from Late 2012 onward
- MacBook Pro with M1, M2, or M3 chips (Apple Silicon)
- MacBook Pro 2016 and newer (Intel-based)
On newer MacBook Pros, the RAM is soldered directly to the motherboard, making upgrades impossible. If you have one of these, you’re stuck with what you bought.
2. Check Your MacBook Pro Model First
How to check:
- Click the Apple menu () in the top left.
- Select About This Mac.
- Look at the Year and Model.
If you see something like MacBook Pro (13-inch, Mid 2012), you’re in luck! If it’s a 2016 model or later—or an M1/M2/M3—you won’t be able to upgrade.
3. What You’ll Need (For Upgradeable Models)
Tools:
- A small Phillips screwdriver
- A plastic spudger (optional but helpful)
- An anti-static wrist strap (optional, for safety)
Parts:
- Compatible DDR3 RAM (older models typically use DDR3L SO-DIMM RAM, up to 16GB for most 2012 models)
4. How To Add RAM (Step-by-Step)
Step 1: Shut Down & Unplug
- Power down your MacBook Pro completely.
- Unplug it from the power adapter and any peripherals.
Step 2: Flip It Over & Remove the Back Panel
- Use your Phillips screwdriver to remove the screws on the back cover.
- Keep the screws organized (they’re different sizes).
Step 3: Ground Yourself
- Touch something metal or wear an anti-static strap to avoid static discharge.
Step 4: Locate the RAM Slots
- Look for the small rectangular modules near the battery.
- There are typically two slots.
Step 5: Remove Existing RAM (If Necessary)
- Gently push the levers on each side of the RAM.
- It should pop up at an angle—pull it out carefully.
Step 6: Insert New RAM
- Align the notch on the new RAM stick with the slot.
- Slide it in at about a 30-degree angle.
- Press down until it clicks into place.
Step 7: Reassemble
- Put the back panel on.
- Screw everything back into place.
5. Turn It On & Check the Upgrade
- Power it back on.
- Go to About This Mac.
- Confirm the Memory section shows the correct amount of RAM.
6. Alternatives If You Can’t Upgrade RAM
If your MacBook Pro has soldered RAM, here are a few performance-boosting alternatives:
- Free up storage space (macOS uses free disk space as virtual memory)
- Close unused apps and browser tabs
- Upgrade to an SSD (if you haven’t already, on older models)
- Consider an external SSD for additional storage and swap files
- Get a newer Mac with more RAM built-in
Pro Tip:
If you’re buying a new MacBook Pro, always max out the RAM you can afford at purchase. You won’t be able to upgrade it later!
Key Takeaways
- RAM upgrades are only possible on older MacBook Pro models, as newer Apple Silicon Macs have non-upgradeable memory.
- Adding more RAM can greatly improve your MacBook Pro’s speed when running multiple programs or handling large files.
- Before upgrading, check your specific model’s memory removal instructions and maximum RAM capacity to ensure compatibility.
Understanding RAM and Its Importance
RAM plays a vital role in your MacBook Pro‘s performance. It handles active data and determines how smoothly your computer runs daily tasks.
What Is RAM?
RAM stands for Random Access Memory. It serves as your MacBook’s short-term memory, storing data that your computer needs to access quickly. Unlike your hard drive or SSD, RAM provides temporary storage that clears when you turn off your computer.
Your MacBook Pro uses RAM to hold active programs, open files, and system processes. Think of it as a workspace where your Mac keeps everything it’s currently using.
Modern MacBook Pro models come with different RAM configurations, typically starting at 8GB. Some models offer up to 32GB or even 64GB of RAM, depending on the year and model.
RAM speed also matters – many newer MacBooks use 2933MHz RAM or faster, which helps data move more quickly between components.
How RAM Affects Performance
RAM directly impacts how many programs you can run simultaneously. More RAM means your MacBook can juggle more tasks without slowing down.
When you don’t have enough RAM, your Mac must constantly swap data between memory and storage. This creates a bottleneck that makes everything feel sluggish.
The more RAM you have, the more data your Mac can access and store, leading to faster performance. You’ll notice the biggest improvements when:
- Running multiple applications at once
- Working with large files (photos, videos)
- Using memory-intensive programs like video editors
- Having many browser tabs open
For everyday tasks, 8GB RAM works fine. For professional work with demanding applications, 16GB or more provides noticeably better performance.
Determining MacBook Pro RAM Compatibility
Before upgrading your MacBook Pro’s memory, you need to know what kind of RAM is compatible with your specific model and how much it can handle. Not all MacBook Pro models allow for RAM upgrades.
Model Specifications
Different MacBook Pro models use different types of RAM. Older models (pre-2012) typically use DDR3 memory, while newer ones might use DDR4. To find your exact model:
- Click the Apple logo in the top-left corner
- Select “About This Mac”
- Note your model year and identifier
Some MacBook Pro models have soldered RAM that cannot be upgraded, especially those with Retina displays made after 2012. Models with removable RAM usually have two memory slots that can be accessed by removing the bottom case.
MacBook Pro computers with M1 or newer Apple chips have integrated RAM that can’t be upgraded after purchase.
Maximum RAM Capacity
Each MacBook Pro model has a maximum RAM capacity it can support:
| MacBook Pro Model | Maximum RAM | Upgradable? |
|---|---|---|
| 2009-2012 (13-15″) | 8-16GB | Yes |
| 2012 Retina models | 8GB | No |
| 2013-2015 Retina | 16GB | No |
| 2016-2019 models | 16-32GB | No |
| 2020+ with Apple chips | 8-32GB | No |
For best performance, install identical memory modules in each slot. This ensures optimal dual-channel memory operation. When buying RAM, make sure it matches your MacBook Pro’s specs exactly.
It’s often worth upgrading to the maximum capacity your MacBook supports to make it more future-proof, especially if you work with large files or multiple applications.
Pre-Upgrade Considerations
Before adding RAM to your MacBook Pro, you need to prepare properly. This includes protecting your data, understanding your current setup, and knowing why an upgrade matters for your specific needs.
Backup Your Data
Always back up your data before making hardware changes to your MacBook Pro. Even simple upgrades can sometimes lead to unexpected issues.
Use Time Machine to create a full backup of your system. This built-in tool makes a complete copy of your files, applications, and settings.
Connect an external hard drive with enough free space. Time Machine will guide you through the backup process.
For extra safety, consider making a separate copy of your most important files. You can use cloud storage like iCloud Drive or Dropbox as an additional backup method.
Check that your backup completed successfully before moving forward. Open the Time Machine interface to verify your files are there.
Check Existing Hardware
First, determine if your MacBook Pro model can even accept RAM upgrades. Many newer models have RAM soldered directly to the motherboard, making upgrades impossible.
To check your model:
- Click the Apple menu in the top left corner
- Select “About This Mac”
- Look at your model year and type
- Note your current RAM amount and configuration
Older MacBook Pro models (pre-2012) typically have removable RAM. Models from 2012-2015 vary by type. Most models after 2016 have non-upgradeable RAM.
If upgradeable, identify what type of RAM your system uses. Common types include DDR3 and DDR4, with specific speed requirements for each model.
Assessing Current Performance
Monitor your current system performance to see if a RAM upgrade will actually help. Open Activity Monitor (found in Applications > Utilities) to check memory usage.
Look at the “Memory Pressure” graph at the bottom of the window. If it’s consistently yellow or red during normal use, your Mac would benefit from more RAM.
Pay attention to how your MacBook performs when running multiple programs. Slow performance, frequent beach balls, or system freezes often point to RAM limitations.
Also check if your hard drive is constantly active. This happens when your Mac uses disk space as virtual memory because it’s running out of RAM.
Run Disk Utility to verify your drive is healthy. Slow performance can sometimes be caused by drive issues rather than insufficient RAM.
Choosing the Right RAM
Selecting the proper RAM for your MacBook Pro requires careful consideration of specifications, price, and vendor reliability to ensure compatibility and optimal performance.
RAM Specifications
When upgrading your MacBook Pro’s memory, you need to know exactly what type your model supports. Most older MacBook Pro models use DDR3 or DDR4 RAM, while newer models have soldered, non-upgradable RAM.
Check your MacBook Pro’s specific requirements before purchasing. Older MacBook Pros can typically handle up to 8GB or 16GB of RAM depending on the model year. Some models require memory modules to be installed in matching pairs.
The speed of the RAM matters too. Memory is rated in MHz (like 1600MHz or 2400MHz), and your MacBook needs RAM that matches its supported speed. Using the wrong speed can cause performance issues or prevent your Mac from starting up.
Key specifications to check:
- RAM type (DDR3, DDR4)
- Speed (MHz)
- Maximum capacity
- Number of slots available
Price Comparison
RAM prices vary widely based on capacity, speed, and brand. Shopping around can save you significant money on your upgrade.
Average price ranges:
- 8GB kit: $40-$80
- 16GB kit: $80-$150
- 32GB kit: $150-$300
The Apple Store typically charges premium prices for memory upgrades. Third-party retailers often offer the same RAM specifications at 30-50% lower prices.
Online marketplaces like Amazon and Newegg frequently run sales on RAM. Setting price alerts can help you grab deals when they appear.
Consider the value proposition of your upgrade. For most users, jumping from 8GB to 16GB provides the best performance improvement for the money.
Trusted Brands and Vendors
Buying from reputable brands and sellers ensures you get quality RAM that works properly with your MacBook Pro.
Recommended RAM brands:
- Crucial
- Kingston
- Corsair
- Samsung
- OWC (MacSales)
OWC specializes in Mac upgrades and offers memory that’s tested specifically for MacBook Pro compatibility. Their kits often include installation tools and detailed guides.
Avoid unlabeled or extremely cheap RAM from unknown manufacturers. These may cause system instability or fail prematurely.
Many vendors offer lifetime warranties on RAM modules. This protection can be valuable if you encounter issues later. Always check that the seller has a good return policy in case the RAM isn’t compatible with your specific MacBook Pro.
Properly installed RAM can dramatically improve your Mac’s performance when running multiple apps or handling memory-intensive tasks.
How to Purchase RAM
Buying the right RAM for your MacBook Pro requires knowing where to shop and what specifications to look for. Getting compatible memory at a good price means checking both online stores and local shops.
Online Retailers
When buying RAM online, check trusted computer parts websites first. Amazon offers various memory options with customer reviews that help gauge quality. Newegg and OWC specialize in Mac components and often provide detailed compatibility guides.
Price comparison sites can help find the best deals. Many online retailers offer free shipping and easier returns than physical stores.
Always verify the RAM is compatible with your specific MacBook Pro model. Look for:
- The correct type (DDR3, DDR4)
- Proper speed rating
- Correct form factor
- Matching capacity with what your Mac can handle
Some sites let buyers filter by laptop model to show only compatible options. This saves time and prevents buying the wrong parts.
Physical Stores
The Apple Store provides genuine memory upgrades for older MacBook Pro models. While often more expensive than alternatives, their RAM comes with expert installation services if needed.
Apple Authorized Service Providers offer similar benefits to Apple Stores but sometimes at lower prices. They maintain Apple’s quality standards while providing local convenience.
Computer specialty shops like Micro Center or Best Buy keep RAM in stock and can offer immediate availability. Their staff can often answer questions or help confirm compatibility.
The main benefit of physical stores is hands-on customer service. Buyers can talk to knowledgeable staff who can explain technical details in person.
Price matching is common in physical stores, so bringing online quotes might lead to better deals.
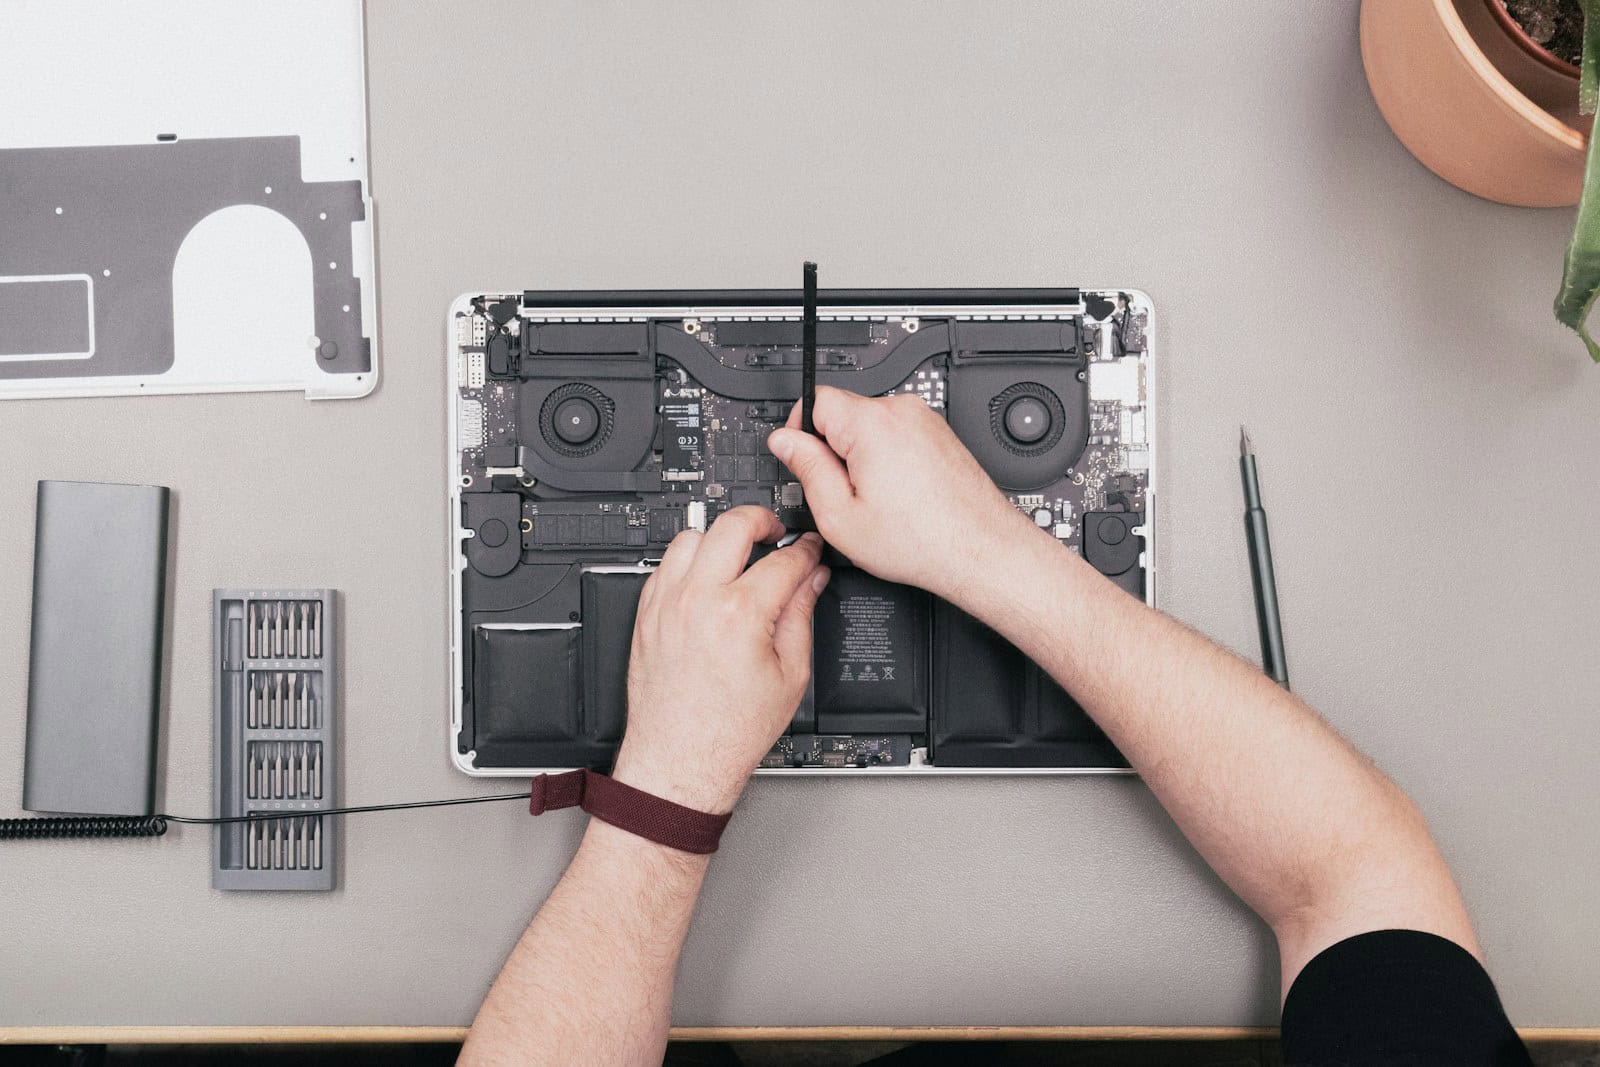
Step-by-Step RAM Installation Guide
Upgrading the RAM in your MacBook Pro can significantly improve performance for memory-intensive tasks. This process requires careful preparation and the right tools to avoid damaging your computer.
Preparing Your MacBook Pro
Before starting any RAM installation, shut down your MacBook Pro completely. Disconnect all cables including power adapter, USB devices, and any security locks from your computer.
Find a clean, static-free workspace with good lighting. Place a soft towel or mat on your work surface to prevent scratches on your MacBook’s case.
Back up your data to an external drive or cloud storage. While RAM installation shouldn’t affect your data, it’s always wise to have a backup just in case.
Check your specific MacBook Pro model’s RAM compatibility. Not all MacBooks allow for RAM upgrades, particularly newer models with Apple Silicon chips where RAM is integrated and cannot be changed.
Tools Required for Installation
A Phillips #00 screwdriver is essential for removing the bottom case screws on most MacBook Pro models. Some models might need a P5 pentalobe screwdriver instead.
An anti-static wrist strap helps prevent static electricity damage to sensitive components. If you don’t have one, regularly touch a metal surface to discharge static.
A plastic opening tool or guitar pick helps safely pry open the bottom case without scratching the aluminum body.
Small containers or an organizer tray keeps tiny screws sorted and prevents loss. Label each container according to screw location for easier reassembly.
A spudger tool assists in carefully disconnecting the battery connector before handling any internal components, which is a critical safety step.
Installing the RAM Modules
First, remove the bottom case by unscrewing all perimeter screws. Keep track of their positions as they may have different lengths. Gently lift off the case starting from the hinge side.
Locate the RAM slots—they typically have retention clips on both sides. Push these clips outward to release the current RAM modules. The modules will pop up at an angle, allowing you to slide them out gently.
Take your new RAM module and align the notch on the gold contacts with the ridge in the slot. Hold the module by its edges and insert it at a 30-degree angle into the slot.
Press down firmly until the module clicks into place and the retention clips secure it. The module should sit flat when properly installed.
Repeat the process for the second RAM slot if you’re installing multiple modules. MacBook memory upgrades work best when identical modules are used in pairs.
Replace the bottom case, tighten all screws without overtightening, and restart your MacBook Pro to verify successful installation.
Post-Upgrade Procedures
After installing new RAM in your MacBook Pro, you need to properly verify the installation and optimize your system to enjoy the full benefits of the memory upgrade. Following these steps ensures everything works correctly and performs at its best.
Testing New RAM
Once you’ve closed up your MacBook Pro and turned it on, verify that your computer recognizes the new RAM. Click the Apple menu in the top left corner and select About This Mac. Look at the Memory section to confirm the new amount is displayed.
Run Apple Diagnostics to check for hardware issues. Restart your Mac and hold down the D key during startup. The test will identify any problems with your newly installed RAM.
Open multiple memory-intensive applications simultaneously to test real-world performance. Try running:
- Photo or video editing software
- Several browser tabs
- Music production apps
The computer should handle these tasks smoothly without freezing. If your Mac runs these programs without crashes or slowdowns, your RAM upgrade was successful.
Troubleshooting Common Issues
If your MacBook Pro doesn’t start up properly after the RAM upgrade, power it down and check that the memory modules are seated correctly. Even slight misalignment can prevent proper functioning.
Watch for these common signs of RAM issues:
- Random system freezes
- Application crashes
- Startup problems
- Beeping sounds at startup
If you see kernel panic errors, remove the new RAM and reinstall the original modules to see if this resolves the issue. This helps determine if the RAM is defective.
For persistent problems, try resetting the PRAM/NVRAM by restarting and holding Command+Option+P+R until you hear the startup sound twice. This often resolves memory-related issues by clearing stored settings.
Optimizing System Performance
To get the most from your new RAM, restart your Mac to clear out any temporary files and refresh the system. This simple step often results in noticeable performance improvements.
Check Activity Monitor (found in Applications > Utilities) to see which apps use the most memory. Close unnecessary background applications that consume RAM when not in use.
Consider these optimization steps:
- Update macOS to the latest version
- Clear browser caches regularly
- Use Disk Utility to repair disk permissions
- Remove login items you don’t need at startup
Adjust virtual memory settings if needed. The operating system handles this automatically, but with more physical RAM, you might want to optimize these settings for better performance.
For creative professionals, reconfigure memory-intensive applications like Adobe Creative Suite or Final Cut Pro to take advantage of the additional RAM. Check the preferences menu in these apps for memory allocation settings.
Additional Upgrade Considerations
When upgrading your MacBook Pro, RAM isn’t the only component you should think about. Storage options and warranty implications also need careful attention before making any changes to your system.
SSD Upgrades
Unlike RAM, the internal SSD in newer MacBook Pro models can sometimes be upgraded depending on the model year. Older MacBook Pros (pre-2016) often allow for SSD replacement, giving you more storage space and potentially faster performance.
To upgrade your SSD:
- Check compatibility – Research which SSD drives work with your specific MacBook model
- Back up your data – Always create a full backup before any hardware changes
- Get the right tools – Special screwdrivers are needed for Apple’s proprietary screws
If you have a newer model, the SSD storage is soldered to the logic board, making upgrades impossible. In these cases, it’s best to buy the maximum SSD capacity you can afford when making your initial purchase.
External SSDs offer a good alternative when internal upgrades aren’t possible. These connect via USB or Thunderbolt ports and can provide extra space without opening your MacBook.
Potential Impact on Warranty
Opening your MacBook Pro to upgrade components will likely void your warranty with Apple. This means future repairs may not be covered, even for unrelated issues.
If your MacBook is still under warranty, consider these options:
- Use an Apple Authorized Service Provider for upgrades to maintain warranty coverage
- Wait until your warranty expires before attempting DIY upgrades
- Get AppleCare+ before upgrading for extended coverage
For newer M-series MacBooks (M1, M2, M3), remember that RAM cannot be upgraded after purchase as it’s integrated into the chip. Opening these models risks serious damage and offers no upgrade benefit.
Some third-party repair shops claim to perform upgrades without voiding warranties, but Apple may still deny service if they detect unauthorized modifications. Always weigh the benefits of more storage against potential warranty issues.
Frequently Asked Questions
MacBook Pro RAM upgrades involve specific considerations regarding hardware design, compatibility, and potential performance benefits. These common questions address key aspects of memory management for your device.
Is the MacBook Pro’s RAM user-upgradable post-purchase?
For newer MacBook Pro models with Apple Silicon (M1, M2, M3 chips), RAM is not upgradable after purchase. The memory is physically integrated into the chip itself.
This design choice means the RAM is soldered directly to the motherboard. You must select the amount of RAM you need when buying your MacBook Pro.
Older Intel-based MacBook Pro models (pre-2016) allowed for RAM upgrades. These models featured removable memory modules that users could replace.
What steps are involved in upgrading the RAM in a MacBook Pro?
For compatible older MacBook Pro models, RAM upgrades involve several steps. First, shut down your MacBook and unplug all connected devices.
Next, flip the MacBook over and remove the bottom case. Locate the RAM modules, which are typically held in place by small clips.
Gently release the clips to remove the old RAM modules. Insert the new RAM by aligning the notches and pressing firmly until you hear a click. Then replace the bottom case.
How can I check the current RAM specifications on my MacBook Pro?
Checking your MacBook Pro’s RAM is simple. Click the Apple icon in the top-left corner of your screen.
Select “About This Mac” from the dropdown menu. The overview tab shows your current RAM amount.
For more detailed information, click “System Report” and select “Memory” from the sidebar. This displays technical specifications like memory type, speed, and configuration.
Are there specific RAM requirements or compatibility issues for upgrading a MacBook Pro?
For upgradable MacBook Pro models, memory compatibility is crucial. Each model requires specific RAM types, speeds, and maximum capacities.
Older MacBook Pros typically use DDR3 or DDR4 SO-DIMM memory modules. The exact specifications vary by model year.
Using incompatible RAM can cause system instability or prevent your MacBook from starting up. Always check your specific model’s requirements before purchasing memory upgrades.
How can upgrading RAM impact the performance of a MacBook Pro?
Adding more RAM can significantly improve your MacBook Pro’s performance. More memory allows your computer to handle multiple tasks simultaneously without slowing down.
Applications that use large amounts of memory, like photo and video editing software, will run more smoothly. You’ll experience fewer freezes and less lag when switching between programs.
RAM upgrades often provide more noticeable performance improvements than other hardware changes, especially if you regularly work with memory-intensive applications.
What considerations should be made when changing the RAM configuration in a MacBook Pro?
Before upgrading RAM, check if your model supports user upgrades. Apple Silicon MacBooks cannot have their RAM changed, as it’s built into the chip.
Consider your typical workload to determine how much RAM you need. For basic tasks, 8GB may be sufficient, while professional work often requires 16GB or more.
Remember that upgrading RAM yourself may void your warranty on some models. If you’re unsure about the process, professional installation from an authorized service provider is a safer option.