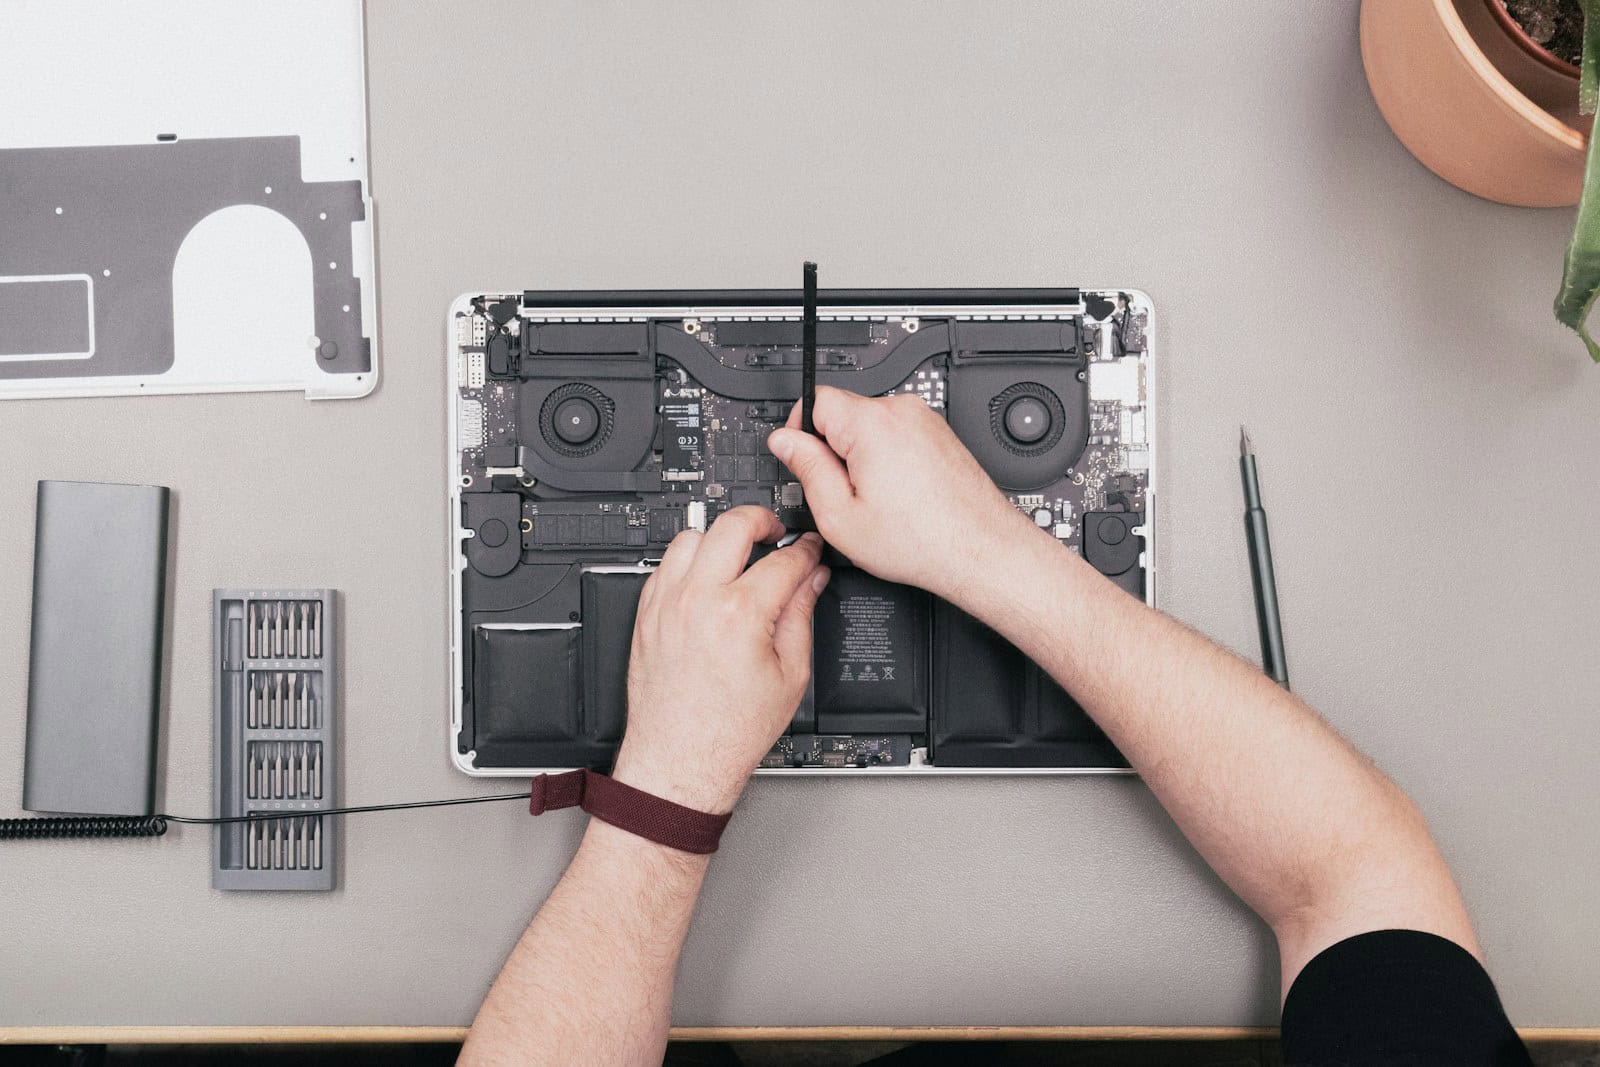
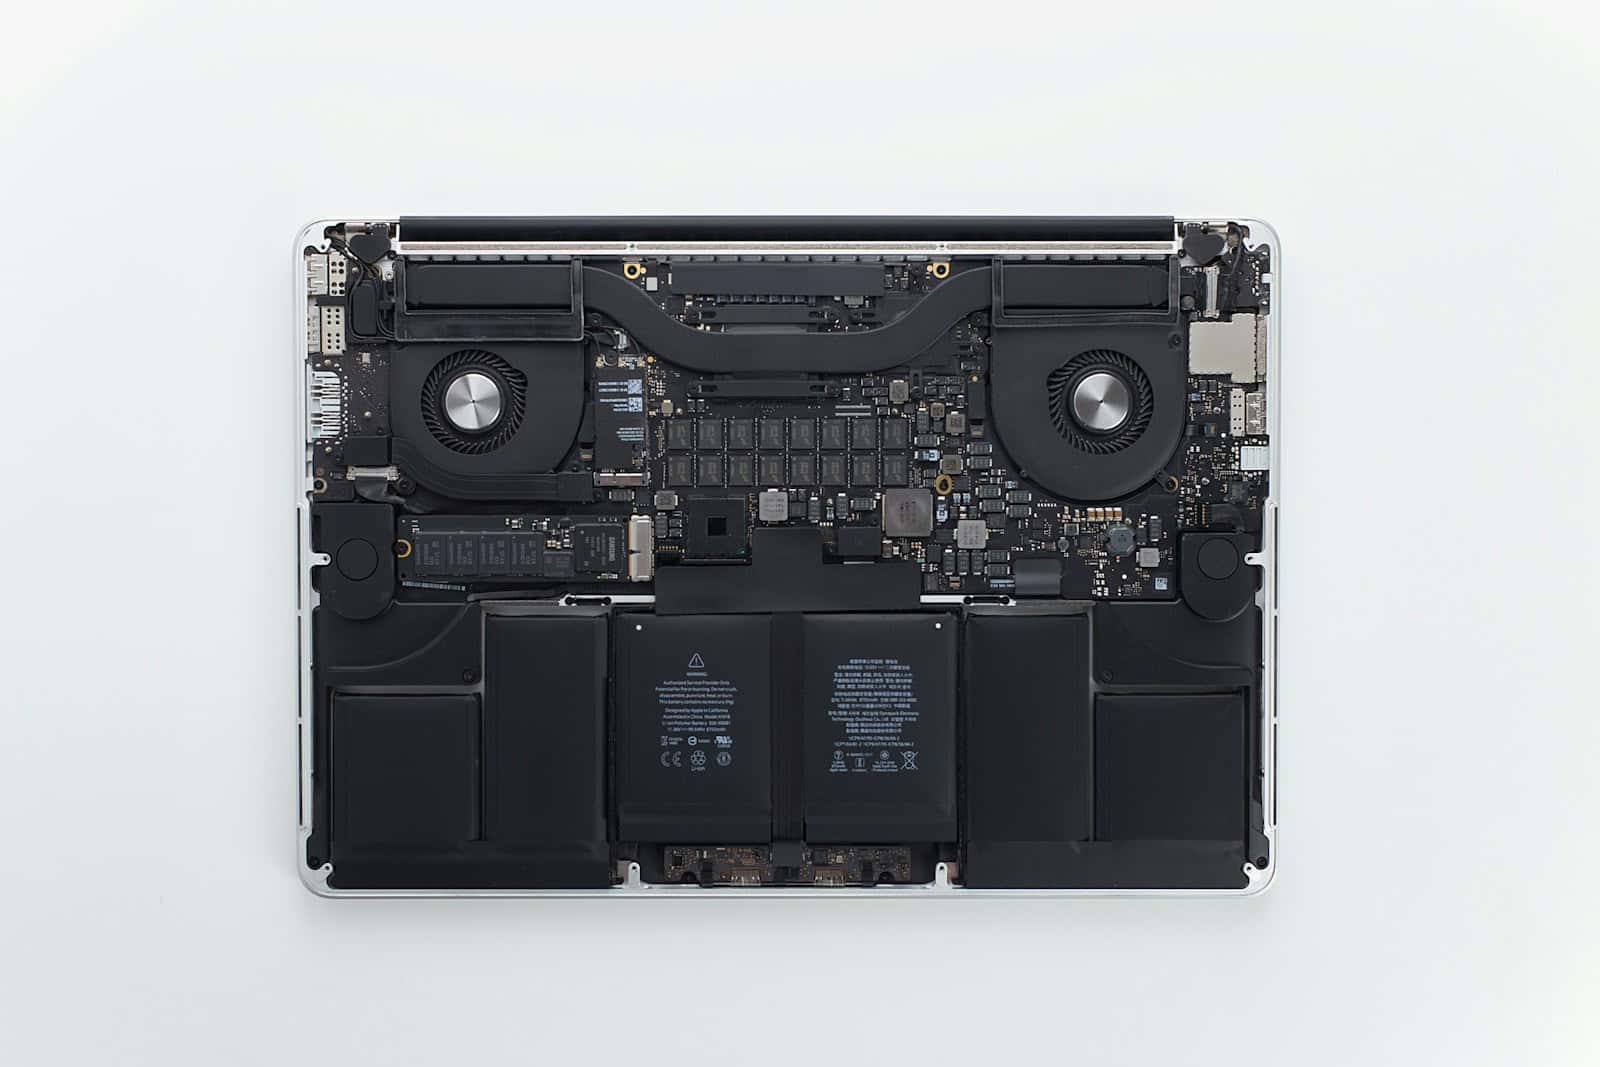
Replacing the battery in a MacBook Pro is a matter of both utility and longevity. As with all rechargeable batteries, the one in your MacBook Pro will eventually lose its ability to hold a charge. This impacts the laptop’s performance and can limit its portability. Undertaking a battery replacement can restore the original battery life, allowing you to use your MacBook Pro without constantly searching for a power outlet. While professional service is an option, many users opt for a DIY approach to battery replacement.
Before starting the battery replacement process, it is essential to have the correct tools and a new battery ready. Safety is key, and it is recommended to discharge the battery to less than 25% to reduce the risk of a dangerous thermal event. The MacBook Pro design uses adhesive strips to hold the battery in place, which requires a careful process to remove without damaging the device.
Installation is the reverse of removal, attention to detail during this part ensures the longevity of the device and the battery. Making sure that the new battery is securely connected and fixed in position is crucial for the proper functioning of the MacBook Pro. Once completed, users can enjoy the renewed efficiency of their laptops.
Tools and Preparations for MacBook Pro Battery Replacement
Safety First: Before You Begin
Prior to embarking on the battery replacement process, it’s crucial to prioritize safety. Ensure your MacBook Pro is completely powered off and disconnected from any power source. This precaution prevents electrical shocks and safeguards your device.

Essential Tools for the Job
Gather the following tools for a successful battery replacement:
- P5 Pentalobe Screwdriver: This specialized screwdriver is necessary to remove the screws securing the MacBook Pro’s bottom case.
- Spudger: A spudger is a flat, plastic tool used to pry open components and disconnect cables.
- Phillips #00 Screwdriver: This screwdriver is needed to remove the screws holding the battery in place.
- Adhesive Remover: Adhesive remover helps to loosen the adhesive strips securing the battery.
- New Battery: Ensure you have a compatible replacement battery for your specific MacBook Pro model.
Preparing Your Workspace
Choose a clean, well-lit workspace with ample space to lay out your tools and components. An anti-static mat is recommended to protect sensitive electronics from static discharge.
The Step-by-Step Replacement Process
Step 1: Open the MacBook Pro
- Place your MacBook Pro upside down on the anti-static mat.
- Use the P5 Pentalobe screwdriver to remove the eight screws securing the bottom case.
- Gently pry open the bottom case using the spudger, starting from the edges.
Step 2: Disconnect the Battery
- Locate the battery connector on the logic board.
- Use the spudger to carefully pry up the connector’s locking flap.
- Gently slide the battery connector out of its socket.
Step 3: Remove the Old Battery
- Locate the adhesive strips securing the battery.
- Apply adhesive remover to the strips to loosen them.
- Carefully peel off the adhesive strips, pulling them slowly and evenly to avoid damaging the battery.
- Once the adhesive strips are removed, gently lift out the old battery.
Step 4: Install the New Battery
- Place the new battery in the same position as the old one.
- Press down firmly to ensure it is securely in place.
- Reconnect the battery connector to the logic board, ensuring it clicks into place.
- Close the locking flap on the connector.
Step 5: Reassemble the MacBook Pro
- Place the bottom case back on the MacBook Pro, aligning it with the screw holes.
- Use the P5 Pentalobe screwdriver to reattach the eight screws.
- Ensure all screws are tightened securely.
Additional Tips and Considerations
- Refer to your MacBook Pro’s specific model repair guide for detailed instructions and diagrams.
- Handle the battery with care to avoid puncturing or damaging it.
- If you encounter any difficulties during the replacement process, seek assistance from a qualified technician.
Please note that replacing your MacBook Pro’s battery may void your warranty. Proceed with caution and ensure you are comfortable with the steps involved before attempting this repair.
Key Takeaways
- A battery replacement enhances a MacBook Pro’s performance and portability.
- Proper preparation and tools are required for a safe and effective battery change.
- Correct installation ensures the longevity of both the battery and the MacBook Pro.
Preparing for Replacement
Replacing a MacBook Pro battery requires careful planning. The following steps ensure a safe and effective replacement process.
Safety Precautions
Before starting, power off the MacBook to avoid any electrical hazards. Discharging the battery below 25% minimizes risks during removal. Working in a well-ventilated area keeps you safe from potentially harmful fumes when handling replacement adhesives.
Tool Gathering
Use the correct tools for a smooth process:
- P5 Pentalobe Screwdriver: Removes the lower case screws.
- T3 and T5 Torx Drivers: Necessary for various internal screws.
- Phillips #00 Screwdriver: Helps in disconnecting specific components.
- Spudger, Opening Pick, and Suction Handle: Assist in safely prying and lifting parts.
- Precision Tweezers: Useful for handling small parts.
- Replacement adhesive: Secures the new battery in place.
Initial Steps
Firstly, gather all your tools and place them within easy reach. With the MacBook powered off, disconnect all cables and lay it on a clean, static-free surface. Next, remove the screws from the lower case using the P5 Pentalobe screwdriver. Carefully disconnect the battery after lifting the lower case, avoiding any force that could damage the MacBook.
Battery Removal and Installation
Replacing the MacBook Pro battery involves precise steps. One must safely disconnect various cables, remove the old battery, and then install the new one.
Disconnecting Components
Before starting the battery replacement, power off the MacBook. Gently disconnect the trackpad cable and any other cables that may hinder battery removal. This may include a ribbon cable or a ZIF connector.
Removing the Battery
The battery in a MacBook Pro is held in place by adhesive strips. Carefully peel off the stretch-release adhesive strips from under the battery. If the battery is swollen, take extra precautions. Remove all screws and clips that secure the battery to the frame.
Installing New Battery
Once the old battery is out, position the new battery in the frame. Attach it using the same screws and washers that held the original battery. Connect the battery power connector to the logic board. Apply thread locker to the screws if necessary. Reattach any cables including the trackpad and ribbon cables disconnected earlier.

FAQs
Calibrating Your MacBook Pro Battery
Modern MacBook Pro models typically don’t require manual battery calibration. Apple’s intelligent battery management system handles this automatically. However, if you experience unusual battery behavior, like inaccurate readings or sudden drops in charge, you can try this process:
- Fully Charge: Plug in your MacBook Pro and charge it to 100%.
- Use on Battery: Disconnect the charger and use your Mac until the battery drains and it shuts down.
- Rest: Leave your Mac off and unplugged for at least 5 hours.
- Recharge: Plug it back in and let it fully charge.
Optimizing Performance After Battery Replacement
A new battery should improve your MacBook Pro’s performance, but here are some additional tips for optimization:
- Update macOS: Ensure you have the latest macOS version for optimal battery management.
- Adjust Energy Saver Settings: Tailor the Energy Saver settings to your preferences. You can find them in System Settings > Battery.
- Check Activity Monitor: Use Activity Monitor to identify any apps consuming excessive power.
- Reset SMC: Resetting the System Management Controller (SMC) can resolve power-related issues. The process varies depending on your model.
- Calibrate Battery: If you’re still experiencing battery problems, try the calibration process mentioned above.


