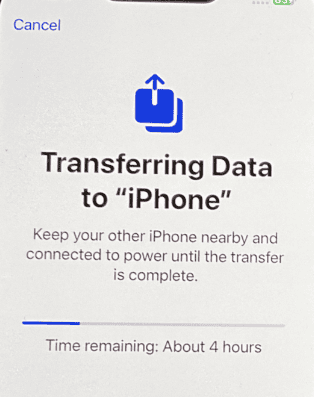
Transferring data to a new iPhone can be exciting, but it’s frustrating when the process gets stuck on “Time remaining: estimating.” This common issue affects many users upgrading their devices. To fix a stuck data transfer, try restarting both phones, ensuring stable Wi-Fi, or using alternative transfer methods like iCloud or a computer backup.
If you’ve been waiting for hours with no progress, don’t worry. There are several ways to get your transfer moving again. We’ll explore quick fixes and alternative methods to get your new iPhone up and running with all your data intact.
Let’s look at some options to resolve this issue and get your new iPhone set up quickly:
| Method | Pros | Cons |
|---|---|---|
| Restart both phones | Quick and easy | May lose transfer progress |
| Use iCloud backup | Works without direct connection | Requires internet and iCloud storage |
| iTunes/Finder backup | Reliable for large transfers | Needs a computer |
| Quick Start method | Fast when it works | Can get stuck on estimating |

Troubleshooting iPhone Data Transfers
Understanding iPhone Data Transfer
Transferring data to a new iPhone is designed to be a smooth process, allowing you to seamlessly move your apps, settings, and content. You have two primary options:
- iCloud Backup and Restore: This method backs up your old iPhone to iCloud and then restores that backup onto your new device.
- Direct Device-to-Device Transfer: This option uses either a wired connection or Bluetooth to transfer data directly from your old iPhone to your new one.
Why Transfers Get Stuck
While usually straightforward, data transfers can sometimes hit a snag. Here are common reasons why you might see “Time Remaining” stuck during the process:
- Network Connectivity: A slow or unstable Wi-Fi connection can significantly hinder iCloud restores.
- Backup Size: The amount of data being transferred plays a major role. Large backups (lots of photos, videos, and apps) naturally take longer.
- Software Glitches: Background software issues on either the old or new iPhone can interfere with the transfer.
- Low Battery: Ensure both iPhones have sufficient battery life, or keep them plugged in during the transfer.
Troubleshooting Stuck Transfers
If your iPhone data transfer is stuck on “Time Remaining,” try these steps:
- Patience is Key: Sometimes, the transfer is actually progressing, but slowly. If you see any indication of progress, even if it’s minimal, consider waiting a bit longer, especially if you have a large backup.
- Check Your Network: Ensure you’re connected to a reliable Wi-Fi network with a strong signal. Avoid using public Wi-Fi, which can be unpredictable.
- Restart Both iPhones: A simple restart can often resolve temporary software glitches.
- Check for iOS Updates: Make sure both iPhones are running the latest version of iOS.
- Pause and Resume: If you’re using a direct device-to-device transfer, try pausing and then resuming the process.
- Try a Different Transfer Method: If iCloud restore is stuck, try a direct device-to-device transfer, or vice versa.
- Restore as New: As a last resort, you can set up your new iPhone as a new device and then manually redownload apps and sync data from iCloud or other services.
| Issue | Solution |
|---|---|
| Slow Wi-Fi | Connect to a reliable Wi-Fi network with a strong signal. Avoid public Wi-Fi. |
| Large backup size | Be patient, as large backups take longer. Consider transferring overnight. |
| Software glitches | Restart both iPhones, check for iOS updates. |
| Transfer method issue | If iCloud restore is stuck, try a direct device-to-device transfer using a cable or Bluetooth, or vice versa. |
| Persistent issue | As a last resort, set up the new iPhone as new and manually redownload apps and sync data. Contact Apple Support if you suspect a more serious issue. |
Additional Tips for Smooth Transfers
- Free Up Space: If you’re using iCloud, make sure you have enough free iCloud storage space to accommodate your backup.
- Keep iPhones Close: During direct transfers, keep the devices close together to ensure a stable connection.
- Avoid Using Your iPhone: Don’t use either iPhone for other tasks during the transfer, as this can slow down the process.
By following these tips, you can troubleshoot stuck iPhone data transfers and get your new device up and running with all your important information.
After the Transfer
Once your data has been successfully transferred, take some time to:
- Verify Your Data: Make sure all your apps, photos, contacts, and other data have been transferred correctly.
- Organize Your Home Screen: Arrange your apps and create folders to keep your Home Screen tidy.
- Set Up Face ID or Touch ID: Secure your new iPhone with biometric authentication.
- Explore New Features: Take some time to familiarize yourself with any new features or changes in the latest iOS version.
Preparing Your Devices for Data Transfer
Before starting the data transfer process, it’s crucial to prepare both your old and new iPhones properly. This ensures a smooth transition and helps avoid common issues that can cause delays or errors.
Ensuring Compatibility and Requirements
Check that both iPhones are running the latest iOS version. Go to Settings > General > Software Update on each device. If updates are available, install them before proceeding.
Ensure you have a stable Wi-Fi connection. A strong internet connection is essential for a quick and uninterrupted transfer.
Charge both devices or keep them plugged in during the transfer. This prevents unexpected shutdowns due to low battery.
Free up space on your new iPhone if needed. You can check available storage in Settings > General > iPhone Storage.
| Requirement | Old iPhone | New iPhone |
|---|---|---|
| iOS Version | Latest | Latest |
| Battery | >50% or plugged in | >50% or plugged in |
| Wi-Fi | Connected | Connected |
| Storage | N/A | Sufficient |
Backing Up Your Old iPhone
Create a recent backup of your old iPhone to ensure all your data is ready for transfer. You have two main options: iCloud backup and iTunes backup.
For iCloud backup:
- Connect to Wi-Fi
- Go to Settings > [your name] > iCloud > iCloud Backup
- Tap “Back Up Now”
For iTunes backup:
- Connect your iPhone to your computer
- Open iTunes or Finder (macOS Catalina or later)
- Select your device and click “Back Up Now”
iCloud backups are convenient but may take longer. iTunes backups are faster but require a computer. Choose the method that works best for you.
Remember to keep your Apple ID and password handy. You’ll need them to sign in on your new iPhone and access your backups during the transfer process.
Using Quick Start for Device Setup
Quick Start simplifies transferring data to your new iPhone. This feature uses Bluetooth to connect devices and your Apple ID for authentication. Let’s explore how to initiate Quick Start and troubleshoot common issues.
Initiating Quick Start
To begin Quick Start, place your new iPhone near your old one. Make sure both devices have Bluetooth turned on. Your old iPhone will display a setup prompt. Tap “Continue” and scan the animation on the new iPhone with your old device’s camera.
Enter your current device’s passcode on the new iPhone. Follow the on-screen instructions to set up Face ID or Touch ID. Choose “Transfer from iPhone” when asked how you want to set up the new device.
Connect your new iPhone to Wi-Fi or cellular data. You may need to activate your mobile service. The transfer process will start automatically. Keep both devices close and plugged in during the transfer.
Troubleshooting Quick Start Issues
If Quick Start gets stuck on “Estimating Time Remaining,” try these steps:
- Restart both devices
- Ensure stable internet connection
- Check available storage on new iPhone
- Update both devices to latest iOS version
If problems persist, you have alternative options:
| Method | Requires Internet | Steps |
|---|---|---|
| iCloud Backup | Yes | 1. Back up old iPhone to iCloud 2. Restore new iPhone from backup |
| iTunes Backup | No | 1. Back up old iPhone to computer 2. Restore new iPhone from computer |
For iCloud backup issues, try signing out of your Apple ID on both devices and signing back in. If using iTunes, ensure you have the latest version installed on your computer.
Remember, Quick Start may take time for large data transfers. Be patient and keep devices connected to power sources throughout the process.
Restoring from iCloud Backup
Restoring your iPhone from an iCloud backup can be a straightforward process. But sometimes it may get stuck on “Estimating Time Remaining.” Let’s explore how to start the restoration and fix common issues.
Starting the Restoration Process
To begin restoring from an iCloud backup, go to Settings > General > Reset > Erase All Content and Settings. After your iPhone restarts, select “Restore from iCloud Backup” on the Apps & Data screen. Sign in to your Apple ID and choose the most recent backup.
Make sure you’re connected to a stable Wi-Fi network. The restoration speed depends on your internet connection and the size of your backup. Keep your iPhone plugged in during this process.
You’ll see an estimation of the time remaining as the restore progresses. This estimate may fluctuate based on network conditions and data size.
Resolving Restoration Hang-Ups
If your iPhone gets stuck on “Estimating Time Remaining,” try these fixes:
- Check your Wi-Fi connection
- Ensure you have enough iCloud storage
- Restart your iPhone
- Stop the restoration and start over
To stop the restoration:
- Go to Settings > Your Name > iCloud > iCloud Backup
- Tap “Stop Restoring iPhone”
- Confirm your choice
If problems persist, you might need to erase your iPhone and start the process again. As a last resort, contact Apple Support for further assistance.
| Common Issues | Quick Fixes |
|---|---|
| Stuck on “Estimating Time” | Restart iPhone |
| Slow Restore | Check Wi-Fi speed |
| Not Enough Space | Free up iCloud storage |
| Failed Restore | Erase and try again |
Transferring Data via iTunes Backup
iTunes backup offers a reliable method to transfer data from your old iPhone to a new one. This process involves creating a backup on your computer and then restoring it to your new device.
Creating an iTunes Backup
To create an iTunes backup, connect your old iPhone to your computer using a USB cable. Open iTunes and select your device. Click “Back Up Now” under the Backups section. This will save a complete copy of your iPhone’s data to your computer.
Ensure you have enough free space on your computer for the backup. The process may take several minutes depending on the amount of data. Do not disconnect your iPhone during this time.
iTunes encrypts backups by default for added security. You can choose to encrypt your backup manually by selecting “Encrypt iPhone backup” and setting a password.
Restoring iPhone from iTunes Backup
After creating your backup, disconnect your old iPhone and connect your new one to the computer. iTunes should detect the new device automatically. If not, select it manually.
Choose “Restore Backup” in iTunes. Select the most recent backup of your old iPhone from the list. Click “Restore” and wait for the process to complete.
Your new iPhone will restart once the restore is finished. Keep it connected to iTunes until the sync is complete. This ensures all your apps and data transfer successfully.
| Backup Method | Pros | Cons |
|---|---|---|
| iTunes Backup | Works offline, Faster than iCloud | Requires computer, Limited by computer storage |
| iCloud Backup | Wireless, Automatic | Requires Wi-Fi, Limited by iCloud storage |
Remember to update your new iPhone to the latest iOS version before restoring. This prevents compatibility issues during the transfer process.
Frequently Asked Questions
Data transfer issues when setting up a new iPhone can be frustrating. These common questions address key troubleshooting steps and solutions for stuck transfers.
What steps can be taken if an iPhone is stuck on the ‘transferring data’ screen?
If your iPhone is stuck, try these steps:
- Wait a bit longer. Transfers can take hours for large data amounts.
- Ensure both devices have enough battery and stay connected to power.
- Check your Wi-Fi connection is stable.
- Restart both iPhones if the transfer remains stuck.
How can the ‘time remaining estimating’ issue be resolved when transferring data to a new iPhone?
To fix the estimating time issue:
- Toggle airplane mode on and off on both devices.
- Verify date and time settings are correct and set to automatic.
- Update both iPhones to the latest iOS version.
- Try a wired transfer using a Lightning to USB cable if wireless fails.
Why does the ‘Move to iOS’ app sometimes get stuck on estimating time remaining during data transfer?
The ‘Move to iOS’ app may get stuck due to:
- Unstable Wi-Fi connection between devices
- Incompatible Android OS version
- Insufficient storage on the new iPhone
- Large amounts of data causing extended processing time
Ensure your Android device is up-to-date and connected to a strong Wi-Fi network.
What are common troubleshooting methods for data transfer delays to a new iPhone?
Try these troubleshooting methods:
- Restart both devices
- Reset network settings on the old iPhone
- Perform the transfer in a different location
- Remove the case from both phones to improve connectivity
- Use a computer to backup and restore instead of direct transfer
Is there a way to reset a stalled iPhone data transfer without losing progress?
You can try to reset a stalled transfer:
- On the old iPhone, tap “Stop Transfer” if prompted
- Restart the transfer process from the beginning
- If unsuccessful, backup to iCloud and restore to the new iPhone
Note that stopping mid-transfer may result in partial data loss.
Why might an iPhone data transfer from an Android device be stuck on ‘time remaining: estimating’?
Android to iPhone transfers may stall due to:
- Incompatible file formats
- Large media libraries
- Outdated ‘Move to iOS’ app
- Interference from Android security software
Update the ‘Move to iOS’ app and temporarily disable any antivirus on your Android device.
| Issue | Quick Fix |
|---|---|
| Stuck on ‘estimating’ | Toggle airplane mode |
| Transfer won’t start | Restart both devices |
| Slow transfer | Use wired connection |
| Partial data transfer | Backup to iCloud instead |


