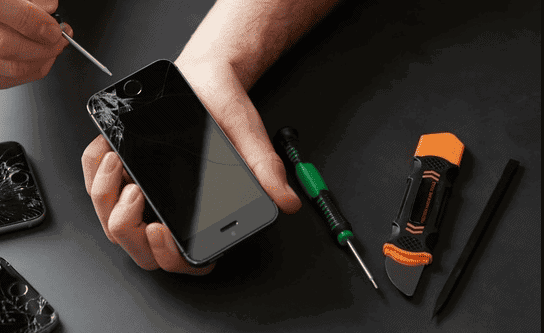
Replacing an iPhone screen can seem like a daunting task, but with the right tools and instructions, it’s possible to do it yourself. It’s a detailed process that requires careful handling and precision. Whether it’s due to a drop or just wear and tear, iPhone users will face a time when the screen needs to be fixed. Choosing a DIY approach can be cost-effective and fulfilling, but it’s not without risks, such as potentially voiding warranties or causing further damage to the phone.
Before taking on this repair, it’s imperative to have the necessary tools and a clean, organized workspace. This helps ensure the safety of the device’s intricate components. For those not comfortable with a self-repair, seeking an Apple Authorized Service Provider or visiting an Apple Store for screen replacement is advisable. They can provide professional services, often with a guarantee of quality and preservation of the device warranty.
Tools and Parts You’ll Need for iPhone Screen Replacement
Before diving into the actual replacement process, it’s crucial to have the right tools and parts at your disposal. While some generic components might work, using genuine parts ensures full compatibility—especially for features like Face ID, True Tone, and touch sensitivity, which can stop functioning with non-authorized replacements.
Essential Tools:
- Pentalobe screwdriver (for iPhone bottom screws)
- Tri-point or Phillips screwdriver (varies by model)
- Plastic opening picks
- Suction handle or screen removal suction cup
- Spudger and tweezers
- Plastic card or guitar pick (for prying)
- ESD-safe gloves or wrist strap (for grounding)
- Heat source (iOpener, heat gun, or hair dryer)
Parts Needed:
- Replacement screen (preferably OEM or Apple-certified)
- Adhesive strips or sealant for reassembly
- New waterproof gasket (if your iPhone is IP-rated)
If you’re replacing the screen through Apple’s official Self Service Repair Program, you’ll also receive a calibration tool that ensures your new screen is recognized by the iPhone’s firmware. This is especially helpful for newer models where part authentication is tied to software integrity.
Step-by-Step Guide to Replacing an iPhone Screen
Step 1: Power Down and Prepare
Begin by powering off your iPhone completely. This reduces the risk of shorting the board or damaging internal components. If possible, let the phone’s battery drain below 25% to minimize the chance of combustion during disassembly.
Step 2: Remove the Pentalobe Screws
Locate the two screws flanking the Lightning port at the bottom edge of your phone. Use a pentalobe screwdriver to remove them. These are your first barrier to entry and need to be stored safely.
Step 3: Soften the Adhesive
Use a heat source—preferably a heat pad or hair dryer—to warm the edges of the screen. This loosens the adhesive that seals the display, making the separation process smoother and less risky.
Step 4: Open the Device Carefully
Place a suction cup just above the home button (or center-bottom if your model doesn’t have one). Gently pull while inserting a plastic pick at the corner to wedge open a gap. Work your way around the edges, being cautious not to push in too far and damage internal flex cables.
Step 5: Disconnect the Battery
Before removing the screen entirely, disconnect the battery to prevent any power from flowing while you’re detaching connectors. Remove the metal shields covering the connectors, then carefully disconnect the battery using a spudger.
Step 6: Detach Display Flex Cables
Your screen is connected via multiple ribbon cables—usually for the display, digitizer, and front camera sensors. Disconnect these methodically. Some models have up to five connectors stacked tightly. Once detached, you can remove the screen completely.
Step 7: Transfer Components (If Required)
If your new screen doesn’t come pre-installed with parts like the earpiece speaker, front sensor array, or home button, you’ll need to carefully transfer them from the old screen. This is the trickiest part—especially for Face ID, which won’t function if damaged or misaligned.
Step 8: Reconnect and Reassemble
Connect the new screen’s flex cables to the motherboard, making sure each connector clicks into place. Reinstall the battery connector last. Reattach the protective shields and test the display for functionality before sealing it shut.
Step 9: Reseal the Phone
Apply a new adhesive seal (especially if waterproofing is a concern) and gently press the screen back into place. Secure the pentalobe screws and power the phone on. Check for dead spots, camera alignment, and any error messages.
Software Configuration and Calibration
On newer iPhones running iOS 18 and above, a post-repair calibration process is initiated via a built-in “Repair Assistant.” This tool helps the phone verify the authenticity of the new part and recalibrates the display to restore features like brightness control, Face ID, and color profiles. You’ll be guided through these steps during startup if required.
Skipping this process can result in permanent alerts, non-functional Face ID, or uncalibrated color tones—especially when using third-party screens. Using Apple’s official program or a certified repair shop ensures a smoother integration.
Important Considerations Before You Start
1. Your Warranty May Be Voided
If your iPhone is under warranty or covered by AppleCare+, attempting a DIY screen replacement may void that coverage. Apple can usually detect third-party repairs, even if they use genuine parts.
2. Face ID and Touch ID May Break
Both biometric systems are uniquely tied to the logic board. Damaging the cables or transplanting them incorrectly will disable Face ID or Touch ID permanently. Use extreme caution or avoid replacing the screen if you’re unsure.
3. Water Resistance Is Compromised
Once opened, your iPhone’s factory waterproofing is no longer guaranteed. Even with new adhesive seals, the original IP rating is hard to restore. If you live in a humid or rainy environment, weigh this risk seriously.
4. Tools Matter
Using cheap or incorrect tools can strip screws, puncture the battery, or tear connectors. Investing in a decent kit or renting one from Apple’s repair program (which includes torque-calibrated screwdrivers) can make all the difference.
Should You Replace the Screen Yourself?
If you’re tech-savvy, comfortable with delicate electronics, and understand the risks, replacing your iPhone screen yourself can save time and money. However, it’s not a task for everyone. Small mistakes can lead to expensive consequences—especially with newer models that are packed tighter than ever.
For most users, having the screen replaced by Apple or an authorized repair center remains the safest route. But for those who love to tinker or simply want to extend the life of their device, this guide gives you the most complete, up-to-date roadmap to success.
Key Takeaways
- Screen replacement is a meticulous process that can be self-managed or professionally serviced.
- A clean, organized workspace and the right tools are crucial for a successful DIY repair.
- Professional repair options are available for those seeking guaranteed quality and warranty preservation.
Preparing for the Replacement
When fixing an iPhone screen, it’s crucial to have the right tools and know the parts involved. This prep work helps to avoid damage and ensures a smooth repair process.
Gathering Necessary Tools
For a successful iPhone screen replacement, gather the following items:
- P2 Pentalobe Screwdriver: To remove the pentalobe screws securing the iPhone case.
- iOpener or Heat Gun: To soften the adhesive holding the screen.
- Suction Cup: Assists in lifting the screen from the frame.
- Opening Picks: To slide through and cut the adhesive that secures the screen.
- Spudger: For disconnecting connectors and prying components carefully.
- Tweezers: To handle small components like screws and ribbon cables.
- Phillips Screwdriver: For screws other than pentalobe.
- Y000 Screwdriver: Specifically for tri-point screws found in some iPhone models.
- Replacement Adhesive: To reseal the screen to the frame, maintaining the waterproof seals.
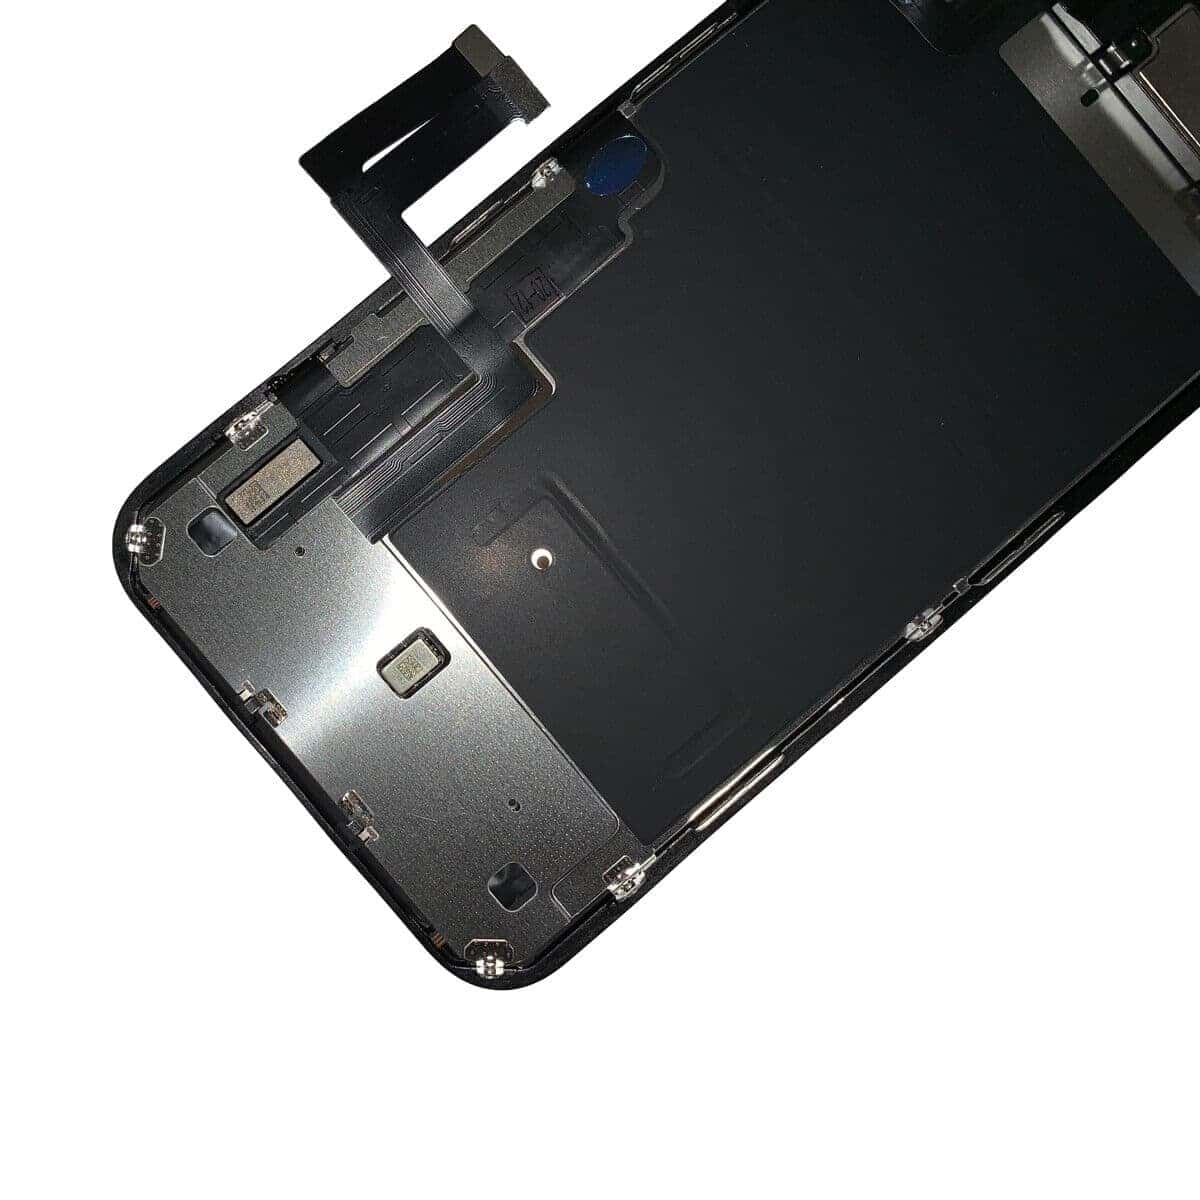
Understanding iPhone Parts
The iPhone’s screen has several parts that connect to the rest of the phone:
- Ribbon Cables and Connectors: Handle these fragile parts with care when disconnecting the screen.
- Home Button: Older models include a Home button that often needs transferring to the new screen.
- Camera and Sensor: The front-facing camera and sensors must be moved to the new screen.
- Earpiece Speaker: Located at the top of the screen assembly and connected by flex cables.
- Proximity Sensor and Flood Illuminator: Part of the Face ID and ambient light sensor system, careful removal is necessary.
- Digitizer and Front Panel Sensor Assembly Connector: These handle touch input and need meticulous realignment when reassembling.
These procedures must protect sensitive components like the logic board and front-facing camera. By understanding what each part does and where it is located, one can approach the iPhone screen replacement with confidence.
Executing the Screen Replacement
Replacing an iPhone screen requires careful handling and attention to detail. It involves removing the broken screen, installing a new one, and making sure the device functions as expected after reassembly. Use only genuine Apple parts for a reliable fix.
Removing the Broken Screen
Power off the iPhone and remove the two pentalobe screws at the bottom edge. Use a suction cup to gently lift the screen while you pry the frame open with a plastic tool. Handle the cracked screen with care to avoid injury or further damage. If the broken glass is loose, cover it with clear packing tape before lifting.
Installing the New Screen
Prepare the replacement part and transfer any necessary components from the old screen to the new one. Align the new screen onto the iPhone body, making sure not to trap any dust or debris between the layers. Connect the cables from the new screen to the motherboard with precision.
Reassembling the iPhone
Once the new screen is in place, secure it with the screws you removed earlier. Tighten these screws evenly to avoid putting undue stress on the new screen. Replace any other components you may have moved during disassembly.
Testing the New Display
Before sealing the iPhone, test the new display to ensure it responds to touch and displays images without issue. Check the resolution, brightness, and colors on your new screen to confirm they meet standards. If the screen works well, finish securing it to the frame.