Taking a screenshot on an iPhone is a simple yet essential task for capturing the contents of your screen at a moment in time. Whether you need to save an important message, share a high score from a game, or preserve information for later use, screenshots are a quick and easy way to do this. With just a couple of button presses, users can capture whatever is displayed on their iPhone’s screen.
Before capturing a screenshot, make sure the information you need is visible on the screen. The process of taking a screenshot varies slightly depending on the model of the iPhone, but in general, it involves pressing a combination of physical buttons on the device. iPhones with Face ID require the side button and the volume up button to be pressed together, while models with a Home button use the Home button and the side or top button.
After taking a screenshot, a thumbnail preview appears temporarily in the corner of the screen, giving users the option to edit or share it immediately. Users can draw, add text, crop, and apply other edits through this preview. Once editing is complete or if no edits are needed, the screenshot can be saved to the Photos app or shared through various apps.
How to Take a Screenshot on Any iPhone
Capturing your iPhone screen can be useful for a variety of reasons—saving messages, grabbing receipts, sharing social media moments, or troubleshooting. Apple has made the process simple, but the exact method varies depending on your device model. Below is a complete step-by-step guide for every type of iPhone currently in use, from the latest models to older generations. We’ll also cover alternative screenshot methods, how to find and edit them, and a few pro tips that can make your workflow even smoother.
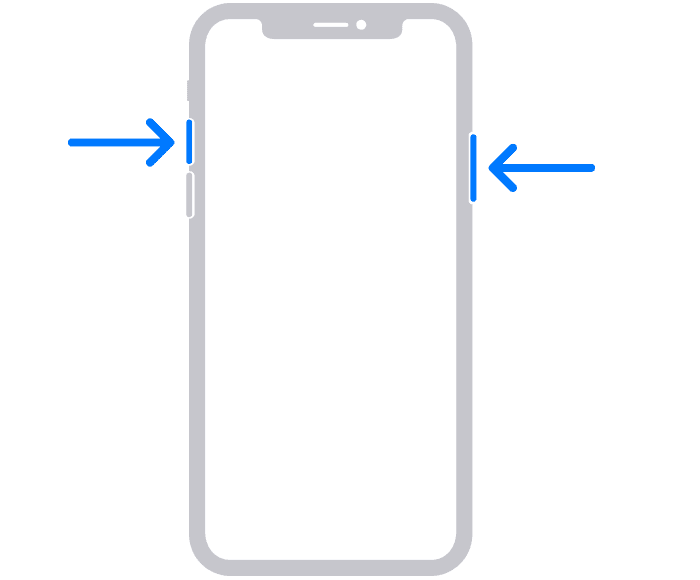
📱 For iPhones with Face ID (iPhone X and newer)
Buttons to Use:
- Side Button (right side)
- Volume Up Button (left side)
How to Take a Screenshot:
- Hold your phone naturally in one hand.
- Quickly press and release both the Side and Volume Up buttons at the same time.
You’ll see a quick white flash on your screen and hear a shutter sound (unless your device is muted). A thumbnail preview of the screenshot will appear in the bottom-left corner. You can tap it to edit or markup the image right away, or swipe it away to save it directly.
Pro Tip:
Don’t hold the buttons too long—this might trigger Emergency SOS or the power-off screen.
🔘 For iPhones with Touch ID and Side Button (iPhone 6, 7, 8, and SE 2nd/3rd Gen)
Buttons to Use:
- Home Button (front bottom)
- Side Button (right side)
How to Take a Screenshot:
- Quickly press and release the Home and Side buttons at the same time.
You’ll see the same flash and thumbnail behavior as the newer iPhones. Editing options follow the same flow too.
📏 For iPhones with Touch ID and Top Button (iPhone 5s, SE 1st Gen, and earlier)
Buttons to Use:
- Home Button (front bottom)
- Top Button (top edge)
How to Take a Screenshot:
- Press and quickly release the Top and Home buttons together.
Even on older iPhones, the process remains intuitive. The screenshot still saves to your Photos app, and you’ll get the same editing options.
🛠️ Alternative Ways to Take Screenshots on iPhone
If you prefer not to use physical buttons or they’re not functioning properly, Apple has included a few clever accessibility features that let you capture your screen just as easily.
1. AssistiveTouch Method
- Go to Settings > Accessibility > Touch > AssistiveTouch and turn it on.
- Tap the floating on-screen AssistiveTouch button.
- Go to Device > More > Screenshot to capture the screen.
You can also customize the menu so that “Screenshot” appears as a top-level option or assign it to a double-tap gesture for even quicker access.
2. Back Tap (iOS 14 and later)
- Head to Settings > Accessibility > Touch > Back Tap.
- Select either Double Tap or Triple Tap.
- Choose Screenshot from the action list.
Now, simply tapping the back of your phone two or three times will instantly snap a screenshot. It’s one of the most underrated features in iOS and a fantastic shortcut for power users.
🖼️ Where to Find Your Screenshots
All screenshots are automatically saved in your Photos app. Here’s how to find them:
- Open the Photos app.
- Tap the Albums tab at the bottom.
- Scroll down to the Media Types section and tap Screenshots.
This folder keeps all your captured images in one place, making it easy to review, organize, or share them later.
✏️ Editing and Marking Up Screenshots
Tapping the screenshot thumbnail immediately after taking it opens the editing interface. Here, you can:
- Crop the image
- Add shapes, text, or your signature
- Use the magnifier to highlight parts of the image
- Share via AirDrop, Messages, Mail, or social apps
If you dismiss the thumbnail, you can always go back into Photos, tap a screenshot, and choose Edit to adjust it later.
🧠 Pro Tips to Maximize Your Screenshot Workflow
- Record Screen Instead: If you need to capture more than just a still image, consider screen recording from the Control Center.
- Use Focused Screenshots: Apps like Safari support “Full Page” screenshots when you capture a webpage—tap the thumbnail and switch from “Screen” to “Full Page.”
- Organize with Tags: In the Notes app, you can paste screenshots into notes and add hashtags to make them searchable later.
- Offload with iCloud: Keep your local storage free by syncing screenshots with iCloud and managing them from your Mac or iPad.
🔚 Wrapping It Up
Whether you’re using the latest iPhone 15 Pro Max or still rocking a classic iPhone SE, capturing your screen is just a quick button press or gesture away. With AssistiveTouch and Back Tap, even accessibility-conscious users or those with hardware issues can take screenshots effortlessly. The built-in editing tools and easy access via the Photos app make iPhones some of the most user-friendly devices for sharing what’s on your screen.
Key Takeaways
- Screenshots on an iPhone can capture any displayed content
- Ready the screen before pressing the button combination specific to your iPhone model
- Edit, save, or share screenshots right after they are taken
Preparing to Take a Screenshot on iPhone
Before taking a screenshot, it’s important to know which buttons to use. iPhone models vary, so the button combination depends on whether your iPhone has a Home button or not.
Identifying the Necessary Buttons
To take a screenshot on an iPhone with Face ID, users should press and release the side button and the volume up button simultaneously. For iPhones with a Home button and Touch ID, pressing the Home button and the side button together is the method. It’s crucial to quickly release both buttons to ensure the screen captures.
Understanding Different iPhone Models
Recent iPhone models, like the iPhone 12, iPhone 14, and the forthcoming iPhone 15, lack a Home button and use Face ID. For these, the screenshot function requires the use of the side and volume up buttons. Older models with a Home button, such as the iPhone 8 or earlier, require a different approach using the side and Home buttons. Users may also enable AssistiveTouch within the accessibility settings for a touch-based screenshot option, which adds an on-screen button to take screenshots without physical buttons.
Capturing, Editing, and Managing Screenshots
This section teaches iPhone users how to capture screenshots, personalize them with edits, and keep them organized. iPhone makes these tasks easy, so you can share your moments quickly and keep your media organized.
Taking a Screenshot
To take a screenshot on an iPhone, users should press two buttons at the same time. If they have an iPhone with a Home button, they press the Home button and the Sleep/Wake button together. On newer models without a Home button, users press the Side button and the Volume Up button instead. The screen flashes white, and the camera shutter sound signals that you’ve taken a picture of the entire screen.
Editing and Annotating
Once the screenshot is captured, a thumbnail appears temporarily in the bottom left corner. Tapping this picture quickly lets users edit their new screenshot. They can crop the image to focus on what matters most. Then they use Markup to draw or write on the screenshot with various tools. iPhone’s edit and Markup features offer powerful ways to highlight or draw attention to what users want to share.
Organizing and Sharing Screenshots
After editing, screenshots automatically save to the Photos app. Users can find all screenshots in the Screenshots album. This makes it easy to locate them later. Users can also share these screenshots using the share feature. They can send it via email, Airdrop, or add it to iCloud Drive by choosing the option from the share menu. This simplicity keeps things tidy and sharing straightforward. With the Files app, users can even manage screenshots alongside their other documents, offering accessibility and convenience in one place.

