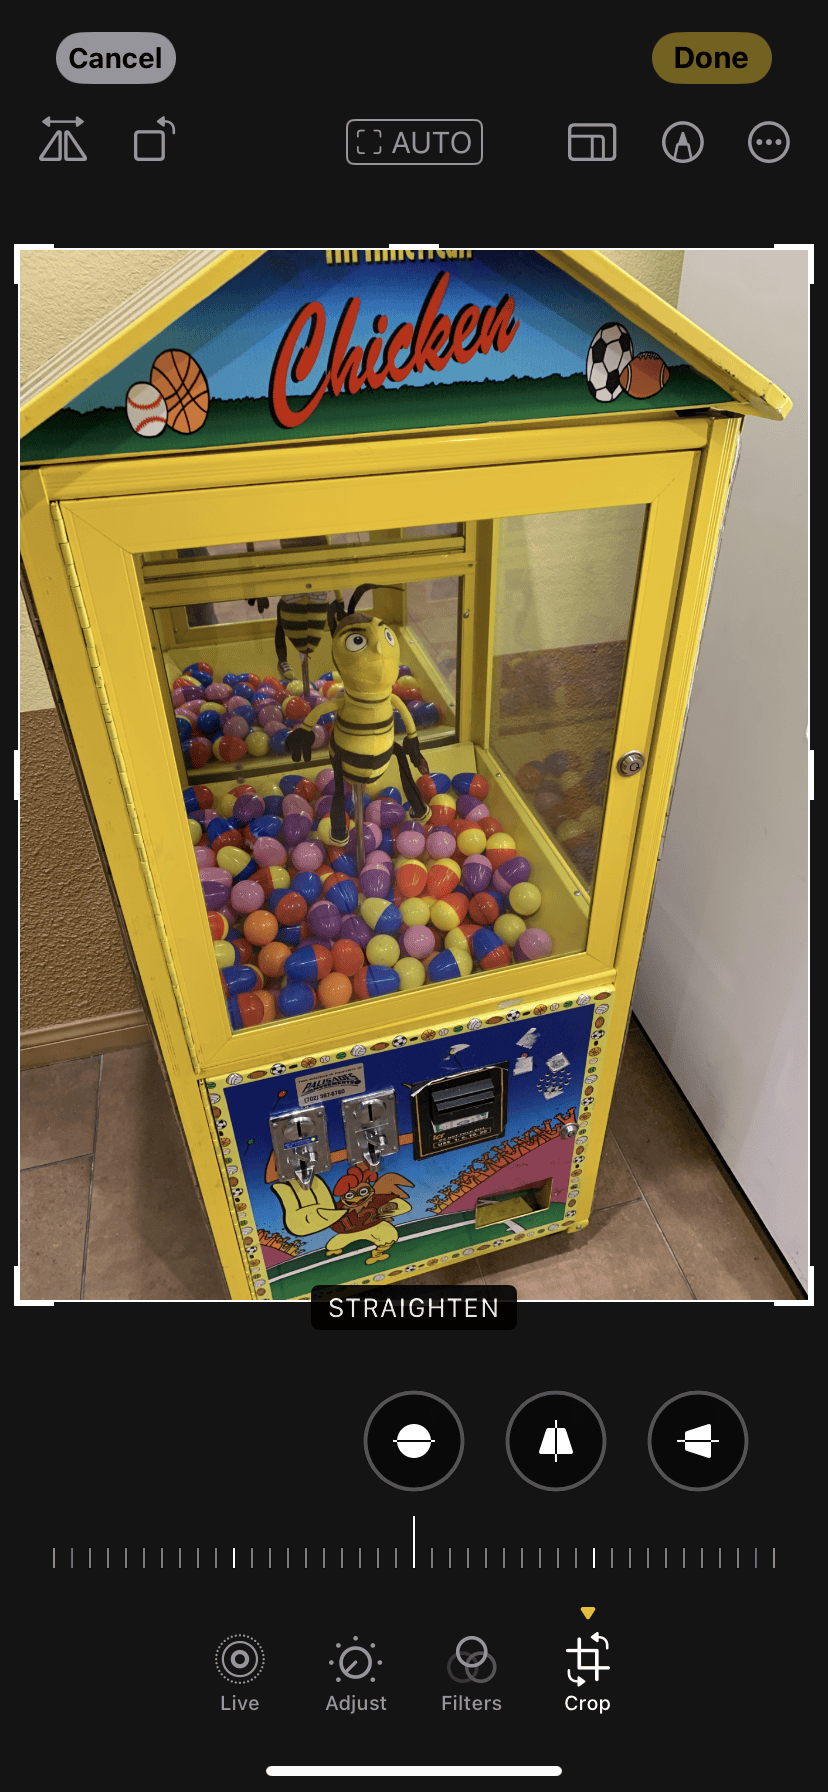
Taking a photo that’s slightly crooked can ruin the image’s overall effect. Often, straightening the horizon or adjusting the angles of the subject is all it takes to make the photo look right. Luckily, the Photos app on your iPhone has built-in editing tools that make correcting these issues a simple and straightforward task. Straightening photos is an essential skill for iPhone photography, allowing users to improve their pictures with just a few taps.
This feature is part of Apple’s iOS and is available on all recent iPhones, so you can edit and enhance your images on the go, no matter where you are. Editing photos on iPhones is a useful skill that enhances the visual appeal of your pictures. The process involves selecting a photo from your library, tapping ‘Edit,’ and using the crop tool to access straightening controls. The adjustment is done by moving a dial, instantly modifying the photo’s angle. This feature is especially beneficial as it does not reduce the quality of the image, ensuring your memories remain in their best form. With these tools, users have the flexibility to refine their photos, whether they’re capturing life’s daily moments or taking professional shots.

Get Perfectly Straight Photos with Your iPhone
Crooked pictures are the bane of every smartphone photographer. Thankfully, there’s an easy fix built right into your iPhone’s Photos app! Here’s how to straighten photos and get those horizons looking perfect.
Using the Photos App to Straighten Images
- Open the Photo: Go into your Photos app and find the crooked photo you want to edit. Tap on it to open it in full-screen view.
- Tap the Edit Button: In the bottom right corner, look for the “Edit” button and tap it.
- Find the Crop Tool: At the bottom of the screen, select the “Crop” tool (it looks like a square with two corner arrows).
- Adjust the Angle: Several editing tools will appear. You can either:
- Manual Adjustment: Drag the slider along the semi-circle below your photo to adjust the angle manually.
- Automatic Straightening: Tap the “Auto” button at the top corner of the crop tool. Your iPhone will often automatically straighten the photo for you.
Additional Tips:
- Check the Grid: While editing, a grid will appear over your image. Use the gridlines as a visual guide to help you make accurate adjustments.
- Zoom In: Zoom in on your image to make sure the lines are truly straight.
- Reset Your Changes: Tap the “Reset” button if you want to start over.
Other Photo Editing Apps for Straightening
For even more control over image straightening, try these third-party photo editing apps:
| App Name | Features |
|---|---|
| Snapseed (Free) | Advanced editing tools with a more precise rotation tool. |
| Adobe Lightroom (Subscription) | Professional-grade photo editing with extensive features. |
| VSCO (Free with Subscription Options) | Aesthetic filters and image rotation among its many features. |
Key Takeaways
- Straightening photos on an iPhone is a simple process using the Photos app.
- The editing tools for photo straightening are built into iOS, so no additional apps are needed.
- Users can quickly adjust photo angles with a swipe, enhancing the picture’s overall look.
Mastering the Basics of Photo Straightening on iPhone
Knowing how to straighten your photos can take your photography skills to the next level. This section will guide you through the simple steps using the Photos app so you can enhance the overall look of your images with ease.
Using the Photos App to Straighten Images
First, select the Photos app on your iPhone and pick the image you would like to adjust from your album or all photos. Go into edit mode by tapping Edit in the top right corner. Here, you’ll find various editing tools. Tap the Crop icon, usually located at the bottom of the screen. You’ll see a dial under the photo when you choose this tool. Swipe your finger on the Straighten dial to rotate the image. You can adjust the image by degrees until the horizon looks level.
- Open the Photos app
- Choose an image to edit
- Tap Edit, then the Crop icon
- Use the Straighten dial to rotate the image
Adjusting Perspectives and Aspect Ratios
Sometimes an image may need more than straightening. It might also need changes in perspective or aspect ratio. In the same editing menu where you found the straighten tool, look for perspective tools. These allow you to adjust the photo’s orientation in a three-dimensional space to fix any distortion.
To change the aspect ratio, tap the aspect ratio button next to the straighten dial. Several preset options like square, 4:3, and others will appear. Tap one to adjust the shape of your photo. Remember, you can always hit the reset button to start over or the revert to original option to discard all changes if things don’t look right.
Here’s a simple step-by-step:
- Tap the aspect ratio button for shape options
- Select a ratio that fits your image
- Use perspective tools to correct distortion
- Use the reset button as needed or revert to original to undo changes
By following these straightforward steps, you can fix any photo’s orientation or shape, making sure every memory you capture looks its best.


