Capturing the content of your iPhone screen can be helpful in various situations. Whether you’re saving a recipe, preserving evidence of a high score in a game, or sharing an interesting conversation, knowing how to take a screenshot is useful. The process of taking a screenshot on an iPhone is quick and easy, although it varies slightly depending on your specific iPhone model. Once you’ve taken a screenshot, the iPhone makes it simple to edit, organize, and share your images. Screenshots are automatically saved in the Photos app, where you can find them in the Screenshots album or the All Photos section of your library. From there, you can crop, annotate, or delete them as needed. If you want to share a screenshot, the iPhone’s share feature is integrated into the Photos app, making it easy to send your screenshots to other apps or people.
Capturing Moments: Your Guide to iPhone Screenshots
Taking a screenshot on your iPhone is easy, whether you want to save a funny meme, a recipe, or an important message. It’s a handy tool for capturing and sharing information.
Quick and Easy Methods
With just a couple of button presses, you can grab a screenshot in no time:
For iPhones with Face ID (iPhone X and newer):

- Press the Side button and Volume Up button at the same time.
- Quickly release both buttons. You’ll see a flash and hear a shutter sound (if your sound is on).
For iPhones with a Home button (iPhone 8 and older):
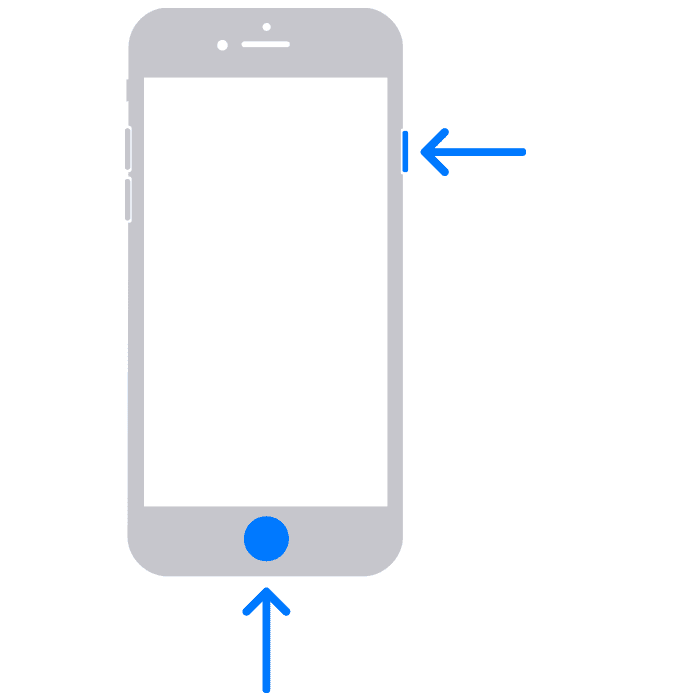
- Press the Side (or Top) button and the Home button at the same time.
- Quickly release both buttons. You’ll get the same visual and audio cues.
| iPhone Model | Button Combination |
|---|---|
| iPhone X and newer (Face ID) | Side button + Volume Up button |
| iPhone 8 and older (Home button) | Side (or Top) button + Home button |
Finding Your Screenshot
After you take the screenshot, a small thumbnail will appear in the lower-left corner of your screen. You can:
- Tap the thumbnail: This opens a preview where you can edit, crop, or share the screenshot.
- Swipe the thumbnail left: This dismisses the preview and saves the screenshot to your Photos app.
- Do nothing: The screenshot will automatically save to your Photos app.
Alternative Ways to Take a Screenshot
If the button combinations are tricky for you, there are other options:
- AssistiveTouch: This accessibility feature lets you create a custom button for taking screenshots (and other actions).
- Voice commands: If you have “Hey Siri” enabled, you can say “Hey Siri, take a screenshot” to capture the screen.
Editing and Sharing
Once you’ve taken your screenshot, you can edit it with the Markup tools in the preview. Add text, drawings, or shapes to personalize it. Then, share it directly from the preview through messages, email, or social media.
Key Takeaways
- Taking a screenshot on an iPhone is a quick process that varies by model.
- The Photos app automatically stores screenshots for editing and organizing.
- Sharing screenshots from an iPhone can be done directly from the Photos app.
Capturing Screenshots on Different iPhone Models
Taking a screenshot on an iPhone is a straightforward process that can be accomplished with the press of a button or the use of gestures. Depending on the model, the steps slightly differ.
Using Buttons on Classic Models
iPhone models with a Home button use a simple button press. For iPhone 8, iPhone SE, and earlier models:
- Press the Side (or Top) button and the Home button simultaneously.
- Release both buttons quickly to capture the screen.
This method uses the physical Touch ID sensor incorporated in the Home button.
Utilizing Gestures on Modern iPhones
iPhone X and later models, which have Face ID, do not have a Home button. To take a screenshot, you should:
- Press the Side button and the Volume Up button at the same time.
- Quickly let go of both buttons to snap the screenshot.
This includes the iPhone XR, iPhone 11 series, iPhone 12 series, iPhone 13 series, and the anticipated iPhone 14 and iPhone 15 models.
Accessibility and Assistive Features
Accessibility features offer alternative ways to take screenshots. AssistiveTouch allows you to take a screenshot with an on-screen menu. To enable it:
- Go to Settings > Accessibility > Touch > AssistiveTouch and turn it on.
- Tap the AssistiveTouch button.
- Select Screenshot from the menu.
Back Tap, another accessibility feature, lets users take screenshots with a double or triple tap on the back of the iPhone, starting with iPhone 8 and later models. It must be set up in Accessibility settings under Touch.
These methods are helpful for users who need or prefer an alternative to hardware buttons.
Editing, Organizing, and Sharing Screenshots
Capturing a screenshot on your iPhone can be effortless, but Apple goes beyond just taking the image. The real power lies in the immediate editing and sharing options, ways to organize screenshots in the Photos app, and the advanced editing features available at every user’s fingertips.
Immediate Editing and Sharing Options
Once you capture a screenshot, a thumbnail temporarily appears in the lower-left corner. Tapping it enters a preview mode where you can quickly annotate or crop the image. For immediate sharing, press and hold this thumbnail to bring up the share menu. You can then send the screenshot via AirDrop, Mail, iCloud, and more.
Organizing Screenshots in Photos App
The Photos app is where all your screenshots live. You can create an album specifically for screenshots to keep them separate from other images. Within the album, you can delete unwanted shots or sort them, thus keeping your screenshots neat and readily accessible.
Advanced Editing Features and Tips
For more detailed editing, open the screenshot in the Photos app and select edit mode. Here, you can rotate images, apply filters, and even add a signature. For iPhone users browsing in Safari, there’s an option to take a full-page screenshot that can be saved as a PDF and stored in iCloud or the Files app. It’s important to know that screenshots are saved as PNG files, which preserve the quality of the original image.