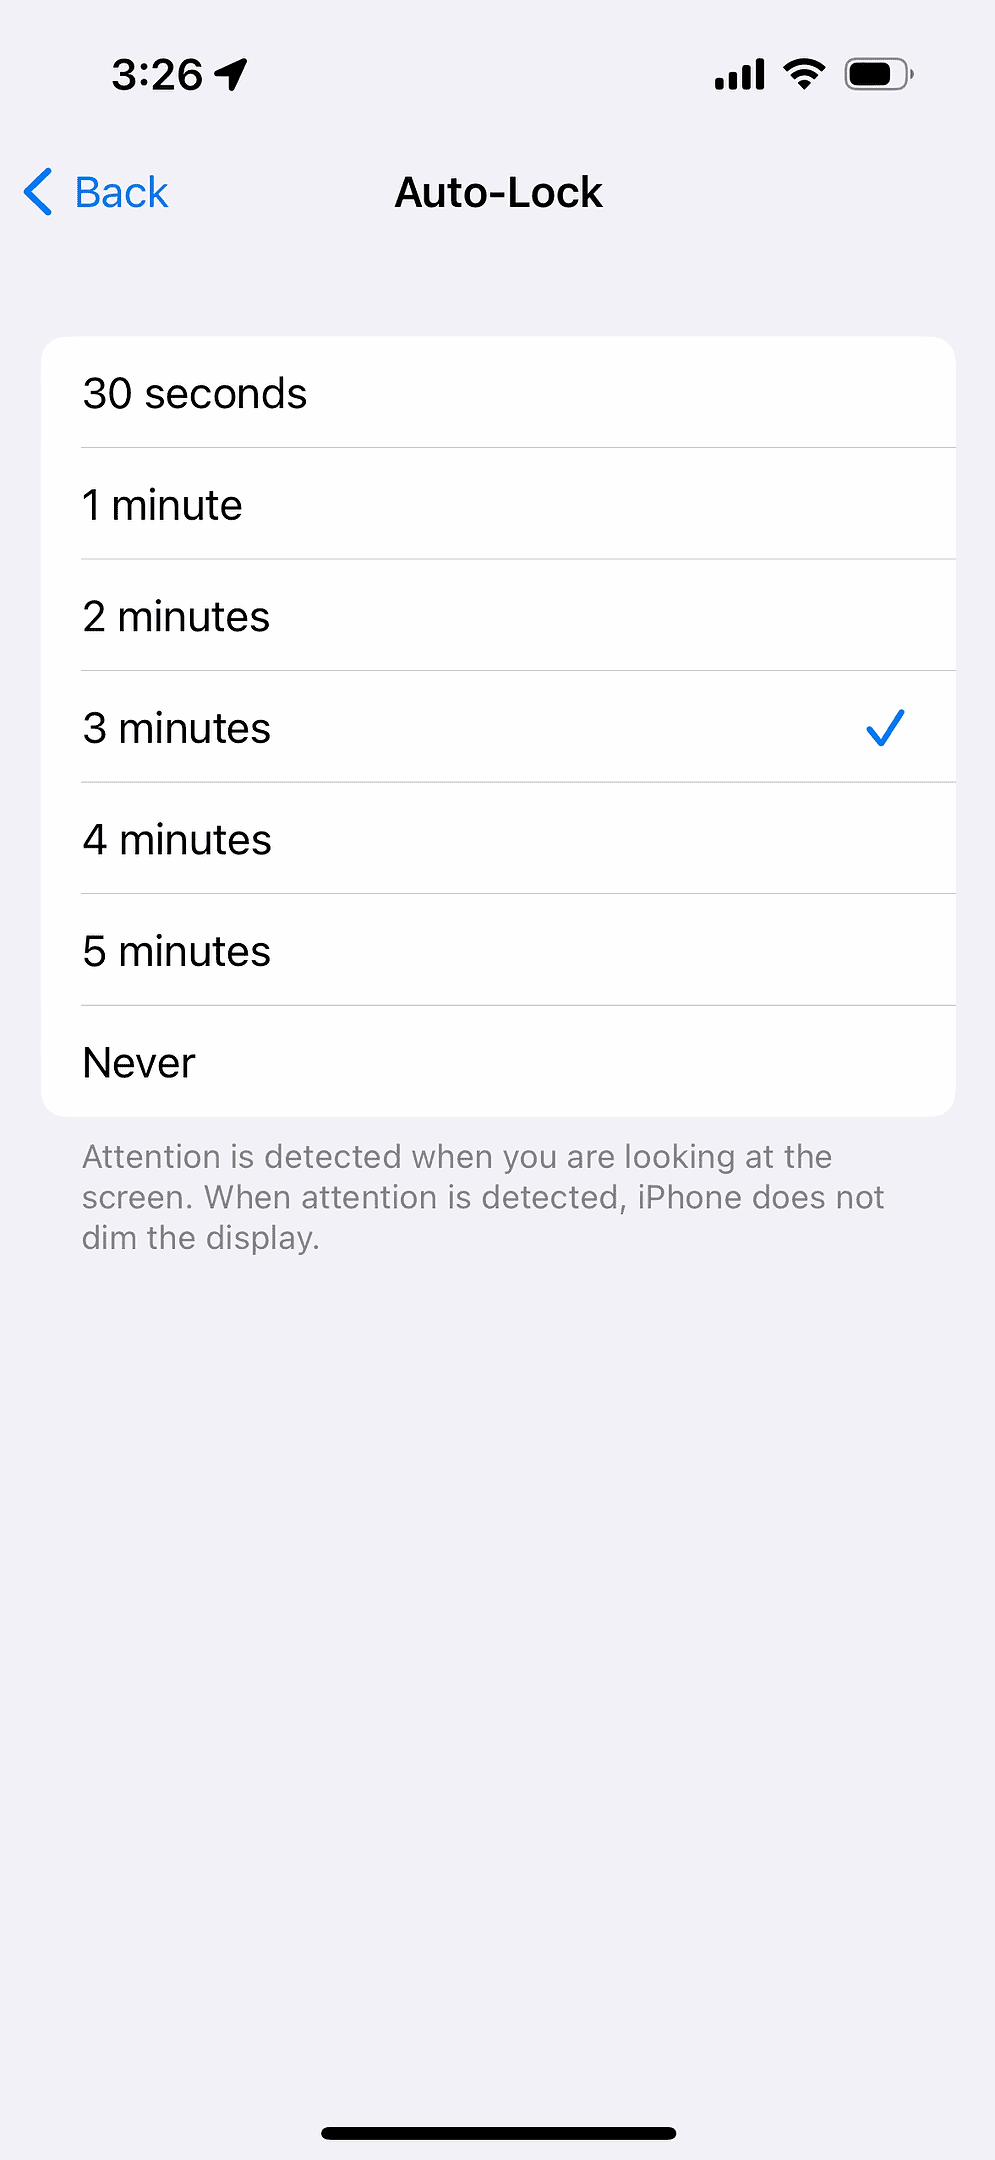
Choosing the right Auto-Lock time is a balance between convenience and battery life. Experiment with different options to find what works best for your needs. Here are your options:
Managing Your iPad’s Screen Lock Time
What is Auto-Lock?
Auto-Lock is a feature that automatically puts your iPad to sleep after a period of inactivity. This helps conserve battery life and prevents accidental touches. The default setting is usually 2 minutes, but you can easily adjust it to fit your preferences.
How to Adjust Auto-Lock Time
- Open the “Settings” app on your iPad.
- Tap on “Display & Brightness.”
- Scroll down and tap on “Auto-Lock.”
- Choose the desired duration: 2, 5, 10, 15 minutes, or Never.
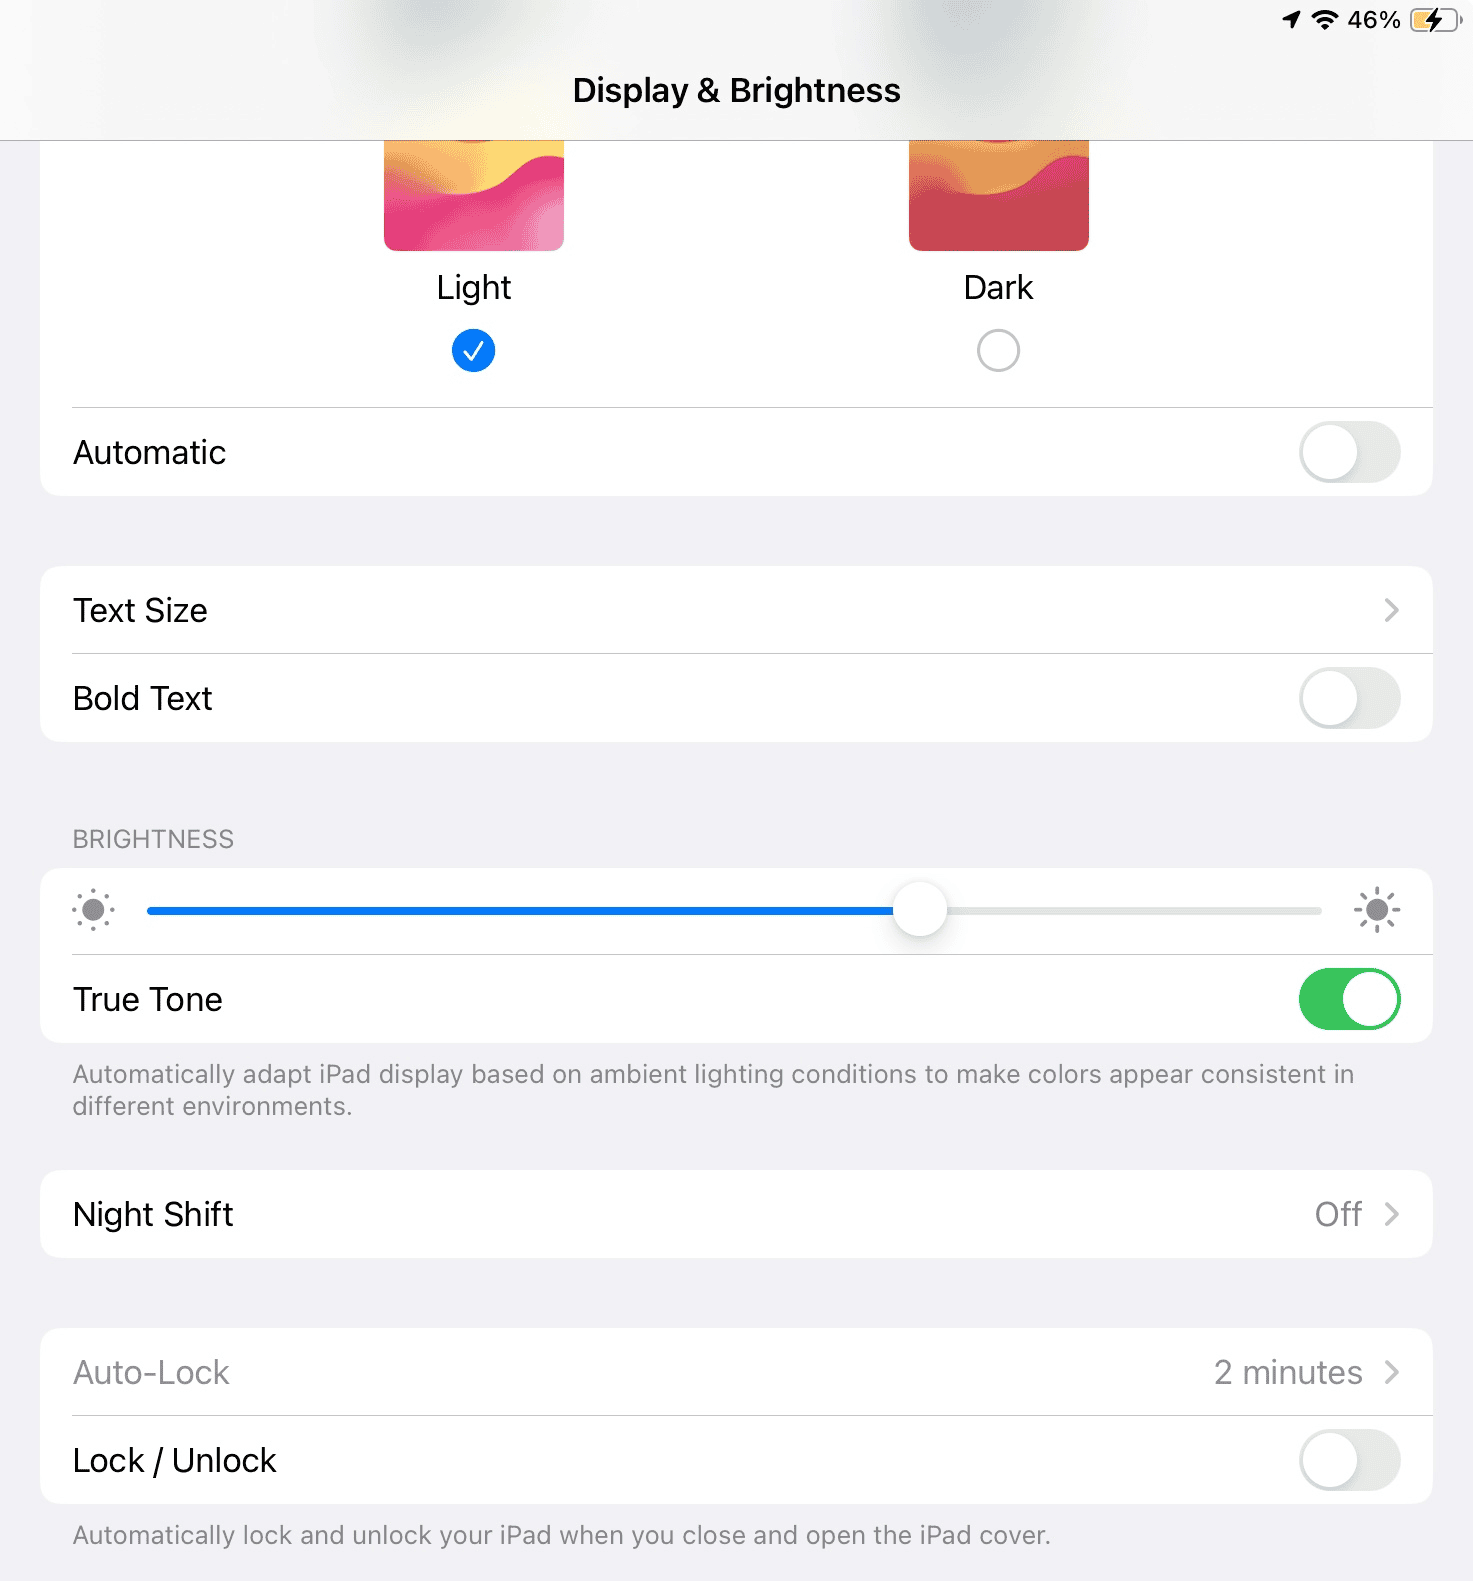
Table: Auto-Lock Options and Recommendations
| Option | Description | Recommended For |
|---|---|---|
| 2 Minutes | The shortest option. Your iPad will lock quickly if left idle, maximizing battery saving. | Users who prioritize battery life and don’t mind frequent unlocking. |
| 5 Minutes | A good balance between convenience and battery conservation. | General use, suitable for most users. |
| 10 or 15 Minutes | A longer duration before auto-lock, ideal for reading or tasks that require less interaction. | Reading, browsing, or when you need more time before the screen locks. |
| Never | The screen will never lock automatically. | Use with caution, as it can significantly drain your battery. Only recommended when plugged in or for specific uses. |
Additional Tips
- Low Power Mode: When Low Power Mode is activated, it overrides your Auto-Lock setting and defaults to 2 minutes. Turn off Low Power Mode if you want to use a different duration.
- Guided Access: If you’re using Guided Access, the auto-lock setting might be overridden. Adjust the settings within Guided Access to control the screen lock time in this mode.
Taking Control of Your iPad’s Auto-Lock Feature
The Auto-Lock feature on your iPad is a handy tool that automatically puts your iPad to sleep after a period of inactivity. This helps save battery life and prevents accidental taps or presses when you’re not using your device. But did you know you can customize this setting to fit your own needs?
Why Adjust Your Screen Lock Time?
You might want a short auto-lock time if you’re concerned about someone accessing your iPad when you’re not around. This adds a layer of security by requiring your passcode or Face ID to unlock it quickly. On the other hand, a longer auto-lock time is useful for reading, watching videos, or following recipes. It prevents the screen from turning off while you’re in the middle of something!
How to Change Auto-Lock Time on Your iPad
It’s easy to change your iPad’s auto-lock time. Just follow these simple steps:
- Open the “Settings” app. It looks like a gray gear icon.
- Tap on “Display & Brightness.”
- Scroll down and tap on “Auto-Lock.”
- Choose the time you want: 2, 5, 10, or 15 minutes. You can also select “Never,” but this might use up your battery more quickly.
Auto-Lock Options and Recommendations
| Option | Description | Recommended For |
|---|---|---|
| 2 Minutes | The shortest option. Your iPad will lock quickly if left idle. | Saving battery life, using your iPad in public places. |
| 5 Minutes | A good balance between convenience and battery conservation. | General use, suitable for most people. |
| 10 or 15 Minutes | A longer duration before auto-lock. | Reading, watching videos, or when you need more time before the screen locks. |
| Never | The screen will never lock automatically. | Use with caution, as it can significantly drain your battery. Only recommended when plugged in or for specific uses. |
Auto-Lock and Security
A shorter auto-lock time, like 2 minutes, helps protect your iPad and the information on it. If you lose your iPad or someone tries to use it without your permission, they won’t have much time to access your data before the screen locks. You can also set a passcode or use Face ID for even more security.
Auto-Lock and Battery Life
Auto-Lock is a great way to save battery life. When your iPad’s screen is on, it uses more power. By setting a shorter auto-lock time, you can help your battery last longer. If you need to save even more battery, you can turn on Low Power Mode. Just remember that Low Power Mode will automatically set your auto-lock to 2 minutes.
Troubleshooting Auto-Lock Issues
Having trouble with your auto-lock settings? Here are a few things to check:
- Low Power Mode: Low Power Mode overrides your auto-lock setting and defaults to 2 minutes. Turn off Low Power Mode if you want to use a longer duration.
- Guided Access: Guided Access might also override your auto-lock setting. Adjust the settings within Guided Access if you need to control the screen lock time in this mode.
- Restart your iPad: If your auto-lock settings aren’t working correctly, try restarting your iPad. This often fixes minor software glitches.
- Check for updates: Make sure your iPad’s software is up to date. Software updates often include bug fixes and performance improvements.
Setting Up Screen Lock Time on iPad
The iPad’s lock time feature improves security and battery life by automatically turning off the display after a set period. This guide shows how to customize this setting.
Accessing Display & Brightness Settings
To begin, open the Settings app and navigate to Display & Brightness. This menu provides several options to manage your iPad’s screen, including the brightness level and screen appearance.
Adjusting Auto-Lock Timer
Within the Display & Brightness settings, tap on Auto-Lock. Here, you can set the duration before your iPad’s screen turns off and locks. Choices typically range from 30 seconds to 5 minutes. Selecting “Never” will keep the screen on until manually locked, but this can drain the battery more quickly.
Configuring Passcode & Biometrics
For increased security, return to the main Settings menu and tap Touch ID & Passcode or Face ID & Passcode, depending on your iPad model. After entering your Passcode, you can modify your PIN or set up biometric authentication through Touch ID or Face ID to control access to your device.
Understanding Screen Time Features
Screen Time on iOS devices lets users manage their device usage by providing insights into app usage patterns, and also allows them to enforce limits.
Enabling Screen Time on Devices
To start using Screen Time, open the Settings app on your iPhone or iPad and navigate to Screen Time. If it’s your first time setting it up, follow the on-screen instructions which might include creating a passcode to secure these settings. This passcode ensures that any limits you set can’t be adjusted without your permission. For those familiar with the platform, activating Screen Time is as simple as tapping the switch to turn it on.
Managing Downtime and App Limits
Downtime is a feature within Screen Time that can be toggled on to schedule a block of time where only phone calls and apps you choose to allow are available. This can be especially helpful in managing the use of games or social media apps that can often be distracting. To customize your Downtime, go to the Screen Time settings, tap Downtime, and then Schedule to set the specific hours.
Alternatively, App Limits can control the amount of time spent in specific apps or categories of apps. For example, you may want to set daily limits on entertainment or games to encourage productivity or focus on other tasks. Just tap App Limits in the Screen Time settings, add a limit, and select the apps or categories you want to manage. Limits can apply to individual apps or group of apps, depending on what works best for you.
Addressing Common Screen Lock Queries
When an iPad screen locks too quickly, it can be frustrating, but leaving it unlocked may pose security risks. This section will guide you through troubleshooting lock issues and customizing settings
Frequently Asked Questions
Adjusting the screen lock time on your iPad can save battery life and increase security. Here’s how to manage your device’s auto-lock settings effectively.
How can I modify the auto-lock timer on my iPad to prevent the screen from turning off?
You can adjust this by tapping Settings > Display & Brightness > Auto-Lock. Then, select the time interval that suits your needs.
What are the steps to adjust the screen timeout settings on my iPad 9th generation?
For the iPad 9th generation, go to Settings > Display & Brightness. Choose Auto-Lock and set the desired duration for the screen to stay on.
Why isn’t my iPad allowing me to set the auto-lock duration longer than 15 minutes, and how can I fix this?
iPads are designed to restrict the auto-lock setting to safeguard the device and conserve battery. If you’re unable to set it longer than 15 minutes, it’s likely a built-in limitation.
What should I do if my iPad’s auto-lock feature is consistently stuck on a 2-minute timer?
Ensure that your iPad isn’t in Low Power Mode since this can limit the auto-lock settings. Check to see if Settings > Battery > Low Power Mode is turned off.
Are there any troubleshooting steps I can follow if my iPad’s screen lock time feature is malfunctioning?
If the screen lock time setting isn’t working correctly, try restarting your iPad. If the issue persists, check for the latest iOS updates or reset all settings.