
Microsoft Word is a powerful tool for creating documents. Many people use it every day but don’t know all its tricks. Learning a few tips can make writing faster and easier.
Word has features that can save time and make documents look better. These include shortcuts for changing text case and tools for adding your most-used commands to the toolbar. You can also use Focus mode to cut out distractions when writing.
Word offers ways to work with others too. You can translate text, add comments, and track changes. These tools help teams work together on documents more smoothly.
Mastering Microsoft Word: Tips and Tricks for Productivity
Microsoft Word is a staple for creating documents, from simple letters to complex reports. But are you using it to its full potential? These tips and tricks will help you streamline your workflow, format documents like a pro, and unlock hidden features you might not know about.
Navigation and Editing: Speed Up Your Workflow
Navigating lengthy documents can be time-consuming. Use the Navigation Pane (**View > Navigation Pane**) to jump between headings, sections, and pages with ease. Master keyboard shortcuts like Ctrl + F (find) and Ctrl + H (replace) to quickly locate and edit text. The “Go To” feature (Ctrl + G) allows you to jump to a specific page, section, or line number instantly.
Formatting Mastery: Beyond Fonts and Styles
Word offers a wealth of formatting options beyond basic fonts and styles. Use “Format Painter” to copy formatting from one section of text to another. Explore the “Paragraph” settings to fine-tune line spacing, indentation, and alignment. The “Page Layout” tab provides control over margins, orientation, and columns. Don’t forget about the power of tables to organize information and create visual appeal.
Hidden Gems: Unveiling Word’s Power
Word has a few lesser-known features that can significantly enhance your productivity:
- Spike: Use the Spike to collect text and images from different parts of your document and paste them all at once. (To use the Spike, select the content you want to add, press Ctrl + F3. To paste the collected content, press Ctrl + Shift + F3.)
- Hidden text: Hide sensitive or distracting text while still keeping it in the document. (Select the text and go to Font > Effects > Hidden.)
- Compare documents: Easily compare two versions of a document to see the differences. (Review > Compare)
- Protect documents: Restrict editing or add a password to your document to prevent unauthorized changes. (File > Info > Protect Document)
Collaboration and Review: Working Together Seamlessly
Word makes it easy to collaborate on documents. Use “Track Changes” to keep a record of all edits and comments. The “Comments” feature allows you to add notes and feedback directly within the document. Word’s real-time co-authoring feature enables multiple users to edit a document simultaneously, seeing each other’s changes in real-time.
Essential Keyboard Shortcuts for Word
| Action | Shortcut |
|---|---|
| Cut selected text | Ctrl + X |
| Copy selected text | Ctrl + C |
| Paste copied text | Ctrl + V |
| Undo last action | Ctrl + Z |
| Redo last action | Ctrl + Y |
| Save document | Ctrl + S |
Microsoft Word is more than just a word processor; it’s a versatile tool that can help you create professional documents, collaborate with others, and streamline your workflow. Whether you’re writing a simple letter or a complex report, these tips and tricks will help you make the most of Word’s features and boost your productivity.
Working with Tables
Word offers robust tools for creating and managing tables:
- Merging tables: Place the tables you want to merge next to each other. Then, select the entire first table, cut it (Ctrl + X), and paste it (Ctrl + V) at the end of the second table.
- Removing lines in a table: Select the table, go to the “Table Design” tab, and click “Borders > No Border.” To remove specific lines, use the “Eraser” tool in the “Borders” group.
Formatting Text: Beyond the Basics
Word provides advanced options for fine-tuning your text formatting:
- Removing strikethrough: Select the text with strikethrough and press Ctrl + D to open the “Font” dialog box. Uncheck the “Strikethrough” option.
- Typing x-bar: Insert an equation (Insert > Equation) and type “x̄” using the equation tools.
- Typing a check mark: Go to Insert > Symbol and choose a check mark symbol. Alternatively, type “2713” and press Alt + X.
- Uncapitalizing text: Select the text and press Shift + F3 to cycle through capitalization options.
- Spacing out letters: Select the text and go to Font > Advanced > Character Spacing. Adjust the spacing value.
- Inserting a line break: Press Shift + Enter to insert a line break without starting a new paragraph.
Page Setup and Printing
Customize your document’s layout and printing options:
- 1-inch margins: Go to Layout > Margins and choose “Normal” or set all margins to 1 inch.
- Printing poster size: Go to File > Print > Settings > Poster Printing.
- Printing index cards: Go to Mailings > Labels > Options and choose an index card size.
- Printing without comments: Go to File > Print > Settings > Print All Pages and uncheck “Print Markup.”
- Printing a mirror image: Unfortunately, Word doesn’t have a built-in option to print a mirror image. You might need to use an external image editor to flip the content before printing.
Working with Objects and Sections
Word allows you to insert and manage various objects and sections within your document:
- Adding an appendix: Insert a section break (Layout > Breaks > Next Page) before your appendix content. Then, use headings and cross-references to link to the appendix from the main text.
- Moving a paragraph: Select the paragraph, cut it (Ctrl + X), and paste it (Ctrl + V) where you want to move it.
- Removing “expand/collapse” in Word: This usually refers to outlining. To remove outlining, go to View > Outline View to switch back to the standard view.
- Selecting multiple headings: Hold down the Ctrl key and click on the headings you want to select.
- Removing shading: Select the shaded area and go to Home > Paragraph > Shading > No Color.
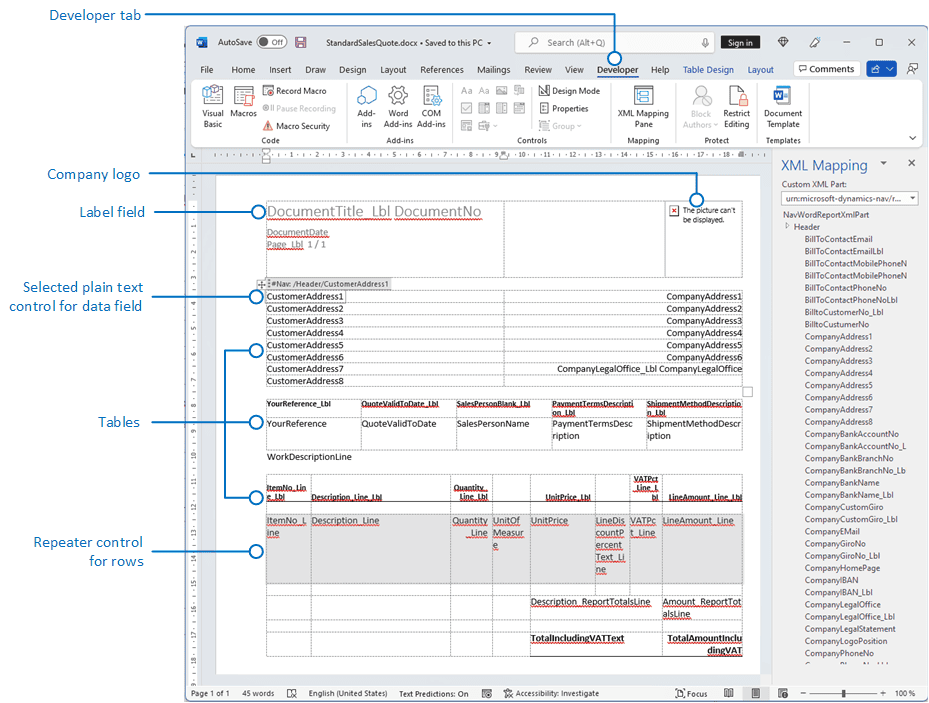
- Inserting a checkbox: Go to Developer > Controls > Check Box Content Control. If the “Developer” tab is not visible, go to File > Options > Customize Ribbon and check the “Developer” box.
- Removing footnotes: Click on the footnote marker in the text and press Delete.
- Removing a hyperlink on Mac: Right-click on the hyperlink and choose “Remove Hyperlink.”
- Demoting and promoting: This refers to outlining levels. Use the “Promote” (Alt + Shift + Left arrow) and “Demote” (Alt + Shift + Right arrow) buttons in the “Paragraph” group on the “Home” tab to change the heading levels.
- Inserting a hard page break: Press Ctrl + Enter.
- Autofitting contents: Double-click the right border of a column header in a table to autofit the column width.
- Inserting a paragraph symbol: Go to Insert > Symbol and choose the paragraph symbol.
- Removing a text box outline: Select the text box and go to Shape Format > Shape Outline > No Outline.
Other Useful Tips and Features
Here are a few more handy features to enhance your Word experience:
- Show/Hide button: Click the “Show/Hide ¶” button in the “Paragraph” group on the “Home” tab to show or hide formatting marks.
- Turning off the editor: Go to File > Options > Proofing and uncheck “Check spelling as you type” and “Mark grammar errors as you type.”
- Numbers in word form: Use the
SPELLNUMBERfunction to convert numbers to words. - Turning off dark mode: Go to File > Account > Office Theme and choose “White” or “Colorful.”
- What is the advantage of making the margins narrower? Narrower margins allow you to fit more content on a page.
- Closing a dialog box: Press the Esc key.
- Inserting a horizontal line: Type three hyphens (—) and press Enter.
- Showing non-printing characters: Same as the “Show/Hide button” mentioned above.
- Indenting just the first line: Go to Paragraph > Indentation > Special > First line.
- Inserting a placeholder: Go to Insert > Quick Parts > Field and choose “Fill-in.”
- Selecting all: Press Ctrl + A.
- Finding duplicates: Unfortunately, Word doesn’t have a built-in feature to find duplicate words.
- Typing a long dash on Mac: Press Option + Shift + Hyphen.
- Creating an AutoCorrect entry: Go to File > Options > Proofing > AutoCorrect Options.
- Creating a word cloud in PowerPoint: Insert a text box with the words you want to include, then go to Insert > Word Cloud.
- Moving a table: Click and drag the table or use the arrow keys to move it.
By mastering these tips and features, you can unlock the full potential of Word and become a document-creating pro!
Key Takeaways
- Word has hidden features that can boost productivity
- Shortcuts and toolbar customization can speed up common tasks
- Collaboration tools in Word make teamwork easier
Mastering the Basics
Learning the key parts of Microsoft Word helps you work faster and better. These tips will make your writing easier.
Navigating the Word Interface
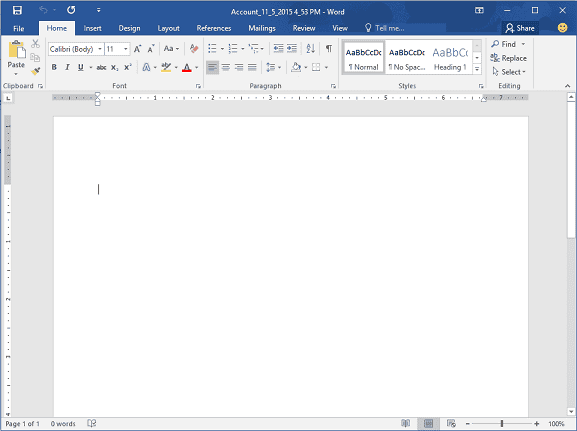
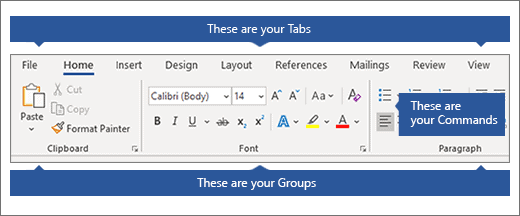
The Word interface has many tools to help you write. The ribbon at the top has most of what you need. It has tabs like Home Insert and Layout. Each tab has groups of related tools.
The Quick Access Toolbar is above the ribbon. It has buttons for common tasks like Save and Undo. You can add your favorite tools here.
The search box is in the top right corner. Type what you want to find or do and Word will show you how.
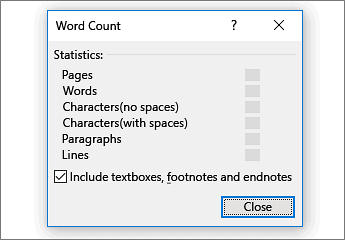
At the bottom of the screen you’ll see the status bar. It shows info about your document like word count and page number.
Using Headings for Structure
Headings make your document easy to read and navigate. They break up long text and show how ideas fit together.
To use headings click the Home tab. Find the Styles group. Choose a heading style like Heading 1 or Heading 2.
You can also make your own heading styles. Right-click a style and choose Modify. Then change the font size color or spacing.
Headings also help make a table of contents. Go to the References tab and click Table of Contents. Word will use your headings to make the list.
Selecting and Editing Text
Knowing how to select text quickly is a key skill in Word. To select a word double-click it. To select a line click in the left margin.
To select more text click and drag the mouse. Or hold Shift and use the arrow keys.
Right-click selected text to see options like Cut Copy and Paste. You can also change the font or color here.
The Format Painter tool is handy for copying text styles. Select some text with the style you want. Click Format Painter then click where you want to apply that style.
To find and replace text use the Find tool in the Home tab. Type what you want to find and what to replace it with. Click Replace All to change every match at once.
Frequently Asked Questions
Microsoft Word has many features to boost productivity and improve document quality. These tips cover formatting, efficiency, dictation, shortcuts, customization, and professional practices.
How can I use Microsoft Word’s advanced features to enhance my document formatting?
Word offers many tools for better formatting. Use styles to keep headings and text consistent. Try the Format Painter to copy styles quickly. Set up templates for documents you use often. This saves time and keeps your work looking neat.
What are some lesser-known tips for increasing efficiency in Microsoft Word?
Quick Parts can save time for text you use a lot. The Navigation Pane helps you move through long documents fast. Learn to use AutoCorrect for common typos. These tricks can speed up your work in Word.
In what ways can dictation be utilized to improve productivity in Microsoft Word?
Dictation lets you speak your text instead of typing. Turn it on in the Home tab. Speak clearly and use voice commands for punctuation. This can be faster than typing for some people. It’s also good if your hands need a break.
What shortcuts and keyboard commands are essential for expert-level proficiency in MS Word?
Ctrl+C, Ctrl+V, and Ctrl+X are must-know shortcuts for copy, paste, and cut. Ctrl+Z undoes mistakes. Ctrl+B makes text bold. Ctrl+I adds italics. F7 runs spell check. Learning these can make your work much faster.
How can one customize the Microsoft Word interface to streamline workflow?
Add your favorite tools to the Quick Access Toolbar. Right-click on any command to add it. You can also hide ribbons you don’t use. Go to File > Options > Customize Ribbon to make changes. This puts your most-used tools at your fingertips.
What practices should be adopted to maintain document consistency and professionalism in Word?
Use a style guide for your work. Pick fonts and colors that match your brand. Check spelling and grammar before sharing. Use page numbers for long documents. Make sure your margins and spacing are even. These steps help your documents look clean and professional.