Printing to PDF on your Mac is a simple and useful feature. You can easily create PDF files from any document or webpage using the built-in print to PDF option in macOS. This allows you to save, share, and archive digital copies of important information.
The process is quick and works in most applications. You’ll find the PDF option in the standard print dialog box. From there, you can name your file and choose where to save it on your Mac.
Here’s a quick guide to help you print to PDF:
| Step | Action |
|---|---|
| 1 | Open the document or webpage |
| 2 | Click File > Print or press Command + P |
| 3 | Click the PDF dropdown menu |
| 4 | Select “Save as PDF” |
| 5 | Choose a name and location, then click Save |

Creating PDFs on Your Mac: A Simple Guide
Saving documents as PDFs is a great way to share them while preserving their formatting. Macs make it easy to “print” any document to a PDF file, even if you don’t have a printer connected.
Printing to PDF from Any App
- Open the document: Open the document you want to save as a PDF in any application (e.g., Pages, Microsoft Word, Safari).
- Open the Print dialog: Go to File > Print or press Command-P.
- Save as PDF:
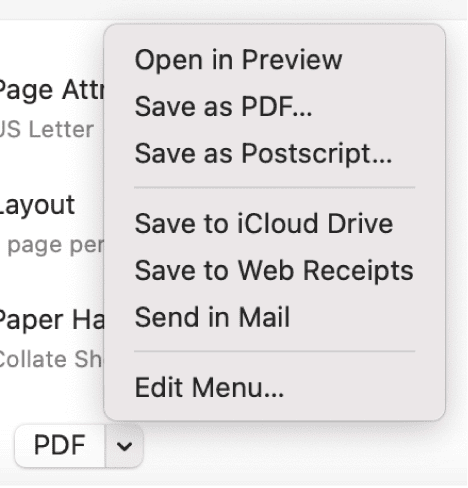
- In the Print dialog box, look for a PDF dropdown menu in the bottom left corner.
- Click the dropdown and select Save as PDF.
- Choose a location and name:
- A “Save As” dialog box will appear.
- Choose a filename and location for your PDF.
- Click Save.
Additional PDF Options
The PDF dropdown menu offers several other options:
- Open PDF in Preview: This automatically opens the created PDF in the Preview app.
- Fax PDF: This allows you to fax the document directly from your Mac if you have a fax modem set up.
- Mail PDF: This creates the PDF and attaches it to a new email message.
- Save PDF to iCloud Drive: This saves the PDF directly to your iCloud Drive.
Customizing PDF Settings
You can further customize your PDF by clicking the Show Details button in the Print dialog box. This expands the window and gives you more options, such as:
- Page range: Choose specific pages to print.
- Paper size: Select different paper sizes.
- Orientation: Choose portrait or landscape orientation.
- Scaling: Adjust the size of the content.
Why Use PDFs?
PDFs offer several advantages:
- Preserves formatting: PDFs retain the original document’s layout, fonts, and images, ensuring it looks the same on any device.
- Universally compatible: PDFs can be opened and viewed on virtually any computer or mobile device.
- Compact and efficient: PDFs are generally smaller in size than the original document, making them easier to share and store.
- Security: You can add password protection to PDFs to restrict access or prevent editing.
By mastering the “print to PDF” feature, you can easily create, share, and archive documents while maintaining their original quality and formatting.
Setting Up PDF Printing on macOS
MacOS offers built-in tools for PDF printing and viewing. You can use Preview or configure Adobe Acrobat for more advanced features.
Using Built-In Preview Application
Preview is macOS’s default PDF viewer and editor. It lets you print to PDF easily. To use Preview:
- Open the document you want to convert
- Click File > Print
- In the print dialog, click the PDF dropdown
- Select “Save as PDF”
Preview also allows basic PDF editing. You can add text, shapes, and signatures. For quick annotations, it’s a great choice.
| Feature | Preview | Adobe Acrobat |
|---|---|---|
| Cost | Free | Subscription |
| Editing | Basic | Advanced |
| Forms | Limited | Full support |
Configuring Adobe Acrobat as the Default PDF Viewer
For more advanced PDF features, you might prefer Adobe Acrobat. To set it as your default:
- Find a PDF file in Finder
- Right-click and select “Get Info”
- Under “Open with”, choose Adobe Acrobat
- Click “Change All” to apply to all PDFs
Adobe Acrobat offers advanced editing, form creation, and security features. It’s ideal for professional use but requires a subscription.
You can still use the macOS print to PDF function with Acrobat as your default viewer. This gives you the best of both worlds – easy PDF creation and powerful editing tools.
The Print to PDF Workflow
Printing to PDF on Mac is a straightforward process. You’ll select the print option, adjust settings, and save your file in just a few clicks.
Selecting the Print Option
To start printing to PDF on Mac, open the document you want to convert. Click “File” in the top menu bar, then choose “Print” or press Command + P. This opens the print dialog box.
In the print window, look for a drop-down menu labeled “PDF” near the bottom. Click this menu to reveal several options for handling your document.
Select “Save as PDF” from the list. This tells your Mac to create a PDF file instead of sending the document to a physical printer.
Adjusting Print Settings
Before saving, you can tweak various settings to customize your PDF:
- Page range: Choose to save all pages or a specific range
- Paper size: Select the appropriate dimensions for your document
- Orientation: Pick portrait or landscape layout
- Scale: Adjust to fit more content on each page
You may also see app-specific options depending on what program you’re using. Take a moment to review these settings to ensure your PDF looks exactly as you want it.
Saving and Naming the PDF File
After adjusting settings, click “Save” to open the file explorer. Choose where you want to store your new PDF. The Documents folder is a common choice, but you can pick any location.
Give your file a clear, descriptive name. Avoid special characters or spaces to prevent issues on different systems. Use underscores or hyphens instead.
Click “Save” again to create your PDF. Your Mac will process the document and save it in your chosen location. You can now open, share, or further edit your new PDF file as needed.
| Step | Action | Key Point |
|---|---|---|
| 1 | Select Print | File menu or Command + P |
| 2 | Choose PDF | From drop-down in print dialog |
| 3 | Adjust Settings | Customize pages, size, layout |
| 4 | Save | Pick location and filename |
Additional Features and Guides
MacOS offers versatile options for creating PDFs beyond basic printing. You can easily convert web pages and generate PDFs from various devices.
Web Pages to PDF Conversion
Converting web pages to PDF on a Mac is straightforward. Use Safari’s built-in feature by clicking File > Export as PDF. This method preserves layouts and interactive elements.
For Chrome users, click the three-dot menu > Print > Save as PDF. This approach works well for most websites but may alter some formatting.
Firefox allows PDF conversion through File > Print > PDF > Save as PDF. It offers settings to adjust margins and remove headers/footers.
| Browser | PDF Conversion Method |
|---|---|
| Safari | File > Export as PDF |
| Chrome | Menu > Print > Save as PDF |
| Firefox | File > Print > PDF > Save as PDF |
Creating PDFs from Desktop and Mobile Devices
On your Mac desktop, you can save as PDF from almost any application. Open the document and select File > Print. In the print dialog, click the PDF dropdown and choose “Save as PDF.”
For mobile devices, use the Share menu in apps like Notes or Pages. Tap the share icon, scroll down, and select “Create PDF.” This generates a PDF you can save or share.
On iOS, you can also use the built-in markup tools to edit PDFs directly. Open a PDF in Files, tap the pencil icon to add text, signatures, or drawings.
Frequently Asked Questions
Saving and printing documents as PDFs on Mac is straightforward. Here are answers to common questions about using PDF features on macOS.
How can I save a document as PDF on a Mac?
You can save a document as PDF on Mac by opening the File menu and selecting Print. In the print dialog, click the PDF button or dropdown menu. Choose “Save as PDF” from the options. Name your file and pick a save location.
What are the steps to print a document as PDF in macOS?
To print a document as PDF in macOS, open the document and press Cmd + P. In the print window, find the PDF dropdown menu at the bottom. Select “Save as PDF” from this menu. Choose where to save the file and click Save.
Why is the ‘Save as PDF’ option not working on my Mac?
If the ‘Save as PDF’ option isn’t working, check your macOS version is up to date. Restart your Mac. Make sure you have enough disk space. Try a different app if the issue persists in one program.
How can I convert a Word document to PDF format on a Mac?
Open your Word document in Microsoft Word for Mac. Click File, then Save As. In the Format dropdown, choose PDF. Pick a save location and click Save to convert your Word file to PDF.
Is there a way to download and save PDF files from Safari on Mac?
Yes, you can download PDFs in Safari. When you open a PDF in Safari, look for a download icon in the toolbar. Click it to save the PDF. You can also right-click on PDF links and choose “Download Linked File.”
Can I enable the Microsoft print to PDF feature on a Mac?
Macs have a built-in PDF printer. You don’t need to enable Microsoft’s print to PDF feature. Use the standard macOS print dialog and choose “Save as PDF” to create PDFs from any app.
| PDF Creation Method | Ease of Use | Availability |
|---|---|---|
| Built-in macOS | Very Easy | All Apps |
| Microsoft Office | Easy | Office Apps |
| Third-party Apps | Varies | App-specific |


